For use with models: LE32HDF3010 / LE32HDF3010S / LE32HDF3010TA / LE32HDF3010STA Need assistance? visit our website at www.tclusa.com or call 1-877-300-8837 (for mainland 48 States), or 1-877-800-1269 (for AK, HI, and Puerto Rico). Figures and illustrations in this User’s Guide are actual product appearance.
Important Information This symbol indicates that this product incorporates double insulation between hazardous main voltage and user accessible parts. When servicing, use only identical replacement parts. CAUTION RISK OF ELECTRIC SHOCK. DO NOT OPEN. Caution: To reduce the risk of electric shock, do not remove cover (or back). No user serviceable parts inside. Refer servicing to qualified service personnel.
Important Safety Instructions 1. 2. 3. 4. 5. Read and follow all instructions. Keep these instructions. Heed all warnings. Do not block any ventilation openings. Install in accordance with the manufacturer’s instructions. Do not install near any heat sources such as radiators, heat registers, stoves, or other apparatus (including amplifiers) that produce heat. 6. Protect the power cord from being walked on or pinched particularly at plugs, receptacles, and the point where it exits from the component. 7.
Table of Contents Important Information................................. 1 Important Safety Instructions...................... 2 Sound Menu............................................. 14 Equalizer........................................................ 14 Speaker......................................................... 14 SPDIF Type................................................... 14 Smart Volume................................................ 14 MTS......................................................
Chapter 1 Connections and Setup Before Initial Setup Protect Against Power Surges • • • • Connect all components before you plug any power cords into the wall outlet or power strip. NEVER plug your TV into an outlet that is controlled by a wall switch. Turn off the TV before you connect or disconnect any cables. Make sure all antennas and cables are properly grounded. Refer to the Important Safety Instructions. Safety Information • • • • • Protect components from overheating.
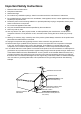
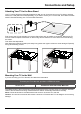
Connections and Setup Attaching Your TV to the Base Stand Your TV comes without the base stand attached so that you can choose to mount your TV either to its base stand or to a wall (wall mount sold separately). If you want to mount your TV to the wall, don’t attach the base stand. Follow the Mounting Your TV to the Wall instructions. First, remove the TV bag and place it on a large, flat surface such as a table or countertop. Remove the TV from the carton and place it face down on the TV bag.
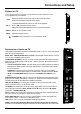
Connections and Setup Buttons on TV If you cannot locate your remote, you can use the TV panel buttons on your TV to operate many TV features. CH+/- VOL+/- Selects channels stored in the channel list or acts as the up/ down arrow (▲/▼) through the menu items. Increases/decreases the volume or acts as the right/left arrow (◄/►) through the menu items. VOL+ also acts as the OK button when in the menu system. MENU MENU Brings up the TV’s main menu. INPUT Selects the signal source.
Connections and Setup by way of an integrated mini-plug cable. Since HDMI technology is based on Digital Visual Interface (DVI), the jack on the back of your TV is also compatible with DVI components. HDMI 2 IN: Lets you connect a component, such as a digital cable or satellite box, with an HDMI output for the best picture quality. Choose Your Connections There are several ways to connect components, such as BD player, DVD players and set-top boxes, to your TV. Note: No cables are supplied with this unit.
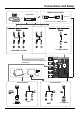
Connections and Setup HDMI Connection (Best) Set-top box HDMI22IN IN HDMI HDMI cable or Same connection HDMI 1/DVI 3ININ Same connection totoHDMI 1/HDMI Y / VIDEO (VIDEO) COMPONENT IN (CMPT) Input Menu operation for input source selection or select the input source directly by pressing INPUT button.
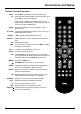
Connections and Setup Remote Control Functions INPUT Press INPUT repeatedly to select the video input 0-9 (Alphanumeric buttons) Enters a channel number, then press OK (or let the entry timeout). • (dot) To enter a digital channel with a sub-channel, enter the main channel; then, press the dot (•), the subchannel, and then the OK button. MENU ▲/▼◄/► Brings up the main menu or press to return to the previous menu. (arrows) Highlights different items in the TV menu and adjusts the menu controls.
Connections and Setup Obtain the Signal The first step in connecting your TV is obtaining the signal. The back panel of your TV allows you to receive analog and/or digital channels by using the HDMI or ANT/CABLE/SAT connections. To obtain the best quality, use the HDMI connection. Connect the outside ariel to the ANT/CABLE/SAT IN ANT/CABLE Outdoor or indoor Antenna connection on the back of the TV to receive off-air channels.
Connections and Setup Setup Wizard Perform the following steps before you press on the remote control unit. • Insert the batteries into the remote control unit. • Connect the antenna cable to the TV. • Plug in the AC cord to the AC outlet. The first time you switch the set on, the Setup Wizard opens, which guides you through the setup process. 1. The first step of the setup requires you to select your preferred language for the menu system.
Chapter 2 Menu Operation Menu Display The following are just illustrations of the menu display. Some menu items may not be displayed depending on the selected input source.
Menu Operation Using Menu System display the menu screen. Press▲/▼ to select “Picture”, then press OK/► to display options. This section explores the menus of your TV. Each menu is outlined and detailed to help you get the most from your TV. Example: Picture Mode Displays a list that lets you select one of the preset picture settings: “Energy Star, Vibrant, Cinematic, Natural, Sports, Personal.” Choose the setting that best for your viewing environment.
Menu Operation Advanced Settings SPDIF Type Zoom Mode: Selects the desired screen format. The screen format may vary depending on the incoming signal. This option controls the type of audio stream sent to the Digital Audio Output jack (SPDIF OUT). Available options are “Dolby Digital, PCM”. 3DNR (Noise Reduction): This setting reduces picture “static” or any type of interference. This feature is especially useful for providing a clearer picture in weak analog signal conditions.
Menu Operation Select the OSD menu language from English, Spanish, or French. 3. Repeat the process to hide additional channels. 4. Press MENU to return to the previous menu, or press CLEAR to close the menu. DTV Signal: Show the condition of DTV signal: Good or Bad, Normal. Bad for no DTV signal or very weak DTV signal. Channel Signal Source: Choose the signal source (“Cable/ Sat” or “Antenna”) you have connected to the ANT/CABLE/SAT IN.
Menu Operation digital closed caption text. 3. Re-enter the same code to confirm the pass word. Note: The password must be entered before the TV will continue with Parental settings next time. The super password is 2458, If you forget your password, enter it to override any existing password. Font Edge Style - Allows you to set edge style of the closed caption text. Font Edge Color - lets you set the color of the closed caption text edge.
Menu Operation OK/► to enter the US Movie Ratings screen. In the US Movie Ratings panel you can customize the program blocking of the following Movie ratings: G PG PG-13 R NC-17 X announcements, and programs without ratings. The Exempt option applies to both US and Canadian unrated programs and Canadian programs rated E. 1. Select Parental Control > Unrated. 2. Press ◄/► to toggle between View and Block. View All unrated programs are available.
Menu Operation panel and tuner information. Location This option allows you to select the desired location setting. Only Home mode is ENERGY STAR compliant. Restore to Default This option resets all settings (except parental lock settings) to the factory defaults. 1. Select “Setting > Restore to default”, Press OK/► to enter, and you must enter your password befor proceding to the next step. 2. Press ▲/▼to select "Confirm" and press OK to confirm to reset all settings.
Chapter 3 Other Information Frequently Asked Questions (FAQs) What’s the quickest way to view High Definition (HD) video? Connect an off-air antenna to the ANT/CABLE/SAT IN to view free local digital channels. You may need to purchase an antenna. Visit www.antennaweb.org for assistance in deciding what type of antenna to use to receive the local digital channels available to you.
Other Information Troubleshooting Most problems you encounter with your TV can be corrected by consulting the following troubleshooting list. TV Problems The TV won’t turn on. • • • • Make sure the TV is plugged in. Check the wall receptacle (or extension cord) to make sure it is “live” by plugging in another device. The TV panel controls may be locked (disabled). Use the remote control to unlock the TV panel controls.
Other Information You can’t select a certain channel. • • • The channel may be blocked or not approved in the Parental Control Menu. If using a VCR, check to make sure the TV/VCR button on the VCR is in the correct mode (press the TV/ VCR button on your VCR). Press the TV button and then try to change channels. The stereo reception is noisy. • It may be a weak station. Use the Sound Menu and Analog TV Sound to choose mono. A black box appears on the screen. • Closed captioning might be on.
Other Information Care and Cleaning Caution: Turn OFF your TV before cleaning. You can clean the TV as required, using a soft lint-free cloth. Be sure to occasionally dust the ventilation slots in the cabinet to help assure adequate ventilation. IMPORTANT: Never use strong cleaning agents, such as ammonia-based cleaners, or abrasive powder. These types of cleaners will damage the TV. The TV’s screen may be cleaned with a soft, lint-free cloth as well. Take care not to scratch or mar the screen.
TTE Technology, Inc. (“TTE”) Limited Warranty All LCD/LED Models. What your warranty covers: Defects in materials or workmanship to the original owner of this TCL product when purchased as new from an Authorized Dealer of TCL brand products in the United States and packaged with this warranty statement. New LCD/LED Televisions (Non-Commercial Use) For how long after your purchase: • Two(2) years from date of purchase for parts and labor for non-commercial use.
• • • • • A television that has been modified or incorporated into other products. A unit purchased or serviced outside the USA. A unit sold in “As-Is”, “Factory Reconditioned”, “Factory Re-Certified”, or “Refurbished” condition or with faults. Acts of nature or God, such as but not limited to earthquake or lightning damage. Special, incidental or consequential damages. Product Registration: Please register your TCL purchase on-line at www.tclusa.com.
Legal Statement of TCL - Manufacturer of this TV set Due to the various capabilities of products featuring the Smart TV - Services, as well as limitations in the available content, certain features, applications, and services may not be available on all devices or in all territories. Some features on Smart TV may also require additional peripheral devices or membership fees that are sold separately. Please visit our website for more information on specific device information and content availability.
This product incorporates HDMI technology. HDMI, the HDMI logo, and High-Definition Multimedia Interface are trademarks or registered trademarks of HDMI Licensing LLC. ENERGY STAR is a set of power-saving guidelines issued by the U.S. Environmental Protection Agency (EPA). ENERGY STAR is a joint program of the U.S. Environmental Protection Agency and the U.S. Department of Energy helping us all save money and protect the environment through energy efficient products and practices.
Para usar con los modelos: LE32HDF3010 / LE32HDF3010S / LE32HDF3010TA / LE32HDF3010STA ¿Necesita asistencia? Por favor, visite nuestro sitio Web en www.tclusa.com o llame al 1-877-300-8837 (para los 48 estados dentro de Estados Unidos), o al 1-877-800-1269 (para AK, HI y Puerto Rico). Las figuras e ilustraciones de este Guía del Usuario se proporcionan solo como referencia y pueden diferir de la apariencia real del producto. El diseño y las especificaciones del producto pueden cambiarse sin previo aviso.
Información Importante PRECAUCIÓN Este símbolo indica que este producto incorpora un aislamiento doble entre los peligrosos voltajes principales y las piezas accesibles al usuario. Al darle mantenimiento, use sólo piezas de repuesto idénticas. RIESGO DE DESCARGA ELÉCTRICA, NO ABRIR. Precaución: Para reducir el riesgo de una descarga eléctrica, NO retire la tapa frontal, ni la trasera de su televisor.
Importantes Instrucciones de Seguridad 1. 2. 3. 4. 5. Lea y siga cuidadosamente todas las instrucciones. Conserve estas instrucciones. Haga caso a todas las advertencias. No obstruya ningún orificio de ventilación. Instale en conformidad con las instrucciones del fabricante. No instale cerca de fuentes térmicas, como radiadores, reguladores de calefacción, cocinas y otros aparatos que generen calor (incluidos los amplificadores). 6.
Índice de Contenidos Información importante............................... 1 Importantes Instrucciones de Seguridad.... 2 Selección avanzada...................................... 14 Menú Sonido............................................ 14 Ecualizador.................................................... 14 Parlante......................................................... 14 Tipo SPDIF.................................................... 14 Volumen Inteligente....................................... 14 MTS..
Capítulo 1 Conexiones y configuración Antes del ajuste inicial Protegase de descargas eléctricas • Conecte todos los componentes antes de enchufar cualquier cable al tomacorriente de alimentación eléctrica o extensión. • No enchufe NUNCA el televisor en un tomacorriente controlado por un interruptor de pared. • Apague el televisor antes de conectar o desconectar los cables. • Asegúrese que todas las antenas y cables tengan una conexión a tierra adecuada.
Conexiones y configuración Fijar su TV al soporte para mesa Su televisor viene con un soporte para mesa no instalado, usted puede elegir si fija el soporte de mesa al televisor, o lo instala sobre una pared (El soporte para instalarlo en la pared, se vende por separado), si decide instalarlo en la pared no instale el soporte para mesa, y siga Primero, saque el televisor de la bolsa de plástico y colóquelo sobre una superficie plana grande, como una mesa o encimera.
Conexiones y Configuración Botones del TV Si no consigue localizar su mando de control remoto, puede usar los botones del panel frontal de su TV para utilizar la mayoría de las funciones. CH +/- Selecciona los canales memorizados en la lista de canales o funciona para moverse arriba/abajo (▲/▼) por las opciones del menú. VOL+/- Sube/baja el volumen o funciona para moverse a izquierda/derecha (◄/►) por las opciones del menú. VOL+ también actúa como el botón OK en dentro del sistema de menús.
Conexiones y Configuración ANT/CABLE/SAT IN: Le permite conectar un cable coaxial para recibir la señal de su antena, cable, descodificador de TV por cable o receptor satélite. USB: Le permite conectar un dispositivo de almacenamiento masivo. HDMI 1 / DVI IN (Interfaz Multimedia de Alta-Definición/Interfaz Visual Digital): Proporciona una conexión digital no-comprimida que transporta simultáneamente datos de audio como de video usando un cable como miniclavijas integradas.
Conexiones y Configuración Conexión HDMI (La mejor) Descodificador por cable HDMI22ININ HDMI Misma conexión para HDMI 1/DVI IN Conexión de Vídeo Compuesto (Buena) Conexión de Vídeo por componentes (Mejor) Entrada COMPONENT IN (CMPT) Entrada Y / VIDEO (VIDEO) Input Seleccione la fuente de entrada a través del menú o directamente pulsando el botón INPUT.
Conexiones y Configuración Funciones del mando de control remoto INPUT Pulse INPUT repetidamente para seleccionar la entrada de vídeo. 0-9 (Botones alfanuméricos) Introduzca un número de canal, luego pulse OK (o espere el tiempo de entrada automática). • (punto) Para introducir un canal digital con un sub-canal, escriba el canal principal; después pulse el punto (•), escriba el sub-canal y luego el botón OK. MENU ▲/▼◄/► Le muestra el menú principal o púlselo para regresar al menú previo.
Conexiones y Configuración Obtener la señal El primer paso para la conexión del TV es obtener la señal. En la parte trasera de su televisor, se encuentran las conexiones de HDMI o ANT/CABLE/SAT, que le permitirán recibir la señal de canales análogos y / o digitales. Para obtener la mejor calidad, use la entrada HDMI. Conecte el cable de la antena, Ariel a las conexiones de ANT/ CABLE/SAT IN, que se encuentran en la parte trasera de su televisor, para recibir canales fuera del aire.
Conexiones y Configuración Asistente de configuración Asistente configuración Ejecute los pasos siguientes antes de pulsar en el mando a distancia. • Inserte las baterías en el mando a distancia. • Conecte el cable de la antena al TV. • Conecte el cable de CA en la toma de corriente. La primera vez que enciende el aparato, se abre el Asistente de Asistente configuración, el cual le guiará a través del proceso de configuración inicial. 1.
Capítulo 2 Funcionamiento del Menú Visualización del menú A continuación tiene las ilustraciones de la presentación del menú. Imagen Fuente Fuente Fuente TV Component AV Imagen Imagen HDMI1 HDMI2 Modo Imagen < Energy Star > Brillo 50 Contraste 50 Saturación 50 Definición 50 Matiz PC 50 Modo color Sonido Sonido < Luz de fondo Ajuste Ajuste Salir MENU Volver CLEAR Salir Salir > Fuente Imagen > > Volver Parlante < Tipo SPDIF < Dolby Digltal > Smart Volume < Desact.
Funcionamiento del Menú Utilización Del Sistema de Menú Para tener acceso al menú “Imagen”, pulse MENU para mostrar la pantalla de menú. Pulse▲/▼ para seleccionar Imagen, luego pulse OK/► para mostrar las opciones. Esta sección explora los menús de su TV. Cada menú se describe y detalla para ayudarle a obtener el mejor uso de su TV.
Funcionamiento del Menú Selección avanzada Tipo de SPDIF Modo Zoom: Selecciona el formato de pantalla deseado. El formato de pantalla puede variar dependiendo de la señal entrante. Esta opción controla el tipo de flujo de audio enviado al conector de Salida de audio digital (SALIDA DE SPDIF). Las opciones disponibles son "Dolby Digital, PCM". 3DNR (Reducción de ruido): Este ajuste reduce la “estática” de la imagen o cualquier tipo de interferencia.
Funcionamiento del Menú 4. Pulse MENU para regresar al menú previo o pulse CLEAR para cerrar el menú. Calidad de la señal: Muestra la condición de la señal DTV: Buena o Mala, Normal. Mala para ausencia de señal DTV o señal DTV muy débil. Seleccione el idioma de menú OSD de entre Inglés, Español o Francés. Canal Fuente de la Señal: Seleccione el fuente de la Señal ("Cable/Sat" o "Antena") que tenga conectada en la entrada ANT/CABLE/SAT IN.
Funcionamiento del Menú Estilo borde fuente - Le permite establecer el estilo del borde del texto de los subtítulos digitales. el TV continue con la configuración de los Padres la próxima vez. La super-contraseña es 2458, por si olvida su contraseña, introdúzcala para anular cualquier contraseña existente. Color borde fuente - le permite establecer el color del borde del texto de subtítulos digitales. Bloqueo del sistema Color Primer Plano - Establece el color del texto de los subtítulos digitales.
Funcionamiento del Menú pulse OK/► para entrar en la pantalla de Niveles de clasificación de Películas EE.UU.. En el panel de Niveles de clasificación de Películas EE.UU. usted puede personalizar el bloqueo de programa de las siguientes clasificaciones de Películas: G PG PG-13 R NC-17 X decidir si se pueden ver aquellos programas que el V-Chip reconoce como sin-clasificar o exentos.
Funcionamiento del Menú 4. Pulse ▲/▼/◄/► para seleccionar “USB”, a continuación pulse OK para entrar. (Nota: también puede tener acceso directamente a la pantalla USB pulsando el botón MEDIA.) 5. Pulse ▲/▼ para seleccionar el Tipo de Medios: Fotos o Música. Entonces pulse OK para proceder. 6. Seleccione el disco conectado, pulse OK para entrar. 7.
Capítulo 3 Otra información Preguntas Frecuentes ¿Cuál es la manera más fácil de ver video de Alta Definición (HD)? Conecte una antena local a la entrada ANT/CABLE/SAT IN para ver canales digitales locales gratis. Quizá deba comprar una antena. Visite www.antennaweb.org si necesita ayuda para decidir el tipo de antena que debe utilizar para recibir los canales digitales locales disponibles en su área.
Otra información Resolución de Problemas La mayoría de los problemas que puede experimentar con su televisor pueden corregirse consultando la siguiente lista de resolución de problemas. Problemas con el Televisor El televisor no enciende. • Asegúrese que el televisor esté enchufado. • Revise el tomacorriente de pared (o el cable de extensión) para asegurarse que funciona correctamente conectando otro dispositivo. • Los controles del panel del TV pueden estar bloqueados (inhabilitados).
Otra información Los botones del panel frontal no trabajan. • Los controles del panel de la TV pueden estar bloqueados (inhabilitados). Utilice el mando a distancia para desbloquear los controles del panel de la TV, seleccionando la función de Bloquear Botón en el menú de Control de padres y pulsando la flecha izquierda o derecha (◄/►) para desmarcar la casilla. • Desenchufe el televisor 10 minutos y vuélvalo a enchufar. Encienda el televisor e intente de nuevo. El televisor se apaga inesperadamente.
Otra información No funciona el control remoto. Este televisor usa nuevos códigos de control remoto y puede no ser compatible con su control remoto universal actual (por ejemplo controles remotos de receptores satélite, de descodificadores de cable, genéricos universales, etc.). En un futuro próximo, los nuevos controles remotos universales disponibles podrán recoger los nuevos códigos de los televisores. Usted está experimentando problemas con los controles V-Chip/de padres.
Garantía Limitada de TTE Technology, Inc. ("TTE") Todos los modelos LCD/LED. Qué cubre su garantía: Los defectos en materiales y/o mano de obra, cuando el propietario original de este producto de TCL, lo haya comprado en un establecimiento autorizado a distribuir y comercializar productos de la marca TCL en los Estados Unidos, y se haya empacado junto con el manual de Garantía limitada de TTE.
• • • • • • • • Daños por mal uso, abuso, negligencia, uso y desgaste normales, daños cosméticos, mala manipulación, instalación incorrecta o sobretensiones transitorias de la alimentación. Marcas o imágenes en la pantalla del televisor resultantes de ver imágenes fijas (incluyendo entre otras, ciertas imágenes 4:3 en televisores de pantalla ancha, o datos o imágenes en ubicaciones fijas de la pantalla procedente de carteles, vídeo juegos o ciertas redes de difusión). Baterías.
Declaración legal de TCL - Fabricante de este equipo de TV Debido a las diferentes capacidades de productos que presentan los Servicios del Smart TV, así como a las limitaciones en el contenido disponible, ciertas características, aplicaciones y servicios pueden no estar disponibles en todos los dispositivos ni en todos los territorios. Algunas funcionalidades del Smart TV pueden requerir también de dispositivos periféricos adicionales o cuotas de membresía que se venden por separado.
Este producto incorpora tecnología HDMI. HDMI, el logo HDMI logo y High-Definition Multimedia Interface (Interfaz Multimedia de Alta-Definición) son marcas comerciales o marcas comerciales registradas de la SRL de licencias HDMI. ENERGY STAR es un conjunto de lineamientos de ahorro de energía emitido por la Agencia de Protección Ambiental (EPA) de EE.UU.