LED TV User’s Guide For use with models: LE32HDE5300 / LE42FHDE5300 / LE46FHDE5300 Need Assistance? Please visit our website at www.tclusa.com or call 1-877-300-8837.
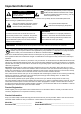
Important Information CAUTION This symbol indicates that this product incorporates double insulation between hazardous main voltage and user accessible parts. When servicing, use only identical replacement parts. RISK OF ELECTRIC SHOCK. DO NOT OPEN. Caution: To reduce the risk of electric shock, do not remove cover (or back). No user serviceable parts inside. Refer servicing to qualified service personnel.
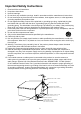
Important Safety Instructions 1. 2. 3. 4. 5. Read and follow all instructions. Keep these instructions. Heed all warnings. Do not block any ventilation openings. Install in accordance with the manufacturer’s instructions. Do not install near any heat sources such as radiators, heat registers, stoves, or other apparatus (including amplifiers) that produce heat. 6. Do not negate the safety purpose of the polarized or grounding-type plug. A polarized plug has two blades with one wider than the other.
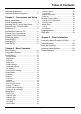
Table of Contents Important Information................................. 1 Important Safety Instructions...................... 2 Closed Caption ..............................................15 Time Setup .....................................................16 System Information ........................................16 Reset All .........................................................16 Chapter 1 - Connections and Setup Parental Control Menu .............................16 Before Initial Setup .......
Chapter 1 Connections and Setup Before Initial Setup Protect Against Power Surges • Connect all components before you plug any power cords into the wall outlet or power strip. • NEVER plug your TV into an outlet that is controlled by a wall switch. • Turn off the TV before you connect or disconnect any cables. • Make sure all antennas and cables are properly grounded. Refer to the Important Safety Instructions. Safety Information • Protect components from overheating.
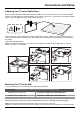
Connections and Setup Attaching Your TV to the Table Stand Your TV comes without the table stand attached so that you can choose to mount your TV either to its table stand or to a wall (wall mount sold separately). If you want to mount your TV to the wall, don’t attach the table stand. Follow the Mounting Your TV to the Wall instructions. First, remove the TV bag and place it on a large, flat surface such as a table or countertop. Remove the TV from the carton and place it face down on the TV bag.
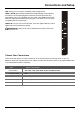
Connections and Setup Buttons on TV If you cannot locate your remote, you can use the TV panel buttons on your TV to operate many TV features. CH+/- Selects channels stored in the channel list or acts as the up/ down arrow (▲/▼) through the menu items. VOL+/- Increases/decreases the volume or acts as the right/left arrow (◄/►) through the menu items. VOL+ also acts as the OK button when in the menu system. MENU Brings up the TV’s main menu. INPUT Selects the signal source.
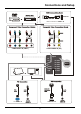
Connections and Setup USB Allows you to connect a compatible mass storage device. HDMI 1 /DVI IN (High-Definition Multimedia Interface/Digital Visual Interface) Provides an uncompressed digital connection that carries both video and audio data by way of an integrated mini-plug cable. Since HDMI technology is based on Digital Visual Interface (DVI), the jack on the back of your TV is also compatible with DVI components.
Connections and Setup HDMI 2 IN Same connection to HDMI 1 IN.
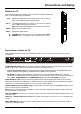
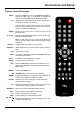
Connections and Setup Remote Control Functions INPUT Opens the Input list; then press INPUT repeatedly to select the video input, or press ▲/▼ to highlight an options, and press OK to select the desired option. 0-9 (Alphanumeric buttons) Enters a channel number, then press OK (or let the entry timeout). • (dot) To enter a digital channel with a sub-channel, enter the main channel; then, press the dot (•), the subchannel, and then the OK button.
Connections and Setup Obtain the Signal The first step in connecting your TV is obtaining the signal. The back panel of your TV allows you to receive analog and/or digital channels by using the ANT/CABLE/SAT IN. Connect the outside aerial or cable network to the ANT/CABLE/SAT IN on the back of the TV set to ANT/CABLE Outdoor or indoor Antenna receive off-air channels or cable channnels. /SAT IN • If you have a set-top box, you may need to call your cable company or satellite service provider.
Connections and Setup Initial Setup Initial setup involves selecting all the settings required to be able to search for and store all the channels you can receive. Make sure that the television is switched on and follow all the steps in turn specified hereafter. Initial Setup Language Please select your language: English Français Español The first time you switch the set on, the Initial Setup Wizard opens, which guides you through the initial setup process. 1.
Chapter 2 Menu Operation Menu Display Following are just the illustration of the menu display.
Menu Operation Using Menu System Advanced Settings Dynamic Backlight: this option automatically adjusts the brightness of the backlight according to the content of the incoming signal. Dynamic Backlight optimizes the picture quality and decreases power consumption. This section explores the menus of your TV. Each menu is outlined and detailed to help you get the most from your TV. To access the menu system: 1. Press MENU to display the main menu. 2.
Menu Operation Frequency Range: displays the different graphic equalizer names set for each sound preset option. Choose a band and make adjustments. When making adjustments, the Equalizer option automatically changes to Personal. Press ◄/► to select the desired frequency (100Hz, 300Hz, 1KHz, 3KHz, 10KHz) you wish to adjust. Use ▲/▼ to adjust the level. When you have finished adjusting the levels, press MENU to exit.
Menu Operation hidden channels by pressing the number of the channel on the numeric keypad. 2. Press ▲/▼ to highlight the input source you wish to label. 3. Press ◄/► to select the label for this source. 4. Press MENU to return to the previous menu, or press CLEAR to close the menu. To hide specific channels: 1. Select Setup > Channel Skip, press OK/► to open the Channel Skip screen. 2. Press ▲/▼ to highlight the channel you wish to skip; then press OK to check the highlighted channel.
Menu Operation Reset All Digital CC Font - Select a character design for the digital closed caption text. A font is a complete assortment of letters, numbers, punctuation marks, etc. in a given design. You can choose from a variety of fonts. Digital CC Background Color - lets you set the color of the area behind the digital closed caption text. Digital CC Background Opacity - Set the appearance of the area behind the digital closed caption text.
Menu Operation 1. Select Parental Control > Channel Block, press OK/► to enter the next screen with channnel list on. 2. Press ▲/▼ to select the channel you wish to block. 3. Press OK to place a checkmark in the box to block that channel. When you tune to that channel, you will need to enter a password to view the channel programming. 2. Press ▲/▼/◄/► to navigate through the TV rating options. Press OK to block (locked) or allow (unlocked).
Menu Operation if programs that the V-Chip recognizes as unrated or exempt can be viewed. Unrated TV programs may include news, sports, political, religious, local and weather programs, emergency bulletins, public announcements, and programs without ratings. The Exempt option applies to both US and Canadian unrated programs and Canadian programs rated E. 1. Select Parental Control > V-Chip > Unrated/ Exempt Ratings, press OK/► to enter the next screen. 2. Press ◄/► to toggle between View and Block.
Chapter 3 Other Information Frequently Asked Questions (FAQs) What’s the quickest way to view High Definition (HD) video? Connect an off-air antenna to the ANT/CABLE/SAT IN to view free local digital channels. You may need to purchase an antenna. Visit www.antennaweb.org for assistance in deciding what type of antenna to use to receive the local digital channels available to you.
Other Information Troubleshooting Most problems you encounter with your TV can be corrected by consulting the following troubleshooting list. TV Problems The TV won’t turn on. • • • • Make sure the TV is plugged in. Check the wall receptacle (or extension cord) to make sure it is “live” by plugging in another device. The TV panel controls may be locked (disabled). Use the remote control to unlock the TV panel controls.
Other Information You can’t select a certain channel. • The channel may be blocked or not approved in the Parental Control Menu. • If using a VCR, check to make sure the TV/VCR button on the VCR is in the correct mode (press the TV/ VCR button on your VCR). • Press the TV button and then try to change channels. The stereo reception is noisy. • It may be a weak station. Use the Sound Menu and Analog TV Sound to choose mono. A black box appears on the screen. • Closed captioning might be on.
Other Information Care and Cleaning Caution: Turn OFF your TV before cleaning. You can clean the TV as required, using a soft lint-free cloth. Be sure to occasionally dust the ventilation slots in the cabinet to help assure adequate ventilation. IMPORTANT: Never use strong cleaning agents, such as ammonia-based cleaners, or abrasive powder. These types of cleaners will damage the TV. The TV’s screen may be cleaned with a soft, lint-free cloth as well. Take care not to scratch or mar the screen.
TTE Technology, Inc. (“TTE”) Limited Warranty All LCD/LED Models EXCEPT TO THE EXTENT PROHIBITED BY APPLICABLE LAW, THIS WARRANTY DOES NOT COVER, AND AS DESCRIBED BELOW TTE EXPRESSLY DISCLAIMS, ALL ACTUAL AND IMPLIED WARRANTIES WITH RESPECT TO ANY PRODUCT USED FOR INSTITUTIONAL OR OTHER COMMERCIAL PURPOSES (INCLUDING BUT NOT LIMITED TO RENTAL PURPOSES).
Product Registration: Please register your TCL purchase on-line at www.tclusa.com. It will make it easier to contact you should it ever be necessary. Registration is not required for warranty coverage. Limitation of Warranty: • THE WARRANTY STATED ABOVE IS THE ONLY WARRANTY APPLICABLE TO THIS PRODUCT. NO VERBAL OR WRITTEN INFORMATION GIVEN BY TTE TECHNOLOGY, INC., ITS AGENTS OR EMPLOYEES SHALL CREATE A GUARANTY OR IN ANY WAY INCREASE OR MODIFY THE SCOPE OF THIS WARRANTY.
This product incorporates HDMI technology. HDMI, the HDMI logo, and High-Definition Multimedia Interface are trademarks or registered trademarks of HDMI Licensing LLC. ENERGY STAR is a set of power-saving guidelines issued by the U.S. Environmental Protection Agency (EPA). ENERGY STAR is a joint program of the U.S. Environmental Protection Agency and the U.S. Department of Energy helping us all save money and protect the environment through energy efficient products and practices.