user’s Guide LCD Flat Panel HDTV For use with models: L32FHDF11 / L40FHDF11 / L40FHDF10 / L46FHDF11 / L46FHDE9A contents Connections 5 Remote 19 Need Assistance? Please visit our website at www.rca.com/tv or call 1-877-794-7977.
Important Information CAUTION This symbol indicates that this product incorporates double insulation between hazardous main voltage and user accessible parts. When servicing, use only identical replacement parts. RISK OF ELECTRIC SHOCK. DO NOT OPEN. Caution: To reduce the risk of electric shock, do not remove cover (or back). No user serviceable parts inside. Refer servicing to qualified service personnel.
Important Safety Instructions 1. Read and follow all instructions. 2. Do not block any ventilation openings. Install in accordance with the manufacturer’s instructions. 3. Do not install near any heat sources such as radiators, heat registers, stoves, or other apparatus (including amplifiers) that produce heat. 4. Do not negate the safety purpose of the polarized or grounding-type plug. A polarized plug has two blades with one wider than the other.
Table of Contents Important Information...............................2 Important Safety Information....................3 Chapter 3 Using the Remote Control Chapter 1 Connections and Setup Chapter 4 Using the TV Menu Remote Control Buttons...........................19 Before Initial Setup ..................................5 Protect Against Power Surges..............5 Safety Information ...............................5 Avoid Audio Interference .....................5 Avoid Direct Light...................
Chapter 1 Connections and Setup Before Initial Setup Protect Against Power Surges • Connect all components before you plug any power cords into the wall outlet or power strip. • NEVER plug your TV into an outlet that is controlled by a wall switch. • Turn off the TV before you connect or disconnect any cables. • Make sure all antennas and cables are properly grounded. Refer to the Important Safety Instructions. Safety Information • Protect components from overheating.
Chapter 1 Connections and Setup Removing and Installing the stand Your TV comes with the table stand attached on the back of the TV. If you want to mount the TV to the wall follow steps1-2. If you do not want to mount your TV to the wall, install the table stand by following the instructions below. For models L32FHDF10/L40HDF10 /L40HDF11/L46HDF11 Step 1 Place the plastic bag off the TV and place it on a table or other flat surface. Place the TV set face down on the TV bag.
For models L46FHDFE9A This model comes with the table stand attached. If you want to mount your TV to the wall, remove the table stand by following the instructions below. 4 Step 1 Step 2 Place the plastic bag off the TV and place it on a table or other flat surface. Place the TV set face down on the TV bag. Remove the table stand from the TV cabinet. Use a screwdriver to remove the four M5 ST-screws. Step 3 TV cabinet with stand cap attached. Attach the stand cap to the TV cabinet.
Chapter 1 Connections and Setup Explanation of Jacks and Buttons on TV (in alphabetical order) This section describes the jacks on the back panel of your TV/DVD. There are several ways to connect components.
Side Input Jacks USB ( ) Allows you to connect a compatible mass storage device using a USB jack. HDMI INPUT 2 Lets you connect a component, such as a digital cable box, with an HDMI output for the best picture quality. AUDIO/VIDEO INPUT 2 (VID2) Lets you connect a component that has composite video jacks, such as a VCR or DVD player. • L AUDIO Provides left audio connection when using the VIDEO INPUT 2 jack. The left audio connectors are usually white.
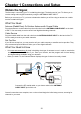
Chapter 1 Connections and Setup Obtain the Signal The first step in connecting your TV is obtaining the signal. The back panel of your TV allows you to receive analog and/or digital channels by using the ANTENNA/CABLE INPUT. Before you connect your TV, you have to determine whether you will be using an antenna or a cable service to obtain the signal.
Choose Your Connections There are several ways to connect components, such as DVD players and setup boxes, to your TV. Please use the following chart to determine which connections are best for you. Proceed to the appropriate pages to connect your components. Note: No cables are supplied with this unit. Please purchase the necessary cables. A high-speed HDMI cable is recommended for better compatibility. Jacks Used Cable Needed Go to...
Chapter 1 Connections and Setup Connecting a Component with Composite Video (Good) To connect a component with a video output jack, such as a DVD player, follow these steps: Example: DVD Player 1. Connect your cable and/or off-air antenna as described on page 10. 2. Connect the yellow video cable to the (VID 1) VIDEO jack on the back of the TV (or he (VID2) VIDEO jack on the side of the TV) and to the video output jack on the DVD player. 3.
Connecting a Component with HDMI (Best) High-Definition Multimedia Interface (HDMI) technology is an uncompressed digital connection that carries both video and audio data by way of an integrated mini-plug cable. Example: Component with HDMI jack. 1. Connect an HDMI cable to the HDMI INPUT 2 jack on the side of the TV (or the HDMI/DVI INPUT 1 jack, or HDMI INPUT 3, or HDMI INPUT 4 jack on the back of the TV) and to the HDMI output jack on the component. 2. Turn on your TV; then turn on the component. 3.
Chapter 1 Connections and Setup Plug in the TV Plug the end of the power cord on the back of the TV into an outlet, inserting the plug completely. Do not plug the TV into an outlet controlled by a light switch. Put Batteries in the Remote • • • Remove the battery compartment cover from the back of the remote control by pushing the tab and lifting off the cover. Insert 2 AAA batteries, making sure the polarities (+ and -) are aligned correctly. Replace the cover.
Complete the Initial Setup The menu system in your TV allows all of the TV’s features to work properly. The first time you turn on your TV, the Initial Setup Wizard opens, which guides you through the setup process, including Language, TV Location, Time Zone, Tuner and Channel Scan. Set the Menu Language The first step of the setup requires you to select your preferred language for the menu system. If English is your preferred language, press OK and proceed to set the TV Location Mode.
Chapter 1 Connections and Setup Auto Channel Scan 1. On the Tuner screen, select either Antenna or Cable. Press the OK button or right arrow ( ) to continue to the next screen. Initial Setup Tuner Please select your tuner mode: Antenna Cable Note: If you are using a satellite of cable set-top box, you do not have to complete the Channel Search. 2. The Channel Scan screen is now displayed. The default choice is to scan.
Chapter 2 Understanding the Basics Turning the TV On and Off 1. Plug the power cord from the TV into an AC power outlet. 2. Press to turn on the TV. 3. Press to turn off the TV. When you turn the TV off, it automatically goes into Standby Mode. Note: When your TV is in Standby Mode, it is still receiving some power. To completely disconnect the power, unplug the power cord. Selecting the Video Input Source 1. Turn on the TV; then, press INPUT on the remote control. The INPUT list appears. 2.
Chapter 2 Understanding the Basics Screen Formats Screen format refers to the way the picture is displayed on your TV. Press the FORMAT button on your remote to see if a different format is available for the video you are viewing. The format changes as you press the FORMAT button, and the format type is displayed at the top left of the screen. Analog video is sent in a 4/3 format, which your TV displays in a 16/9 format.
Chapter 3 Using the Remote Control Remote Control Buttons 1. MEDIA – Press the MEDIA button to enter the USB menu directly. 2. Alphanumeric Buttons – Using these buttons, enter channel numbers. To enter a channel, press the number buttons and press OK (or let the entry timeout). To enter a digital channel with a sub-channel, enter the main channel; then, press the dot (•), the sub-channel, and then the OK button. 3. MENU – Press the MENU button to display the Main Menu. 4.
Chapter 4 Using the TV menu Using the Menu System This section explores the menus of your TV. Each menu is outlined and detailed to help you get the most from your TV. To access the menu system, follow these steps: 1. Press the MENU button to open the main menu. 2. Use the up and down arrows ( ) to highlight an option and press the OK button or the right arrow ( ) to enter its sub-menu. 3.
Tint - This option adjusts the balance between the red and green levels. Color Temperature - Use the left or right arrow ( ) to adjust the color temperature from cool to warm: Cool for a bluer palette of picture colors; Normal; or Warm for a redder palette of color. Advanced Picture Settings Light Sensor – When activated, this feature monitors the ambient light conditions in the room and adjusts the TV’s backlight for optimum viewing.
Chapter 4 Using the TV menu Sound Menu The Sound Menu lets you adjust audio output. To access the Sound Menu, press MENU on the remote, and then ) to highlight Sound from use the up and down arrows ( the Main Menu. Press the OK button or right arrow key ( ) to select. The following options will be displayed: Equalizer – The five-band equalizer allows you to adjust the audio frequency settings. You can select one of the five preset options or create a custom preset.
Setup Menu The Setup Menu allows you to configure the TV with your preferences. Press MENU on the remote to open the Main Menu. Press the up and down arrows ( ) to select Setup; then press the OK button or the right arrow ( ) to display the following options: Signal Type Setup Picture Sound Setup Parental Control Language USB Exit Choose the type of signal (Cable/Antenna) you have connected to the ANTENNA/CABLE INPUT.
Chapter 4 Using the TV menu Channel Skip Channel Skip You can hide channels in the Channel List. Then, when you press the CH+ or CH- button, the TV will skip the hidden channels. You can still tune to these hidden channels by pressing the number of the channel on the numeric keypad. To hide specific channels: 1. In the Setup Menu, press the up or down arrow ( ) to highlight Channel Skip. 2. Press the left or right arrow ( ) to open the Channel List screen. 3.
Input Skip You can hide video inputs in the Channel List. This option allows you to remove the inputs from the Channel List so you do not encounter them when channeling up or down. Once you have hidden inputs, the TV will skip these inputs when you press the CH+ or CH- button. To hide video inputs: 1. In the Setup Menu screen, press the up or down arrow ( ) to highlight Input Skip. 2. Press the left or right arrow ( ) to open the Input Lists screen. 3.
Chapter 4 Using the TV menu Closed Caption Many programs are encoded with closed captioning information, which allows you to display the audio portion of a program as text on the TV screen Note: Closed caption settings are not available for HDMI or CMPT INPUTS. These settings must be set in the connected component’s menu. Closed captioning is not available on all channels at all times. Only specific programs are encoded with closed captioning information.
Digital CC Background Color – Set the appearance of the area behind the digital closed caption text: White, Green, Blue, Red, Cyan, Yellow, Magenta, or Black. Digital CC Background Opacity – Set the appearance of the area behind the digital closed caption text: Solid, Translucent, Transparent, or Flashing. Window Color – Choose the color of the window: White, Green, Blue, Red, Cyan, Yellow, Magenta, or Black. Window Opacity – Set the appearance of the window: Solid, Transparent, or Translucent.
Chapter 4 Using the TV menu Reset All This option resets all settings (except parental control settings) to the factory defaults. When you select this option, a confirmation box opens. 1. Press the left or right arrows ( ) to select OK or Cancel. 2. Press the OK button to confirm. Parental Controls and V-Chip The choices in the US V-Chip and Canada V-Chip menus involve software inside your TV, referred to as V-Chip, which allows you to block TV programs and movies.
3. Press the OK button or right arrow ( ) to enter the next screen. 4. Press the up or down arrow ( ) to highlight Expert Settings. 5. Press the left or right arrow ( ) to continue to the next screen. 6. Contrast is highlighted. Enter 2458, using the numeric keypad. 7. Return to the Parental Control menu to select Change Password and set a new password.
Chapter 4 Using the TV menu V-Chip Rating Screen The following graphic details where items are located within the TV Ratings option with the US V-Chip menu. Rating Status Field Lets you select whether the status of the age-based rating to the left limit is view or block. Rating Field Lets you select from a list of agebased ratings you can block or view. Content Themes Lists the content themes you can blockor view. U. S.
Hierarchy of Age-Based Ratings Content Themes TV-Y All Children D Sexually Explicit Dialogue TV-Y7 Directed to Children 7 Years and Older L Adult Language TV-G General Audience S Sexual Situations TV-PG Parents Guidance Suggested V Violence TV-14 Parents Strongly Cautioned TV-MA Mature Audience Only Fantasy Violence FV US V-Chip Movie Rating Limit Set movie rating limits by blocking movies rated above a specified level. To access the Movie Rating Limit Menu, follow these steps: 1.
Chapter 4 Using the TV menu 6. Press the left or right arrow ( ) to proceed. 7. Press the up or down arrow ( ) to select the desired rating. 8. Press the OK button to toggle between View and Block. Open V-Chip - allows you to select the downloadable rating level. In the event that a new rating system is provided by the broadcaster, the new rating options would appear within this menu.
3. Press the OK button or right arrow ( ) to display the Language Screen. 4. Press the up or down arrow ( ) to select the preferred language for the menu. 5. Press the left or right arrow ( ) to select On or Off. 6. Press the MENU or CLEAR key to exit the menu. USB Menu The USB feature on your TV allows you to play audio files (format supported: MP3) or display pictures (format supported: JPEG). To utilize this feature, follow these steps: 1. Press MENU on the remote control (the Main Menu appears). 2.
Chapter 5 Other Information Frequently Asked Questions (FAQs) What’s the quickest way to view High Definition (HD) video? Connect an off-air antenna to the ANTENNA/CABLE Input to view free local digital channels. You may need to purchase an antenna. (See page ?? for more information). Visit www.antennaweb.org for assistance in deciding what type of antenna to use to receive the local digital channels available to you.
Troubleshooting Most problems you encounter with your TV can be corrected by consulting the following troubleshooting list. TV Problems The TV won’t turn on. • Make sure the TV is plugged in. • Check the wall receptacle (or extension cord) to make sure it is “live” by plugging in another device. • The side panel controls may be locked (disabled). Use the remote control to unlock the side panel controls. • Select the Button Block feature on the Parental Control menu and press OK to uncheck the box.
Chapter 5 Other Information The buttons on the side panel don’t work. • The side panel controls may be locked (disabled). Use the remote control to unlock the side panel controls by selecting the Button Block feature in the Parental Control Menu and press OK to uncheck the box. • Unplug the TV for 10 minutes and then plug it back in. Turn the TV on and try again. The TV turns off unexpectedly. • The electronic protection circuit may have been activated because of a power surge.
The remote control doesn’t work. • Something might be between the remote and the remote light sensor on the front of the TV. Make sure there is a clear path. • The remote may not be aimed directly at the TV. • The batteries in the remote may be weak, dead, or installed incorrectly. Put new batteries in the remote. The Universal Remote control doesn’t work. This TV utilizes new remote control signals and may not be compatible with your existing universal remote (e.g.
Chapter 5 Other Information V-Chip Rating Explanations US V-Chip Rating System TV-MA (Mature Audience Only) Specifically designed to be viewed by adults and may be unsuitable for children under 17. It contains one or more of the following content themes: crude indecent language (L), explicit sexual activity (S), or graphic violence (V). TV-14 (Parents Strongly Cautioned) Contains some material that many parents would find unsuitable for children under 14.
C8+ (Children 8 and older) Programming generally considered acceptable for children 8 years and over to watch on their own. Violence Guidelines: Violence will not be portrayed as the preferred, acceptable, or only way to resolve conflict or encourage children to imitate dangerous acts which they may see on television. Any realistic depictions of violence will be infrequent, discreet, of low intensity and will show the consequences of the acts.
TTE Technology, Inc. (“TTE”) Limited Warranty All LCD Models EXCEPT TO THE EXTENT PROHIBITED BY APPLICABLE LAW, THIS WARRANTY DOES NOT COVER, AND AS DESCRIBED BELOW TTE EXPRESSLY DISCLAIMS, ALL ACTUAL AND IMPLIED WARRANTIES WITH RESPECT TO ANY PRODUCT USED FOR INSTITUTIONAL OR OTHER COMMERCIAL PURPOSES (INCLUDING BUT NOT LIMITED TO RENTAL PURPOSES).
What your warranty does not cover: • Customer instruction. (Your Owner’s Manual describes how to install, adjust, and operate your unit. Any additional information should be obtained from your dealer.) • Installation and related adjustments. • Damage resulting from non-approved installation methods. • Signal reception problems not caused by your unit. • Damage from misuse or neglect. • Batteries.
TTE Technology Canada Ltd. (“TTE”) Limited Warranty EXCEPT TO THE EXTENT PROHIBITED BY APPLICABLE LAW, THIS WARRANTY DOES NOT COVER, AND AS DESCRIBED BELOW TTE EXPRESSLY DISCLAIMS, ALL ACTUAL AND IMPLIED WARRANTIES AND CONDITIONS WITH RESPECT TO ANY PRODUCT USED FOR INSTITUTIONAL OR OTHER COMMERCIAL PURPOSES (INCLUDING BUT NOT LIMITED TO RENTAL PURPOSES). What your warranty covers: • Defects in materials or workmanship to the original purchaser.
What your warranty does not cover: • Customer instruction (Your Owner’s Manual describes how to install, adjust, and operate your unit.
ENERGY STAR is a set of power-saving guidelines issued by the U.S. Environmental Protection Agency (EPA). Manufactured under license from Dolby Laboratories. “Dolby” and the double-D symbol are registered trademarks of Dolby Laboratories. FCC Information This equipment has been tested and found to comply with the limits for a Class B digital device, pursuant to Part 15 of the FCC Rules. These limits are designed to provide reasonable protection against harmful interference in a residential installation.