
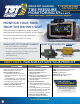
User Guide

Power ON the display. The ON/OFF switch is on the right side of the
display.
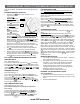
PROGRAM SENSORS TO DISPLAY
1. Press and hold
SET
until it beeps. Display is now in
programming mode.
The words HI
PRE
SSURE SET will
appear at the bottom of
the screen.
Press
5 times to scroll
through the parameters
until LEARN ID appears.
2. Press and release
SET
. The rst tire on
the display will blink.
Press
to move to the
desired tire position.
Press and release
SET
again and FFF FFF will blink. Hold the Display next to the
sensor for that tire position (see diagram for Internal
Sensor position). Press and release
GO
. ID LF will appear
on the screen, then the 6 digit sensor ID code will appear.
Press and release
SET
to save the code to that tire position.
When coded correctly, a six (6) digit unique code will be
displayed (You may record this code by wheel position using
the Sensor Code Diagram included with this guide).
3. Use
to move to the next tire position to be programmed.
Repeat Step 2 until all sensors have been programmed.
4. When complete, press and release
BACK
twice to return to
the main screen (the sensors will begin reading 0 pressure and
an alarm will sound. This is part of the normal setup process.
Press
to silence the alarm while continuing the setup).
SET THE FOLLOWING BEFORE PAIRING SENSORS:
PRESSURE UNITS
Note: Default setting is PSI.
To change the Pressure Unit, press and hold
SET
until it beeps.
Press
three (3) times and SET will appear at the bottom of the
screen and BAR and PSI will be blinking on the screen. Press and
release
SET
again, then use to select BAR or PSI. Press
SET
again to save. Press and release
BACK
to go to the Main Screen.
TEMPERATURE UNITS
Note: Default setting is °F.
To change the Temperature Unit, press and hold
SET
until it
beeps. Press
four (4) times and SET will appear at the bottom
of the screen and °F and °C will be blinking on the screen.
Press and release
SET
again, then use to select °F or °C.
Press and release
SET
again to save. Press and release
BACK
2 times to go to the Main Screen.
HIGH TEMPERATURE ALARM
Note: Default setting is 158°F (70º C).
We recommend that you do not change the temperature
alarm setting.
T
o se
t the High Temperature Alarm, press and hold
SET
until
it beeps. Press
twice and HI TEMP SET will appear. Press
and release
SET
again, then use or to adjust the High
Temperature Alarm, if desired. Press and release
SET
to save.
Press and release
BACK
2 times to go to the Main Screen.
LOW PRESSURE ALARM
Note: If the vehicle recommended tire pressure is below 100
PSI, the Low Pressure Alarm must be set rst, then set the High
Pressure Alarm. The High Pressure Alarm cannot go below the
default Low Pressure Alarm of 100 PSI until the Low Pressure
Alarm is reduced.
To set up the Low Pressure Alarm, press and hold
SET
until it
beeps. Press
once and LOW PRESSURE SET will appear.
Press and release
SET
, then press and release
GO
to select
the appropriate axle. Press
or to adjust the Low Pressure
Alarm 10% below your normal tire pressure for that axle. Press
and release
GO
to move to the next axle. For a trailer setup, see
below.*
HIGH PRESSURE ALARM
To set up the High Pressure Alarm, press and hold
SET
until it
beeps.
HI PRESSURE SET wil
l appear at the bottom of the screen.
Press and release
SET
, then press and release
GO
to select the
appropriate axle. Press
or to adjust the High Pressure Alarm
to 25% over your normal tire pressure for that axle. Press and
release
GO
to move to the next axle. When nished setting each
axle, press and release
SET
to save. Press and release
BACK
2
times to go to the Main Screen. For a trailer setup, see below.*
*Trailer setup - Up to four trailers can be congured to a single
display. When you get to the trailer section of the display, all the
trailer axles on that section will ash in groups of three. You can set
the High & Low Pressure Alarms for that group. Press
and release
GO
to move to the next group or the next trailer. The trailer number
will appear in the middle of the screen (#1 to #4). Press
and release
SET
to save settings. Press
and release
BACK
2 times to return
to the Main Screen.
REPEATER INSTALLATION
1. The repeater is used to boost the sensor signal. A repeater is
factory-installed with this system.
2. The repeater is wired to a 12V source that will be constant
while driving. The red light on the repeater will illuminate
“constant or blinking” (the repeater will illuminate with a
constant light when power is applied, once the display is
on and the sensors are reporting. The light will blink when
transmitting information to the display).
No additional setup is needed for the repeater.
EXTERNAL CAP SENSOR INSTALLATION -
After Programming
1. Hand-tighten the corresponding sensor on the valve stem for
that tire position until the air stops leaking, then tighten 1/4 turn
fur ther.
2. DO NOT OVER TIGHTEN!
Sensor
Wheel
Sensor is installed 180º
from the tire valve stem
PROGRAMMING YOUR TST TIRE PRESSURE MONITORING SYSTEM
www.TSTtruck.com