
Product Manual

Set-Up
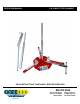
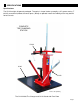
One of several design features to the CH-22 includes options to mount it.
For best results TSI has developed a Platform and Stand to compliment the CH-22 function and range.
The Platform (TSI PN 6192) provides a non-slip footing surface for a service technician. Likewise the
CH-23 Stand puts the work being done with the CH-22 at a good height along with including a very
handy Bead Breaker and tool storage center.
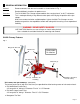
Bolt them together (using the bolt holes on Pg. 2 Fig. 1) and bolt the platform to level ground for a
trouble free work environment.
It is possible to bolt the CH-22 Multi-Tire
Changer to an alternative surface. Use the bolt holes (Pg. 2
Fig. 1)
for bolting to the CH-23 Tire Stand and fasten to a suitable level location preferably in a clean
working environment with necessary access.
See back cover of this manual for Options & Accessories.
INSTRUCTIONS
Use
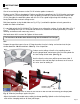
Prepare the mach
ine to put a tire on it. Determine what size tire is being serviced and set the jaw
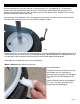
clamps (see Fig. 3 & 4) accordingly. Note Fig. 2 for rim position.
Put the pins in matching holes on each of the slide arms with the
two free-moving jaw clamps (see
Fig. 2). Slide the jaw clamps against the pins.
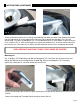
Adjust the handle & threaded rod assembly jaw clamp (see Fig. 3) back so the tire flange clears
each of the clamping teeth on all three jaw clamps.
Tire bead must be broke loose before using the CH-22 Multi-Tire Changer
Fig. 3
Handle & Threaded
Rod Assembly
Fig. 4
Page 3
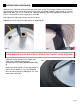
For best results taking a tire off a rim or putting one on,
have the
longer bead seated area of the rim facing down for
the
Jaw Clamps to lock onto. (See Fig. 2)
Most the time the valve stem will be up and accessible. If
not, mount the tire and later flip it to connect an air hose to
the valve stem for adding air.
Fig. 2