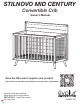
STILNOVO MID CENTURY Convertible Crib Owner’s Manual Scan the QR code to register your product https://www.evolurbaby.com/customer-care/product-registration/ Read all instructions before assembling and using product. IMPORTANT - Keep instructions for future use.
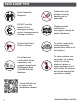
SAFE SLEEP TIPS Adult Assembly Required. 0-6 DO NOT use the product if it is damaged, broken, and/or components are missing or broken. Do Not Use Power Drills or Drivers. For a Safe and comfortable Sleep experience, we suggest using Evolur Greengaurd Gold Certified Full-Size Mattress. Small parts may present choking hazard prior to assembly. Please read the instructions thoroughly. Identify all parts & hardware. To protect your parts during assembly, please place them on a soft surface.
THANK YOU... …. for choosing Evolur and congratulations on joining our family; a family that has been transforming lives for over 30+ years! We appreciate your feedback and wish you the very best in the coming years with your new addition. If you have any questions or concerns please don’t hesitate to reach out to us. One of our trusted Customer Care representatives will be happy to assist you. Thank you again for entrusting us to supply you with safe, and affordable baby products and accessories.
WARNINGS • FAILURE TO FOLLOW THESE WARNINGS AND ASSEMBLY INSTRUCTIONS COULD RESULT IN SERIOUS INJURY OR DEATH. • TO REDUCE THE RISK OF SIDS(SUDDEN INFANT DEATH SYNDROME), PEDIATRICIANS RECOMMEND HEALTHY INFANTS BE PLACED ON THEIR BACKS TO SLEEP, UNLESS OTHERWISE ADVISED BY YOUR PHYSICIAN. • CHECK THIS PRODUCT FOR DAMAGED HARDWARE, LOOSE JOINTS, MISSING PARTS OR SHARP EDGES BEFORE AND AFTER ASSEMBLY AND FREQUENTLY DURING USE. • DO NOT USE THIS CRIB IF ANY PARTS ARE MISSING, DAMAGED OR BROKEN.
WARNINGS (cont.) WARNING • DO NOT USE THIS CRIB IF YOU CANNOT EXACTLY FOLLOW THE ACCOMPANYING INSTRUCTIONS. • DO NOT USE THIS CRIB FOR A CHILD WHO CAN CLIMB OUT OF IT OR WHO IS TALLER THAN 90 CM. • DO NOT PLACE IN OR NEAR THIS CRIB ANY CORD, STRAP OR SIMILAR ITEM THAT COULD BECOME WRAPPED AROUND A CHILD’S NECK. • DO NOT PLACE THIS CRIB NEAR A WINDOW OR A PATIO DOOR WHERE THE CHILD COULD REACH THE CORD OF A BLIND OR CURTAIN AND BE STRANGLED.
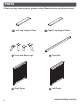
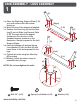
PARTS If there are any missing parts, please contact Evolur before using the product. 1-L Left Leg Support Plate 2 Front and Rear Legs 1-R Right Leg Support Plate 3 Front Bar 2 4 Right Panel 6 5 Left Panel www.evolurbaby.
PARTS (cont.) If there are any missing parts, please contact Evolur before using the product. 6 Headboard 7 Mattress Support 8 Footboard Panel www.evolurbaby.
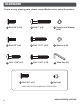
HARDWARE If there are any missing parts, please contact Evolur before using the product. A Bolt 3/4” (×16) B Bolt 2” (×2) C Spring Lock Washer (x16) D Bolt 3/4” (×4) E Bolt 1-1/2” (×10) J Washer (x16) H Bolt 1-3/8” (×4) I Bolt 1-3/4” (×10) K Allen Key (x2) F Bolt 3/4” (×6 ) G Nut (×6) KEEP PARTS FOR DAYBED AND TODDLER BED 8 www.evolurbaby.
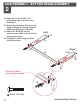
CRIB ASSEMBLY - LEGS ASSEMBLY 1 (2) 1a. Place the Right Leg Support Plate (1-R) on a soft surface with the bottom facing up. 1b. Note: the top of the plates are labelled. 1c. Position the Front Leg (2) and the Rear Leg (2) on the Right Leg Support Plate (1-R). The legs need to be angled outwards in the direction of the threaded sleeves as shown in the illustration. Similarly repeat for the Left Support Plates. 1d.
CRIB ASSEMBLY - BOTTOM FRAME ASSEMBLY 2 2a. Align the Front Bar (3) to the assembled legs as shown in the illustration. 2b. Ensure the threaded sleeves on the Support Plates are facing outward while assembling the Front Bar. 2c. Attach the Bolts (E) into the insertions provided on the front bar securing the parts. 2d. Tighten the bolts using the Allen Key (K) provided. (Left) (1-L) (Right) (3) (Ensure the holes are facing downward) (1-R) (3) (E) (E) E Bolt 1-1/2” (×4) 10 www.evolurbaby.
CRIB ASSEMBLY - SIDE ASSEMBLY 3 3a. Align the Left Panel (5) and Right Panel (4) to the assembled bottom frame of the crib as shown in the illustration. 3b. Attach the Bolts (B) and Bolts (H) into the insertions provided on the side panels securing the parts. 3c. Tighten the bolts using the Allen Key (K) provided. (5) (H) (4) (B) (H) (H) (B) B Bolt 2” (×2) www.evolurbaby.
CRIB ASSEMBLY - HEADBOARD ASSEMBLY 4 4a. Align the Headboard Panel (6) to the side panels as shown in the illustration. 4b. Attach the Bolts (I) into the insertions provided on the headboard securing the parts. 4c. Tighten the bolts using the Allen Key (K) provided. (6) I Bolt 1-3/4” (×10) 12 www.evolurbaby.
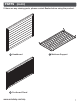
CRIB ASSEMBLY - MATTRESS SUPPORT ASSEMBLY 5 5a. Attach all the corners of the Mattress Support Panel (7) to the headboard and side panels as shown in the illustration. 5b. Attach the Bolts (D) into the insertions and tighten the bolts using the Allen Key (K) provided. 5c. Note that the Lowest Position of the Mattress Support Panel will be for Toddlers babies (who can stand up and walk), Mid Position is for Infant babies (who start to turn and sit up), and the Highest Position is for newborn babies. 5d.
CRIB ASSEMBLY - FOOTBOARD ASSEMBLY 6 6a. Align the Footboard Panel (8) to the assembled side and front panels as shown in the illustration. 6b. Attach the Bolts (E) into the insertions provided on the side panels securing the parts. 6c. Tighten the bolts using the Allen Key (K) provided. (8) E Bolt 1-1/2” (×6) 14 www.evolurbaby.
CONVERSION MODES - DAYBED ASSEMBLY 1 1a. To convert the crib to a Daybed, you must remove the Footboard of the crib. 1b. Attach the Bolts (F) into the Nuts (G) through the (G) insertions provided on both the side panels as shown in the illustration. 1c. Tighten the bolts using (G) the Allen Key (K) provided. (G) (F) (F) (G) (F) (F) (G) (F) (F) (G) NOTE: * Make sure mattress support is at the lowest position. F Bolt 3/4” (×6 ) www.evolurbaby.
CONVERSION MODES - TODDLER BED ASSEMBLY 2 2a. To convert the crib to a Toddler Bed, you must remove the Footboard of the crib. 2b. Attach the Stabilizer Bar and Toddler Guard Rail using the bolts from the Footboard removal. 2c. Make sure to follow the complete instructions provided with the Toddler Guard Rail. NOTE: *Make sure mattress support is at the lowest position.
CONVERSION MODES - FULL SIZE BED ASSEMBLY 3 3a. To convert the crib to a Full-Size bed, you must remove the Footboard of the crib. 3b. Remove the Mattress Support Panel, followed by Left and Right Panels and the legs. 3c. Make sure to follow the complete instructions provided with Bed Rails. NOTE: *Make sure to use the Evolur Bed Rails (SKU-812) in order to convert the crib to a Full-size Bed with Footboard.
FURNITURE CARE INSTRUCTIONS ROOM CLIMATE CONTROL: • Wood, when first cut contains more than 50 percent water. When it is prepared for furniture construction it is placed in a Kiln and the moisture content is brought down to 8 to 10 percent. Wood is porous and responds to its environment. If the room has high humidity it will absorb it and expand and if the humidity is low it will lose moisture and shrink.
FURNITURE CARE INSTRUCTIONS (cont.) IN GENERAL: • Protect furniture surface from hot or extremely cold items. • Use coasters under hot or cold beverages. • Do not use synthetic fabric under accessories or lamps. • Protect tops from pens, markers and crayons. • Oils from potpourri and other scented items can damage the finish of the furniture. • Do not drag items across the surface of the furniture. • Allow the surface to breath by rotating your accessories and lamps.
TM 1532 S. WASHINGTON AVE STE1 PISCATAWAY, NJ 08854-9908 E-mail: info@evolurbaby.com www.evolurbaby.com Follow Us On @Evolurbaby @evolurbaby to get your nursery featured on our social media. Enter our monthly giveaway! Scan the QR code to register. Chat with us! Scan the QR code to Live Chat.