
Tus neeg siv phau ntawv


6
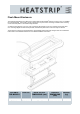
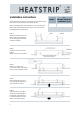
Installaon Instrucons
Ensure all minimum clearance requirements are met and the mate-
rials used are compliant to your local building codes.
Before installing the ush mount enclosure, ensure the site to be
xed is fully prepared with the hole cut the correct size and the
mounng points securely in place.
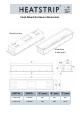
MODEL
“D”
DISTANCE FROM END
TO BRACKET (mm)
THX2400 170
THX3600 288
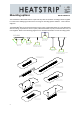
STEP 2:
Screw the enclosure into the
baens.
NOTE: screws are not included.
STEP 3:
If there is no roof access,
connect the heater to the power
source, ensure the power is OFF.
STEP 4:
Li the heater into the enclo-
sure ensuring the brackets are
to the side of the mounts
STEP 5:
Push the heater to the le en-
suring the brackets engage in
the mounts. It will then drop
in. Shake the heater to ensure
that it is securely mounted.
STEP 1:
Aach the brackets to the rear
of the heater. The dimensions
for the spacing of the brackets
is listed in the table.