802.
802.
First Edition (May 2003) © Copyright International Business Machines Corporation 2003. All rights reserved. US Government Users Restricted Rights – Use, duplication or disclosure restricted by GSA ADP Schedule Contract with IBM Corp.
Contents Preface . . . . . . . . . . . . . . . v Registering your option . . . . . . . . . Appendix B. Specifications . . . . . . 25 . v Appendix C. Troubleshooting . . . . . 27 Installation guide . . . . . . . . . . . 1 Product description . . . . . . . . . . . . 1 Installing the Wireless CardBus Adapter . . . . . 1 Installing the Wireless CardBus Adapter in Windows XP Professional . . . . . . . . . 1 Installing the Wireless CardBus Adapter in Windows 2000 . . . . . . . . . . . . .
iv 802.
Preface In addition to this User’s Guide, the option package includes the following: v IBM® 802.11a/b/g Wireless CardBus Adapter v Installation and User’s Guide CD containing device drivers v IBM 802.11a/b/g Wireless CardBus Adapter warranty and regulatory notices flyer v Program License Agreement As you examine these items, look for any physical damage. Retain your proof of purchase and packaging material in the event you need to return your CardBus Adapter.
vi 802.
Installation guide This guide provides information on the IBM 802.11a/b/g Wireless CardBus Adapter. Product description The IBM 802.11a/b/g Wireless CardBus Adapter contained in this package has the following features: v Conforms to IEEE 802.11a, 802.11b, and 802.11g (draft) standards. v Up to 54 Mbps data rate for high-capacity, fast operation v Driver support for: – Microsoft® Windows® 2000 Professional – Microsoft Windows XP – Microsoft Windows NT® 4.
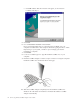
c. Click OK and the Welcome window will appear, as shown below. Continue with Step 5. 5. Click Next. 6. Choose Destination Location and click Next. Driver and Client Utility files are copied from the CD-ROM onto your computer hard disk drive. After setup has finished copying the files to where they belong on your system, a window opens notifying you that the installation is complete. 7. Click Finish. 8. Locate an available Type II or Type III PCMCIA CardBus slot on your computer. 9.
. Continue with “Using the IBM Client Utility to set up your wireless network under Windows XP, Windows 2000, and Windows NT 4.0” on page 9. Installing the Wireless CardBus Adapter in Windows 2000 To install the adapter in Microsoft Windows 2000 Professional, do the following: 1. Make sure that the CardBus Adapter is not inserted in the CardBus slot. If it is, eject it from the slot. 2. Insert the Installation and User’s Guide CD into the computer CD-ROM drive. An IBM welcome window opens automatically.
9. Hold the CardBus Adapter so that its 68-pin connector is facing your computer PCMCIA CardBus slot and that its label is facing up. 10. Slide the CardBus Adapter completely into the PCMCIA CardBus slot. When the CardBus Adapter is properly inserted, Windows 2000 finds the new hardware and a beep will be emitted indicating that the installation is complete. 11. Continue with “Using the IBM Client Utility to set up your wireless network under Windows XP, Windows 2000, and Windows NT 4.0” on page 9.
7. Click Next. The following window opens displaying the destination where setup will install the files. If you do not want to accept the default location that is displayed, click Change, specify a new location, and then click OK. 8. Click Next. Setup installs the files to the destination that you specified. After all of the files have been copied, the following window opens. 9. Click Finish. 10. Continue with “Installing the Windows NT 4.0 device driver (with networking installed”.
2. Double-click the Network icon. The Network window displays. 3. Click the Adapters tab. The window will display adapters currently installed on your computer. 6 802.
4. Click Add. The Select Network Adapter window opens. 5. Click Have Disk. The Insert Disk window opens. 6. Replace the drive letter shown with the path where the NDIS device driver is located on the Installation and User’s Guide CD. Specify D:\NDIS4 (where D is the letter of your CD-ROM drive). The Select OEM Option window opens, displaying the name of the device driver.
7. Click OK to copy the files to the computer hard disk drive. The Network window opens again displaying the name of the Wireless CardBus Adapter. 8. Click Close. The Microsoft TCP/IP Properties window opens, as shown below. 9. Assign an Internet Protocol (IP) address by selecting Obtain an IP address from a DHCP server or Specify an IP address. If you select Specify an IP address, type the IP address, subnet mask, and default gateway in the appropriate fields. 10.
11. Click OK. 12. Click Yes to restart the computer. 13. After the computer restarts, hold the CardBus Adapter so that its 68-pin connector is facing the computer PCMCIA CardBus slot and that its label is facing up. 14. Slide the CardBus Adapter completely into the PCMCIA CardBus slot. When the CardBus Adapter is properly inserted, Windows NT finds the new hardware and a beep is emitted that indicates that installation is complete.
Software description The IBM Client Utility enables you to: v View status information v Define, modify, and delete profiles v View diagnostic information Accessing the IBM Client Utility When your CardBus Adapter is inserted into the computer CardBus slot, the IBM Client Utility device driver loads automatically and a device driver icon displays in your system tray, as shown below. The device driver icon appears as a series of four vertical bars.
2. Press the right mouse button and click Launch Client Utility. The following window opens. Understanding the IBM Client Utility menu commands The IBM Client Utility window contains menus at the top and tabs below. You use these menus and tabs to perform various operations. You can use the menus to perform the following actions: v The Action menu lets you enable or disable the radio frequency signal, display or remove the IBM Client Utility icon in your System Tray, and exit the IBM Client Utility.
Viewing or changing display settings To view or change the IBM Client Utility settings, click Display Settings in the Options menu to open the Display Settings window, as shown below. In the window, you have the following options: v Signal Strength Display Units enables the signal strength to be displayed as a percentage or as decibels. v Refresh Interval specifies the number of seconds that elapse before the display is updated (or “refreshed”). You can specify a refresh time from one to 30 seconds.
The Current Status tab has an Advanced button that you can click on to view advanced status information, as shown in the figure below. Working with profiles A profile is a collection of configuration settings. A profile specifies the network type, security mode, and up to three network names. You can create profiles as you need them. After you create them, you can activate them, modify them to suit your requirements, and delete them when you no longer need them.
creating, as shown below. 3. In the General tab, specify the following parameters: v Profile Name: Type a name for the profile you are creating. v Network Names: Specify up to three service set identifiers (SSIDs) for this configuration profile. To enable connection to any access point, leave all three fields empty. 4. Click the Security tab and the following screen is shown.
window. Type the encryption information and click OK. v Key Entry Method: Enables you to select the entry method for an encryption key, using hexadecimal (0-9, A-F) or ASCII text (all keyboard characters. v Encryption Keys: Enables you to specify either a per-user or up to four shared keys as the default encryption key to be used. v Shared Keys (1-4): Defines a set of shared encryption keys for network configuration security. To enable security using a shared key, type at least one shared key value.
v Power Save Mode: Select the power-saving mode for the configuration profile you are creating. You can select Maximum, Normal, or Off. v Network Type: Select the type of network for the configuration profile you are creating. You can select Access Point or Ad Hoc. Note: If you click Ad Hoc and specified more than one SSID on the General tab, only the first SSID you entered on that tab will be used. Clicking Ad Hoc also enables the Wireless Mode When Starting Ad Hoc Network options.
Connecting to a different network The Profile Management tab has an Available Networks button that enables you to view and connect to different networks. To connect to a different network, do the following: 1. In the Profile Management tab, click a configuration profile. 2. Click Available Networks to open the Available Access Points and Ad Hoc Networks window. This window displays the available access points and ad hoc network for the station.
You can use the Advanced Statistics button on the Diagnostics tab to display the following window.
Specification (NDIS) device driver, as shown below. Uninstalling the Wireless CardBus Adapter This section provides information on uninstalling the Wireless CardBus Adapter. To uninstall the Wireless Cardbus Adapter in Windows XP Professional and Windows 2000, do the following: 1. 2. 3. 4. Right-click My Computer and select Manage. From the list on the left, select Device Manager. Expand the Network Adapters item on the right side of the window.
If the following window opens, skip to step 6. If the window does not open, continue with step 5. 5. Click Start → Run. Navigate to the computer CD-ROM drive, double-click the SETUP.EXE file on the Installation and User’s Guide CD, and click OK. The window shown above opens. 6. Select Remove. 7. Click Next to open the following window. 8. Click Yes to remove the Setup program and its components. 20 802.
9. When the following window opens, remove any discs from their drives and click Finish to complete the uninstall process.
22 802.
Appendix A. LED information Your IBM 11a/b/g Wireless CardBus Adapter provides two Light Emitting Diodes (LEDs), a Power LED, and a Network LED. These LEDs indicate power and activity status of the CardBus Adapter. Power LED Network LED Description Slow blink OFF Power Save Mode: The CardBus Adapter enters this mode after power-up or reset. ON OFF Awake Mode: The CardBus Adapter automatically enters this mode after exiting from power save mode.
24 802.
Appendix B. Specifications The following table lists the specifications of the IBM 11a/b/g Wireless CardBus Adapter. Model: IBM 11a/b/g Wireless CardBus Adapter Physical specifications: Form Factor CardBus Type II Extended Dimensions 2.2″ x 4.7″ x 0.51″ (54 mm x 120 mm x 13 mm) Weight 1.5 oz. (43 g) Connector Interface 68-pin CardBus Power 3.3 v Frequency band v 802.11a: 5.15 GHz to 5.85 GHz General specifications: Frequency and modulation v 802.11b and 802.11g: 2.412 GHz to 2.
Regulatory and Safety 26 Safety UL, C-UL United States FCC Part 15.247 and 15.249 Canada Industry Canada RSS - 210 Japan VCCI, JATE, Telec 802.
Appendix C. Troubleshooting The following list provides general troubleshooting tips for the Wireless CardBus Adapter. v Your computer does not recognize the Wireless CardBus Adapter: – Be sure the CardBus Adapter is properly inserted into a 32-bit CardBus slot. v The Wireless CardBus Adapter does not work properly after the Setup program is installed: – Reinsert the CardBus Adapter into the slot. A beep should be heard if the adapter is properly inserted.
28 802.
Appendix D. Service and Support The following information describes the technical support that is available for your product, during the warranty period or throughout the life of the product. Refer to your IBM Statement of Limited Warranty for a full explanation of IBM warranty terms. Online technical support Online technical support is available during the life of your product through the Personal Computing Support Web site at www-3.ibm.com/pc/support/site.wss/.
Country or Region Telephone Number Country or Region Telephone Number Belgium Dutch 02-210-9820 New Zealand 0800-446-149 French 02-210-9800 Bolivia 0800-0189 Norway 66 81 11 00 Brazil 55-11-3889-8986 Peru 0-800-50-866 Canada 1-800-565-3344 Philippines 632-995-2225 Toronto 416-383-3344 Chile 800-224-488 Portugal 21-791 51 47 China (PRC) 800-810-1818 Russia 095-940-2000 China (Hong Kong S.A.R.
Appendix E. IBM Statement of Limited Warranty Z125-4753-07 - 11/2002 Part 1 - General Terms This Statement of Limited Warranty includes Part 1 - General Terms, Part 2 Country-unique Terms, and Part 3 - Warranty Information. The terms of Part 2 replace or modify those of Part 1. The warranties provided by IBM in this Statement of Limited Warranty apply only to Machines you purchase for your use, and not for resale.
v any non-IBM products, including those that IBM may procure and provide with or integrate into an IBM Machine at your request. The warranty is voided by removal or alteration of identification labels on the Machine or its parts. IBM does not warrant uninterrupted or error-free operation of a Machine.
functionally equivalent to the item replaced. The replacement assumes the warranty service status of the replaced item. Your Additional Responsibilities Before IBM or your reseller exchanges a Machine or part, you agree to remove all features, parts, options, alterations, and attachments not under warranty service. You also agree to: 1. 1.ensure that the Machine is free of any legal obligations or restrictions that prevent its exchange; 2. 2.
This limit also applies to IBM’s suppliers and your reseller. It is the maximum for which IBM, its suppliers, and your reseller are collectively responsible.
How to Obtain Warranty Service: The following is added to this Section: To obtain warranty service from IBM in Canada or the United States, call 1-800-IBM-SERV (426-7378). CANADA Limitation of Liability: The following replaces item 1 of this section: 1.
days of the date the other party appoints its, the first appointed arbitrator shall be the sole arbitrator, provided that the arbitrator was validly and properly appointed. All proceedings shall be conducted, including all documents presented in such proceedings, in the English language. The English language version of this Statement of Limited Warranty prevails over any other language version. HONG KONG S.A.R. OF CHINA AND MACAU S.A.R.
excluded or limited. The Consumer Guarantees Act 1993 will not apply in respect of any goods which IBM provides, if you require the goods for the purposes of a business as defined in that Act. Limitation of Liability: The following is added to this Section: Where Machines are not acquired for the purposes of a business as defined in the Consumer Guarantees Act 1993, the limitations in this Section are subject to the limitations in that Act.
reseller approved to perform warranty service or (2) from IBM, provided the Machine has been announced and made available by IBM in the country in which you wish to obtain service.
summary proceedings, will be submitted to the exclusive jurisdiction of the English courts; 3) in Belgium and Luxembourg, all disputes arising out of this Statement of Limited Warranty or related to its interpretation or its execution, the law, and the courts of the capital city, of the country of your registered office and/or commercial site location only are competent; 4) in France, Algeria, Benin, Burkina Faso, Cameroon, Cape Verde, Central African Republic, Chad, Comoros, Congo Republic, Djibouti, Democ
sale of consumer goods. Such rights are not affected by the warranties provided in this Statement of Limited Warranty. How to Obtain Warranty Service: The following is added to this section: To obtain warranty service from IBM in EU countries, see the telephone listing in Part 3 - Warranty Information. You may contact IBM at the following address: IBM Warranty & Service Quality Dept.
CONSEQUENCE OF THE EVENT THAT GENERATED THE DAMAGES; OR 4) LOSS OF BUSINESS, REVENUE, GOODWILL, OR ANTICIPATED SAVINGS. THE FOLLOWING TERMS APPLY TO THE COUNTRY SPECIFIED: AUSTRIA What this Warranty Covers: The following replaces the first sentence of the first paragraph of this section: The warranty for an IBM Machine covers the functionality of the Machine for its normal use and the Machine’s conformity to its Specifications.
money refunded. The second paragraph does not apply. What IBM Will Do to Correct Problems: The following is added to this section: During the warranty period, transportation for delivery of the failing Machine to IBM will be at IBM’s expense. Limitation of Liability: The following paragraph is added to this section: The limitations and exclusions specified in the Statement of Limited Warranty will not apply to damages caused by IBM with fraud or gross negligence and for express warranty.
3. loss of profits, business, revenue, goodwill, or anticipated savings. SLOVAKIA Limitation of Liability: The following is added to the end of the last paragraph: The limitations apply to the extent they are not prohibited under §§ 373-386 of the Slovak Commercial Code.
The warranty period may vary by country or region and is specified in the table below. NOTE: ″Region″ means either Hong Kong or Macau Special Administrative Region of China. 802.11a/b/g Wireless CardBus Adapter Country or Region of Purchase Warranty Period Type of Warranty Service Worldwide 1 year 4 A warranty period of 1 year on parts and 1 year on labor means that IBM provides warranty service without charge for parts and labor during the 1 year warranty period.
You will deliver or mail as IBM specifies (prepaid unless IBM specifies otherwise) the failing Machine suitably packaged to a location IBM designates. After IBM has repaired or exchanged the Machine, IBM will make it available for your collection or, for Mail-in Service, IBM will return it to you at IBM’s expense, unless IBM specifies otherwise. You are responsible for the subsequent installation and verification of the Machine. The IBM Machine Warranty worldwide web site at http://www.ibm.
Country or Region Telephone Number Country or Region Telephone Number Japan Consumer customers 0120-887-870 Venezuela 0-800-100-2011 Vietnam 848-8295-160 Business customers 0120-887-874 Luxembourg 46 298-977 5063 802.
Appendix F. Notices IBM may not offer the products, services, or features discussed in this document in all countries. Consult your local IBM representative for information on the products and services currently available in your area. Any reference to an IBM product, program, or service is not intended to state or imply that only that IBM product, program, or service may be used.
Trademarks The following terms are trademarks of International Business Machines Corporation in the United States, other countries, or both: IBM IBM logo HelpCenter ThinkPad Microsoft, Windows, and Windows NT are trademarks of Microsoft Corporation in the United States, other countries, or both. Other company, product, or service names may be trademarks or service marks of others. Electronic emission notices Machine - 802.
Tested To Comply With FCC Standards FOR HOME OR OFFICE USE Industry Canada Class B emission compliance statement This Class B digital apparatus complies with Canadian ICES-003. Avis de conformite a la reglementation d’Industrie Canada Cet appareil numérique de la classe B est conforme à la norme NMB-003 du Canada. Deutsche EMV-Direktive (electromagnetische Verträglichkeit) Zulassungbescheinigunglaut dem Deutschen Gesetz über die elektromagnetische Verträglichkeit von Geräten (EMVG) vom 30. August 1995 (bzw.
limits for Class B equipment were derived for typical residential environments to provide reasonable protection against interference with licensed communication devices. Union Européenne - Directive Conformité électromagnétique Ce produit est conforme aux exigences de protection de la Directive 89/336/EEC du Conseil de l’UE sur le rapprochement des lois des États membres en matière de compatibilité électromagnétique.
Japanese statement of compliance for products less than or equal to 20 A per phase Appendix F.
52 802.
Part Number: 31P9111 Printed in U.S.A.