
User's Manual


ADA HEIGHT INSTALL GUIDETEC_TM_120 REV. B 02/02/2022 Page 67 of 74
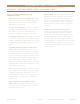
ADJUSTMENTS, SERVICING & REPLACING COMPONENTS
DRAWER ADJUSTMENT
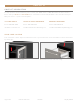
Drawer front bracket and skin bracket screw holes are
slotted to assist with drawer adjustment. See figs. 1-4.
PROCEDURE
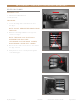
1. Loosen the drawer front bracket screws. See fig. 1.
2. Adjust the drawer front as needed. See fig. 2.
3. Tighten the drawer front bracket screws.
4. Verify drawer alignment. If more alignment is
needed, continue to steps 5 and 6.
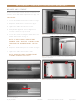
5. Loosen the screws securing the drawer skin to the
drawer skin bracket. See fig. 3.
NOTE: IF APPLICABLE, REMOVE ANY
DRAWER SKIN / BRACKET SCREWS GOING
THROUGH THE DRAWER FRONT. SEE FIG.
4.
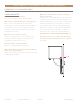
6. Adjust the drawer skin/panel as needed. See fig. 5.
7. Tighten the drawer skin bracket screws.
NOTE: REINSTALL ANY DRAWER FRONT
SCREWS REMOVED IN STEP 5.
FIG. 1.
Drawer front bracket screw locations. Other side not shown.
FIG. 3.
Drawer skin bracket screw location. Not all locations shown.
FIG. 5.
Bracket screw holes are slotted for easy adjustment. Screw
removed for illustration.
FIG. 2.
Bracket screw holes are slotted for easy adjustment. Screw
removed for illustration.
FIG. 4.
Drawer front screw locations.