
User's Manual

TRUE RESIDENTIAL
®
TEC_TM_102 REV. B02/02/2022Page 44 of 74
CABINET SETUP
Follow the instructions below to install door overlay
panels. Door panel height and positioning varies by
application; for more details, please see “Standard
Installation Plan Views” (page 16) or “Optional
Installation Plan Views” (page 21). For custom panel
specifications, please see “Custom Overlay Panel
Specifications” starting on page 25.
NOTE: DO NOT INSTALL A SOLID PANEL ON
A GLASS DOOR. THIS MAY CAUSE MOISTURE
TO FORM BEHIND THE PANEL, RESULTING
IN DAMAGE. BE SURE TO INSTALL A LOCK
BEFORE INSTALLING THE DOOR PANEL.
REQUIRED TOOLS
Required tools include (but may not be limited to)
the following:
• Surface protection*
• 2+ Clamps ≥ 2" (51 mm)
• 1/8" Hex Head Allen Wrench
• Phillips Bit Driver
• 1/8" Dill Bit
• (Qty 6) #6 x 1/2" Screws**
• Drill
*Cardboard, moving blanket, foam padding, etc.
**Screw type varies by panel material.
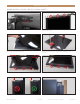
PROCEDURE
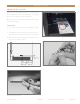
NOTE: FIGURES SHOW A LEFT-HINGED DOOR.
1. Carefully lay the door overlay panel on a protected
surface.
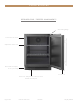
2. With a 1/8" hex head Allen wrench, loosen the
cabinet hinge bolts. Then, remove the door.
See fig. 1.
NOTE: DO NOT REMOVE THE HINGE FROM
THE DOOR ASSEMBLY.
NOTE: IF CONVERTING FROM STAINLESS
STEEL DOOR SKIN TO AN OVERLAY
PANEL, REMOVE THE DOOR SKIN BEFORE
POSITIONING THE DOOR FRONT ON THE
PANEL. DO NOT REMOVE THE DOOR SKIN
BRACKET FROM THE DOOR FRONT.
SEE FIG. 2.
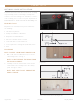
3. Remove the gasket. See fig. 3.
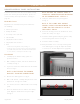
4. Place the door front face down on the overlay
panel. Align the door front and panel edges. See
fig. 4.
NOTE: THE PANEL’S VERTICAL
POSITIONING AND LENGTH VARY
BY INSTALLATION. SEE “OPTIONAL
INSTALLATIONS” (PAGE #).
5. Clamp the door and panel. See fig. 4.
NOTE: IF THE CLAMP JAWS ARE NOT
PADDED, INSERT PADDING BETWEEN THE
CLAMP AND THE OVERLAY TO PROTECT
THE PANEL’S FINISH.
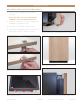
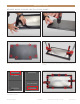
6. If desired, install a handle before proceeding to the
next step. For best installation. Fasten the handle
with recessed screws.
7. With a 1/8" drill bit, carefully drill pilot holes into
the door front. See fig. 5.
NOTE: TAKE CARE TO NOT DRILL THROUGH
THE FRONT OF THE PANEL.
8. Fasten the overlay panel to the door front. Then,
remove the clamps. See fig. 6.
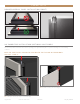
9. Install the door gasket. Verify the gasket is fully
seated in the gasket channel. See fig. 7.
10. Install the door assembly. Verify the door closes
correctly and the gasket seals without gaps (see
fig. 8). Adjust the door as needed; see “Door
Adjustment” (page 66).
DOOR OVERLAY PANEL INSTALLATION