
User's Manual

TRUE RESIDENTIAL
®
TEC_TM_102 REV. B02/02/2022Page 42 of 74
CABINET SETUP
OPTIONAL LOCK INSTALLATION
Follow the instructions below to install a lock assembly
in your overlay panel. If converting to overlay from
stainless, reuse the existing lock. Otherwise, to order a
lock assembly, please contact our parts department at
844-849-6226 or TrueResidentialParts@TrueMfg.com.
REQUIRED TOOLS
Required tools include (but may not be limited to)
the following:
• 1/8" Allen key wrench
• Phillips Screwdriver or Bit Driver
• Adjustable Lock Nut Wrench
• 3/4" hole saw with shank or similar
• 1-1/4" drill bit for countersunk hole
• Tools required for creating 1/4" (6.35 mm) notch
• Drill
PROCEDURE
NOTE: FIGURES SHOW RIGHT-HINGED DOOR.
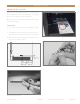
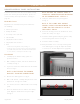
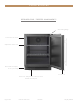
1. With a 1/8" hex head Allen wrench, loosen the
cabinet hinge bolts. See fig. 1.
NOTE: DO NOT REMOVE THE HINGE FROM
THE DOOR ASSEMBLY.
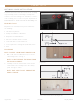
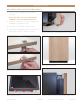
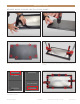
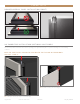
2. Carefully create the lock bracket notch and the
countersunk lock assembly hole in the overlay
panel. See figs. 2 and 3.
NOTE: TAKE CARE TO NOT DAMAGE THE
PANEL’S FINISH.
FIG. 1
. The articulating hinge uses keyhole slots.
FIG. 2.
Panel front. Lock assembly hole position. Rotate 180° for left-
hinged units.
23 5/8"
600mm
28"
711mm
2 23/32"
69mm
29/32"
23mm
.7500 THRU
3/4"
19mm
1/4"
6mm
NOTCH DEPTH
1 5/8"
41mm
1/4"
6mm
2 1/2"
64mm
7/32"
6mm
BACK VIEW
ADA OVERLAY DOOR FOR 6" GRILL
WITH LOCK
FIG. 3.
Panel back. Countersunk lock assembly hole and lock bracket
notch positions. Rotate 180° for left-hinged units.
23 5/8"
600mm
28"
711mm
2 23/32"
69mm
29/32"
23mm
.7500 THRU
3/4"
19mm
1/4"
6mm
NOTCH DEPTH
1 5/8"
41mm
1/4"
6mm
2 1/2"
64mm
7/32"
6mm
BACK VIEW
ADA OVERLAY DOOR FOR 6" GRILL
WITH LOCK
FRONT
BACK