
Manual

/
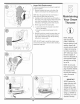
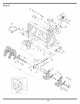
Friction Whee_ Remova_
if the snowthrowerfailsto drivewiththe drivecontrol
engaged,andperformingthedrive controlcameadiust-
menton page14failsto correctthe problem,the friction
wheelmayneedto bereplaced,Followthe instructions
below,Examinethe frictionwheelfor signsof wearor
crackingandreplaceif necessary
o Placetheshift bver in third Forward(F3) position,
o Drainthe gasolinefromthe snowthrower,or placea
pieceof plasticunderthe gas cap,
o Carefullypivotthe snowthrowerup andforwardso
thatit restsonthe augerhousing,
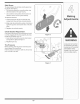
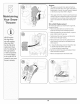
1, a, Removetheframecoverfromthe undersideof
the snowthrowerby removingfourself-tapping
screwswhichsecureit,
b, Removethe right-handwheelby removingthe
screwandbellwasherwhichsecureit to the axle,
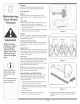
2, Carefullyremovethe hexnut andwasherwhich
securesthe hexshaft to the snowthrowerframeand
lightlytap the shaft'sendto dislodgethe ballbearing
fromthe rightsideof the frame,
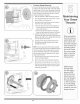
3, Carefullypositionthe hexshaftdownwardandto
the bft beforecarefullyslidingthefrictionwheel
assemblyoff theshaft,
NOTE: Ifyou'rereplacingthe frictionwheelassembly
as a whob, discardtheworn partandslide the newpart
ontothe hexshaft,Followthe stepsaboveinreverse
orderto reassemblecomponents,Ifyou'redisassem-
blingthefrictionwheeland replacingonlythe rubber
ring, proceedas follows:
4, Removethe four screwswhichsecurethe friction
wheel'sside platestogether,
o Removethe rubberringfrombetweenthe plates,
o Reassemblethe side plateswitha newrubberring,
Slidethefrictionwheelassemblybackontothehex
shaftandfollowthestepsabovein reverseorderto
reassembbcomponents,
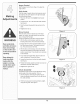
When reassembling
the friction wheeHas-
sembHy,tighten each
screw only one rota-
tion beforeturningthe
wheeHclockwise and
proceedingwith the
next screw. Reoeat
this process several
times to ensurethe
platesare secured
with equalforce,
NEVER repuace
the auger shear
pins with anything
other than OEM
Part No.738-04124
replacementshear
pins. Any damage to
the auger gearbox
or other components
as a result of failing
to do so will NOT be
coveredby yoursnow
thrower's warranty.
\
17