Safety o Assembly o Operation o Adjustments o Maintenance oTroubleshooting o Parts Lists oWarranty ® Two-Stage READ SAFETY RULES Snow Thrower -- STORM 8526 AND mNSTFIUCTmONS CAREFULLY BEFORE OPEFIATmON Warning: This unitis equippedwith an internalcombustionengineand shouldnot be usedon or nearany unimprovedforest-covered,brush= coveredor grass=coveredland unlessthe engine'sexhaustsystemis equippedwith a sparkarrestermeetingapplicablelocalor state laws (if any), If a sparkarresteris used, it s
This Operator's Manua_ is an important part of your prepare and maintain the unit for best performance. new snow thrower, mtwHI help you assemble, P_ease read and understand what it says. Table of Contents Safety Labels ...................................................... Safe Operation Practices ................................... Setting Up Your Snow Thrower .......................... Operating Your Snow Thrower ........................... MakingAdjustments .........................................
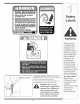
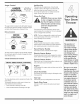
m 1. KEEPAWAYFROMROTATING IMPELLER ANDAUGER.CONTACT WITHIMPELLER OR AUGERCANAMPUTATE HANDSANDFEET. 2. USECLEAN-OUT TOOLTO UNCLOG DISCHARGE CHUTE. 3. DISENGAGE CLUTCH LEVERS, STOPENGINE, ANDREMAINBEHINDHANDLES UNTILALL MOVINGPARTSHAVESTOPPED BEFORE UNCLOGGING ORSERVICINGMACHINE. 4. TOAVOIDTHROWNOBJECTS INJURIES, NEVER DIRECT DISCHARGE ATBYSTANDERS. USEEXTRA CAUTION WHENOPERATING ON GRAVELSURFACES. 5. READOPERATOR'SMANUAL.
WARNING: EngineExhaust, someofitsconstituents, andcertainvehiclecompo _ nentscontainoremitchemicals knownto StateofCalifornia tocausecancerand birthdefectsor otherreproductive harm. DANGER: Thismachinewasbuilttobeoperated according totherubsforsafeoperation inthis manual.Aswithanytypeofpowerequipment, carelessness or erroronthepartoftheoperatorcan Sa.'_e ,, resultinseriousinjury.Thismachine is capableofamputating handsandfeetandthrowingobjects.
Operation Maintenance 1. Donotputhandsorfeetnearrotatingparts, inthe auger/impellerhousingor chuteassembly.Contactwith the rotatingpartscan amputatehands andfeet. 2. The auger/impellercontrol leveris a safetydevice.Never bypassits operation.Doingso makesthe machineunsafe andmay causepersonalinjury. 3. The control leversmustoperate easilyin both directions andautomaticallyreturnto the disengagedpositionwhen released. 4. Neveroperate witha missingor damagedchuteassembly.
J ?S ,/ NOTE:References_ongm or lett siaeof the snow mrowerare ae[ermmea trom oenmatne un tin tne operatingpos_on(stana_ng directtybehindtne snow thrower,facingtne nonage paneH, NOTE:Two reptacemenl augersnearpinsare mcluaeawltn [nls manual _orstowed n the p_astLc nanalepane), Referto Augerson page16 for more mTorma_ron regardingshear p_nreplacement, 1, Observethe lowerreararea of the snowthrowerto be sure bothcablesare alignedwith rollerguides beforepivotingthe handleupward, 2, Securethe handle bytight
5, Removethe flat washerand hairpinclip from theend of the chute directionalcontrol insertthe end of the chute directionalcontrolintothe lowerbracketand securewith the flat washerand hairpin clipiust removed,If necessary',the lowerbracket can be adiusted,Refer toChute BracketAdiustment, on Page 13, iMPORTANT:Priorto operatingyoursnowthrower,refer to Auger ControlTeston page 11,Readand followall instructionscarefullyand performall adiustmentsto verify yoursnow throweris operatingsafelyand properly, Tire Pre
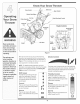
Know Your Snow Thrower f Shift Lever / AugerControl Engine Controls WARNING Choke Controm Read, understand, and follow aH instructions and warnings on the machine and in this manual before Figure 1 operating. Choke Now that you have set up your snow thrower for operation, get acquainted with its controls and features. These are described be!ow and illustrated in Figure 1. This knowledge will allow you to use your Use extreme care when handling gasoline.
Auger Control ignition Key The ignitionkeyis a safety devise,It mustbe fully insertedin orderfor the engineto start, Removethe ignitionkey whenthesnow throweris not in use, Donot turnthe ignitionkey in an attemptto startthe engine,Doingso maycause it to break, f CJean-Out TooJ WARNING: Never use your hands to clear a clogged chute assemo Your Snow bly.
Gas & Oit Fill-Up Servicethe enginewith gasolineand oil as instructedin theTecumsehEnginesmanualpackedseparatelywith yoursnowthrower,Readinstructionscarefully, StartingThe Engine 1, Attachsparkplug wire tospark plug, Makecertainthe metalloop on theend of the sparkplug wire(inside the rubberboot)is fastenedsecurelyoverthe metal tip on the spark plug, WARNING Read, understand, and follow all instruc= 2, Makecertain boththe augercontroland drivecontrol are in the disengaged(released)position, tions and warn
6. Wipeall snowand moisturefrom the areaaroundthe engineas wellas the area in and aroundthedrive controland augercontrol Also,engageand release bothcontrolsseveraltimes. To Engage 1. To engagethe augersand start throwingsnow, squeezethe augercontrolagainstthe left handle. Releaseto stop the augers. NOTE: Keepthe keyin a safe place.The enginecannot start withoutthe ignitionkey.
Auger Controm Referto Auger ControlTeston Page11to adiustthe augercontrol Shift Making Cable if thefull rangeof speeds(forwardand reverse)cannot be achieved,referto thefigures to the rightand adiust theshift cableas follows: 1, Placethe shiftleverin the fastest forwardspeed position, 2, Loosenthe hex nuton the shiftcable indexbracket, See Figure3, 3, Pivotthe bracketdownwardto take up slack in the cable, 4, Retightenthe hexnut, Drive Control f Whenthedrive controlis releasedand in the disen= gaged"u
be adiusted,See Figure6, Forclose snow removalon a smoothsurface,raise skid shoeshigheron the augerhousing, • Use a middleor lowerpositionwhenthearea to be clearedis uneven,such as a graveldriveway, Toadiustthe skid shoes: 1, Loosenthe four hexnuts (two on eachside) and carriagebolts,Moveskid shoes to desiredposition, 2, Makecertainthe entire bottomsurfaceof skid shoeis againstthe groundto avoidunevenwearon the skid shoes, 3, Retightennutsand boltssecurely, Chute Bracket Adjustment If the spiralat the botto
Engine Referto the separateTecumsehEnginesmanual packedwith yourunitfor all enginemaintenance, Lubrication Engine Referto the separateTecumsehEnginesmanual packedwith yourunitfor all enginelubricationinstructions, \ \ \ Gear Shaft \ / The gear (hex)shaft shouldbe lubrbatedat bast once a seasonor after every25 hoursof operation, 1, Removethelowerframecover by removingthe two screwswhichsecureit, / 2, Applya lightcoatingof an aBweathermulti-purpose greaseto the hex shaft, See Figure8, Figure 8 Whee
// // '_ /// Auger Belt Replacement To removeand replaceyoursnow thrower'sauger belt, proceedas follows: 1, Removethe plasticbelt coveron the front of the engineby removingthe two self-tappingscrews, NOTE:Drainthe gasolinefrom the snowthrower,or placea pieceof plasticunderthe gas cap, 2, Carefullypivotthe snowthrowerup andforwardso that it restson the augerhousing,Removethe frame coverfrom the undersideof the snow throwerby removingfourself=tappingscrewswhich secureit, 3, Rollthe auger beltoff the enginep
-_ j NEVERreplace theaugershear pinswithanything otherthanOEM PartNo.
Friction Whee_ Remova_ if the snowthrowerfailsto drivewith the drivecontrol engaged,and performingthedrive controlcameadiustmenton page 14fails to correctthe problem,the friction wheelmay needto be replaced,Followthe instructions below,Examinethe frictionwheelfor signs of wearor crackingand replaceif necessary o Placetheshift bver in third Forward(F3) position, o Drainthe gasolinefromthe snow thrower,or placea pieceof plasticunderthe gas cap, o Carefullypivotthe snowthrowerup andforwardso that it restson th
If thesnow throwerwill not be usedfor 30 daysor longer, or if it is the end of the snowseason whenthe last pos= sibilityof snow is gone,the equipmentneedsto be stored properly.Followstorageinstructionsbelowto ensuretop performancefromthe snowthrowerfor many moreyears. Preparing Engine or in poorty ventilated areas, where fuel fumes may reach an open flame, spark or pilot tight as on a furnace, water heater, clothes dryer or gas appliance.
ProbHem Cause Ermine faiUsto start ' Engine runs erratic Eng ne overheats !. Chokenot in ON position. 1. Movechoketo ON position. 2. Sparkplugwire disconnected. 2. Connectwire to sparkplug. 3. Fueltank emptyor stale fuel. 3. Filltank with clean,fresh gasoline. 4. Enginenot primed. 5. Fautyspark pug. 4. Primeeng ne as instructedin OperatingYourSnowThrower. 5. Clean adiustgap or replace. 6. Blockedfuel line. 7. Safetykey notin ignitionon engine. 6. Cleanfuel line. 7.
StyWe 0 20
, 1, _i _i i_ G i _III 731-2635 SnowRemovalToolMount 29, 684-04107 SpiralAssembly,LH j2, 684-04057 JmpellerAssembly,12"Dia, 30, 684-04108 SpiralAssembly,RH j 3, 710-0347 Hex Screw,3/8q6, 1,75,Gr5 31, 731-04870 Spacer,1,25ODx ,75ID x 1,00 4, 710-0451 Bolt, Carriage,5/16q8, ,750Grl 32, 736-0188 Washer,Flat,,76x 1,49x ,06 5, 710-0604A Screw, 5/16q8, 0,625 33, 741_0493A Bushing,Flange,,80ID x ,91OD 6, 710_0703 Screw,Carriage,1/4_20,,750,Gr5 34, 790-00138A BearingHousingw/Hob, l"He
StyJe 0 -@ ® / ,,,,/" 22
, 1, 631=04133 HandleAssembly,Lock, LH 30, 736=0185 Washer,Flat,,375x ,738x ,063 2, 631=04134A HandleAssembly,Lock, RH 31, 736=0451 Washer,Saddle,320 x ,93 x ,060 3, 684=04105A HandleAss' y, EngagementLH 32, 747=04263 Eye Bolt,ChuteCrank 4, 684=04106A HandleAss'y,Engagement,RH 33, 749=04138 Handle,Lower 5, 710=0224 Screw,#1Od6,0,500 34, 749=04141 Handle,Upper,RH 710d026 Screw,1/4=20,1,750 35, 749=04142 Handle,Upper,LH 7, 710q233 Screw,Machine,#10=24,1,375 36, 731=04912A Chute,Lower,
StyWe 0 @ \ \ 24
, 1, _i _i i_ G i _III 756-04177 Disc, FrictionWheel 39, 741-0919 Ball Bearing 2, 684-04153 FrictionWheelAssembly,5,50D 40, 710_0108 Rex Screw,1/4_20,1,25,Gr5 3, 684-04154 SupportBracket,FrictionWheel 41, 710_0191 Rex Screw,3/8_24,1,25,Gr8 4, 684-04156 Shift Assembly,Rod 42, 710_0672 Hex Screw,5/16_24,1,25,Gr5 5, 710-0627 Hex Screw,5/16-24,,750,Gr5 43, 710_0654A Screw,Seres,3/8_16,1,00 6, 710-0788 Screw,1/4-20,1,000 44, 710_1245B Rex Screw,5/16_24,,875,Gr8 7, 710-0896 Screw
MANUFACTURER'S LIMITED WARRANTY FOR ® _ _ _ The limitedwarrantyset forth belowis givenbyTroy-BiltLLCwith respect to newmerchandisepurchasedand usedin the UnitedStatesand/or its territoriesand possessions,and by MTDProductsLimitedwith respectto newmerchandisepurchasedand usedin Canadaand/or its territoriesand possessions(eitherentityrespectively,"Troy-Bilt"), "Troy-Bilt"warrantsthis product(excludingits normalwearparts as describedbelow)againstdefectsin materialand workmanshipfor a period of two (2) ye