
Manual


Section5: Maintenance
w:_mw:ltt_ll_[_l Beforeinspecting,cleaningorservicingthemachine,shutoffengine,waitformovingpartstostop,disconnectspark
1__ plugwireandmovewireawayfromsparkplug.Removeignitionkey(elecb'icstartmodels).
Failuretofollowtheseinstructionscanresultinseriouspersonalinjuryorpropertydamage.
BATTERYMAINTENANCE
Useextremecautionwhenworkingon
or nearbatteries. To helppreventper-
sonalinjuryorpropertydamage:.
• Batteriesgenerate explosivegases.
Keepsparksand flames away from
the batteryat all times. Ventilatethe
areawhenchargingorusingthe bat-
teryin anenclosedarea.
BatteryCarein Service
The batteryis sealedandis mainte-
nance-free.Acid levelscannot be
checked.
• Alwayskeepthe batterycablesandter
minalscleanandfree of corrosive
build-up.
• After cleaningthe batteryandtermi-
nals,
apply a light coatof petroleumjelly or
greaseto both terminals
• Alwayskeepthe rubber bootposi-
tioned
overthe positiveterminalto prevent
shorting.
Charging
Ifthetractor hasnot beenput into use
for anextendedperiodof time, charge
the battery with anautomotive-type12-
volt chargerfor a minimum of erie heur
at sixamps.
JumpStarting
IMPORTANT:Neverjump your tiller's
deadbatterywith the batteryof a run-
ning vehicle.
1. Connectend of onejumper cableto
the positiveterminal of the good battery,
then the other endto the positivetermi-
nal of the deadbattery.
2. Connectthe otherjumper cableto the
negativeterminal of the good battery,
then to the frameof the unit with the
deadbattery.
Failure to use this procedure could
cause sparking, and the gas in either
batterycould explode.
Cleaning
Clean the battery by removing it from
the tractor and washing with a baking
soda and water solution. If necessary,
scrape the battery terminals with a wire
brush to remove deposits. Coat termi-
nals and exposedwiring with grease or
petroleumjelly to preventcorrosion.
Battery Failures
Somecommon causesfor batteryfailure
are:
• incorrect initial activation
• undercharging
• overcharging
• corrodedconnections
• freezing
IMPORTANT:Thesefailuresare NOT
coveredbyyour tractor's warranty.
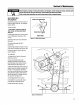
BatteryRemovalandInstallation
When removingandinstallingthe bat-
tery, disconnectandconnectthe cables
in this orderto avoidsparking:
1. To removethe battery,first discon-
nectthenegative(-) cablefrom the
grounding screw onthe backof the bat-
tery bracketpost. Bendthe cable away
from any metalparts.
2. Disconnectthe negative(-) cable
from the negative(-) batterypost.
3. Disconnectthe positive (+) cable
from the positive (+) batterypost and
bendit awayfrom any metalparts.
Coverthe cableterminalwith its rubber
boot.
4. Removethe batteryclamp.
5. To installthe battery,reversethe
abovesteps. Besurethat the battery
postsfaceto the rearof thetiller and
that the positive (+) post is onthe left
side as you faceforward from the han-
dlebars.
BatteryStorage
Chargebatteryfully. The battery loses
some of its chargeeachdaywhen the
unit is not used.
IMPORTANT:NEVERstore batterywith-
out afull charge.Rechargebatterybe-
fore returningto service or everytwo
months,whicheveroccursfirst.
Whenstoring unit for extendedperiods,
disconnectbatterycables.Removing
batteryfrom unit is recommended.
CLEANINGUNDERSIDEOF
MOWERDECK
Mowerbladesaresharp.
When working near blades, wear
heavyleatherglovesor wrapbladesin
thick ragsto protectyourselffrom the
sharpedges.
Frequentlycheck,andcleanif necessary,
the undersideof the mower deck. Grass
build-upin this areacan affectthe cut-
ting performance.Beforeinspectingor
cleaning,makesurethat theengineis
shut off andthesparkplug wire is
disconnectedfrom the spark plug.
Inspection/Cleaningof MowerDeck:
1. Stopengine,waitfor all partsto
stopmoving,anddisconnectspark
plug wire.
2. Tip mower on rearwheelsbyfollow-
ing instructions "TippingMower For
Service"in this Section.
3. Usea plastic or metalscraperto
removegrassbuild-upfrom deck or
blades.
24