
Manual


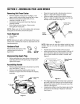

WingNut _'_
Hairpin Cli! _"
Weld Pin
Figure 4
Insert the carriage bolt, included in the hardware
pack, in the upper hole on the handle mounting
bracket (carriage bolt must go to the inside of
handle). Secure with one plastic wing nut, also
included in the hardware pack. Repeat on the other
side with remaining items from the hardware pack.
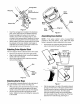
Attach cables to the lower handle with the two cable
ties already on the lower handle. Insert pegs on
cable ties intothe holes on the lower handle. Pull
cable ties tight and cut off the extra.
AttachingDriveAdjusterBlock
The drive adjuster block isattached to the drive cable.
• Remove bolt attached to the lower right handle.
• Align the drive adjuster block, curved side against
handle, with hole in handle.
• Secure drive adjuster block with bolt previously
removed.See Figure 5.
Adjuster
Block
Figure 5
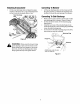
AttachingStarterRope
The rope guide is already attached to the right side of
the upper handle of your mower. See Figure 6.
• With spark plug wire disconnected and grounded,
hold the blade control handle against the upper
handle, and pull the starter rope out of the engine.
• Slip the rope through the rope guide as shown
below. Tighten the wing nut holding the rope guide
to the handle
Upper
Handle
Starter
Rope
Lower
Handle
Rope
Guide
Figure 6
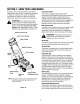
AssemblingGrassCatcher
NOTE: If the grass catcher came pre-assembled,
proceed to the next section. If not, follow the steps
below to assemble it before attaching to the mower.
• Insert frame intograss bag with the black plastic
side on the bottom of bag. See Figure 7.
_f Grass Catcher
Frame Insert frame
intobag
Graas
_ Ba _
Plastic
Channel
Grass Catcher
Assembly
Complete
Figure 7
Slip the openings inthe side of the plastic channel
on bag over the hooks on the grass catcher frame.
Secure bag to the frame by working the six plastic
channels on bag over frame. All of the plastic
channels except the center top of the bag attach
from the outside of bag. The center top of the bag
attaches from inside the bag. See Figure 7.