
Manual


\
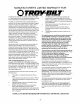
Lower
Handle
Notch
Figure 16
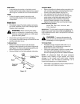
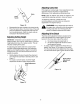
Reassemble the upper handle to the lower handle.
Place the hairpin clips in the inner holes of the weld
pins and replace the carriage bolts and wing nuts
on te handle brackets. Attach the starter rope as
instructed inthe Assembly section.
AdjustingCuttingHeight
IMPORTANT: All wheels must be placed in the same
relative position. For rough or uneven lawns, move the
height adjustment lever to a higher position. This will
help stop scalping of the grass.
An adjusting plate and thumb lever at each wheel
provides cutting height adjustment. Each adjusting
plate has nine height positions. Height of cut will be
changed when you move the thumb lever from one
position to another.
• Simply depress the lever towards the wheel and
move the lever assembly to desired position. See
Figure 17.
• For rough or uneven lawns, move the height
adjustment handles to higher height position.
Height Adjustment
Lever
AdjustingCarburetor
If the engine is running rough, minor adjustments to the
carburetor may be required to compensate for
differences in fuel, temperature, altitude and load.
NOTE: Dirty air cleaner may cause an engine to run
rough.Before adjusting carburetor, check air cleaner.
To adjust the carburetor, please follow the
recommendations and instructionson carburetor
adjustment in the engine manual.
WARNING: If any adjustments are made to
the engine (e.g. carburetor) while the engine is
running, keep clear of all moving parts. Be
careful of heated surfaces like the muffler.
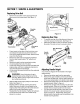
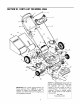
AdjustingDriveClutch
The drive clutch adjustment wheel is located on the
lower right handle and is used to tighten or loosen
tension on the drive cable. Adjust this cable if
a. the mower does not propel itself; or
b. the wheels hesitate with the drive control
handle pushed forward.
• To adjust, rotate the adjustment wheel with your
fingers. See Figure 18 for location of the wheel.
Turn the wheel to the left to tighten the drive cable.
Turn the wheel to the right to loosen the drive cable.
Drive Clutch
Adjustment
Wheel
Figure 18
Figure 17
15