
Manual


Section 3 MICR Quality Control
MICR Basics Handbook -- Document #50-70300-001 Rev. C 3-1
Using the TROY MICR Document Template
This section explains how to check the print quality and positioning of your E-13B MICR printing, based
on the ANSI X9/TG-2 document. For information on international MICR specifications and guidelines,
refer to the ISO-1004 standards document.
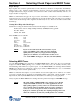
The quality of the magnetic printing and the print position on checks is critical. Use the TROY MICR
Document Template (Figure 2-1) to check the MICR positioning on your printed checks. Additional
TROY MICR Document Templates can be ordered using the TROY part number 54-17373-001.
NOTE: Be sure to print and inspect a sample of your MICR-encoded
documents whenever you buy new MICR security paper stock,
change MICR paper types, or replace the MICR toner cartridge.
During development of your check-printing program, all output should be tested using the MICR
document template. Each printed check should meet the tolerances and dimensions outlined in this
section.
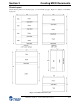
Figure 2-1: MICR Document Template (not to scale)
To use the TROY MICR Document Template:
• Place template on the check and align the right and lower edges (or perforations) of the check with
the long dashed lines on the template marked edge of check.
• All MICR printing must fall within the 1/4" wide band - located in the middle of the 5/8" wide clear
band at the bottom of the check.
• The left-hand transit symbol must be located in position 43 within the 1/4" band.
• Ensure that only E-13B MICR characters appear in the 5/8" clear band. Since all printing generated
by the printer is magnetic it is extremely important that borders, signatures or any other characters do
not intrude into the clear band.
NOTE
: If the template indicates problems, check obvious reasons,
such as improper cutting of the paper or printer misfeeds.