802.11b Print Server User’s Guide Part Number 40148-100 Revision 1.
Copyright Notice All rights reserved. No part of this publication may be reproduced, stored, in a retrieval system, or transmitted in any form or by any means, electronic, mechanical, photocopying, recording, or otherwise, without the prior written permission of TROY Group, Inc. The information contained herein is designed only for use with this TROY product. TROY is not responsible for any use of this information as applied to other products.
Contents Introduction System Requirements . . . . . . . . . . . . . . . . . . . . . . . . . . . . . . . . . . . . . . .2 Network Operting Systems Supported . . . . . . . . . . . . . . . . . . . . . . . . . .2 Network Protocols Supported . . . . . . . . . . . . . . . . . . . . . . . . . . . . . . . . .2 1 Installing the EtherWind Print Server Hardware Before You Begin . . . . . . . . . . . . . . . . . . . . . . . . . . . . . . . . . . . . . . . .1-1 Unpacking the Print Server . . . . . . . . . . . . . . .
11 Troubleshooting Troubleshooting Frequently Asked Questions . . . . . . . . . . . . . . . . . . .11-1 Loading the Firmware . . . . . . . . . . . . . . . . . . . . . . . . . . . . . . . . . . . .11-3 Uninstalling the EtherWind Wireless Software . . . . . . . . . . . . . . . . . .11-4 12 Where to Get Help Worldwide Web Support . . . . . . . . . . . . . . . . . . . . . . . . . . . . . . . . . .12-1 Contacting TROY . . . . . . . . . . . . . . . . . . . . . . . . . . . . . . . . . . . . . .
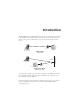
Introduction The EtherWind 802.11b Wireless Print Server lets you communicate with printers from anywhere on an 802.11b wireless network. You can use the print server in ad-hoc (peer-to-peer) or infrastructure (access point) wireless mode, as shown below. EtherWind Laptop computer with 802.11b capabilities Printer Ad-Hoc Mode 802.11b Access Point Laptop computer with 802.
System Requirements To use the EtherWind for printing from a wireless network, you need an 802.11b wireless network. The wireless network will consist of either of the following: ◗ An 802.11b wireless enabled PC or Macintosh printing straight to the printer (Ad-Hoc or Peer-to-Peer Mode). ◗ An 802.11b wireless Access point allowing wireless and wired Ethernet enabled computers to print to the EtherWind.
◗ AppleTalk • Apple Printer Utility compatibility • Binary AppleTalk support • AppleTalk spoofing ◗ IPX/SPX • NetWare RPrinter Bindery mode • NetWare PServer Bindery mode • NetWare NPrinter NDS mode with NDPS support • NetWare PServer NDS mode • Ethernet II, 802.3, 802.2, 802.
4
1 Installing the EtherWind Print Server Hardware Before You Begin Before you install the EtherWind wireless print server, make sure that your printer or other device and your computer already function properly via a parallel, serial or USB printer cable. Refer to your printer’s documentation for instructions on using and maintaining your printer. In addition, make sure that you have properly installed the 802.
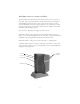
EtherWind Connectors, Switches, and LEDs Test Switch. Press down this switch for less than 5 seconds to print a test page on the printer. The test page will show the current wireless and network settings of the EtherWind wireless print server. Press it down for more than 5 seconds to reset the EtherWind to its factory default parameters. If you hold the test switch down upon powering up, the print server will power up in Ad-Hoc mode on RF Channel 11 with the SSID of printer. Power Connector.
Connecting to a Printer Follow these steps to connect the EtherWind wireless print server to your printer: 1. 2. 3. 4. 5. 6. Attach the EtherWind to the desktop mounting base. Make sure the printer is off. Connect the parallel cable to the print server and the printer. Plug the power cord from the power supply into a wall outlet or power strip. Connect the the power supply to the EtherWind. Turn the printer on.
Connecting the EtherWind to an RS-232 Serial Device Note: Skip this section if you are not using the EtherWind serial port. The EtherWind has one standard PC-compatible 9-pin female D-connectors. The serial port uses PC-compatible 9-pin male D-connectors. Note that the standard off-the-shelf 9-pin female to 25-pin male PC cables will require a null modem in order to connect to most printers or terminals.
SET PORT S1 CONSOLE ENABLED You can remotely restore the port to normal serial operation by unselecting Console Mode from WebXAdmin or by using the console command SET PORT serialport CONSOLE DISABLED. The serial ports are factory set at 115200bps, 8-bit data, CTS/RTS (Hardware) flow control, and no parity. If your printer or serial device requires different settings, you must use WebXAdmin or a console terminal connected to port S1 as described in the previous paragraph.
1-6
2 Configuring the EtherWind 802.11b and IP Settings Configuring the EtherWind There are three basic steps required to configure the EtherWind: 1. Configuring the EtherWind 802.11b settings. To operate on an 802.11b network, you must set the wireless (ad-hoc or infrastructure), SSID, channel, data rate and WEP encryption. All nodes of a wireless network need to have the same settings in order to communicate with each other. 2. Configuring the IP address settings.
this option, select Ad-hoc Computer-to-Computer, or whatever mode your adapter uses to communicate on a wireless network without an access point. ◗ If you are using WEP (Wired Equivalent Privacy) encryption on your wireless network, you will need to temporarily disable WEP on your PC in order to configure the print server.
Installing the Software Follow these steps to install the WP-Admin software and configure the print server. 1. Insert the EtherWind Wireless Configuration CD-ROM into your PC or Macintosh. Note: There is also a Linux version of the WP-Admin utility available on the TROY website (www.troygroup.com). 2. If you are using a Windows computer, click on Install TROY EtherWind Utilities, then click on Install EtherWind Configuration Utilities and Printing Software.
Note: If you don’t see the print server in the list, hold down the button for more than 5 seconds to reset it to factory defaults and try the search again. If you still don’t see it, check the troubleshooting section (chapter 11). 5. When you see the print server you want to configure in the list, highlight it and click Configure.
• If your network uses WEP encryption, you will need to enable WEP and enter the appropriate WEP key(s). Contact your system manager to determine what information . • If you are using TCP/IP (recommended for Windows printing) and you do not have a DHCP server (see note below), you will need to manually assign a valid IP Address, Subnet Mask, and Gateway and then set the Boot Method to Static. • If you are using a Macintosh, no further configuration should be necessary.
2-6
Management Methods 3 TROY offers a variety of ways to configure and monitor the EtherWind. These methods are: WP-Admin Utility ◗ This utility runs on Windows and Macintosh computers, and is used for initial configuration of the print server and allows you to set the wireless settings as well as the basic network settings including TCP/IP. ◗ See the previous section (Configuring the EtherWind 802.11b and IP Settings) for detailed use instructions ◗ Can be downloaded from our web site (www.troygroup.
◗ ◗ ◗ ◗ No additional software is needed on the system. Can be used on any system that supports web browser capabilities. Simply type the IP address into your web browser address bar to connect Default password is ACCESS *Both the EtherWind and the PC must be configured with an IP address and your browser must be configured to work across a LAN in order to use WebXAdmin.
4 Microsoft Windows Network Configuration The EtherWind includes the easy-to-use ExtendNet Connect IP Monitor software for printing from Windows computers over an 802.11b wireless link. This software creates a network port on the Windows system, which acts like a normal parallel port. As a result, it works transparently with any standard Windows printer driver and application program.
5. If you are using Windows NT/2000/XP, go to the Ports tab. If you are using Windows 95/98/ME, go to the Details tab. 6. Click on Add Port. 7. If you are using Windows NT/2000/XP system, highlight Troy Group ExtendNet Connect IP Monitor, and click New Port. If you are running Windows 95/98/ME, select Other, highlight Troy Group ExtendNet Connect IP Monitor, and click OK.
8. The search will begin for available print servers, highlight the print server you would like to create the port for, and click ADD. 9. Make sure the port you created is chosen and click Apply.
If you are running Windows 95/98/ME, the Details tab should look something like this: You are now ready to print. Additional Windows Configuration Methods EtherWind print servers are also compatible with other methods of printing from Windows. These include the Standard TCP/IP Port option in Windows 2000/XP, and the LPR Port option in Windows NT that are built into the operating system. In addition, you can download the NetBEUI/NetBIOS Port monitor from the TROY Wireless web site (www.troygroup.
5 AppleTalk Network Configuration The EtherWind runs over wireless Ethernet (also known as Ethertalk). This capability allows Macintosh computers to print jobs to a printer simultaneously with jobs from Windows, NetWare, and other computers. The print server will appear as a shareable printer node on an Appletalk Phase 2 network. The print server broadcasts information to Macintoshes on the network and automatically appears in the Chooser on each Macintosh.
5. Close the Chooser. You can now print to the printer using any standard Macintosh application program. Setting Up Printing (MacOS X) 1. If you haven't done so already, set the name of your computer by going to the Applications folder*, selecting System Preferences, and then Sharing. Type in the computer name in the Network Identity section (you can also set the IP address here if you want). 2. Turn on the Airport and AppleTalk by clicking on the Applications folder and then clicking on Network.
6 NetWare Network Configuration Configuring the Print Server and Print Queue with XAdmin32 (Queue Server Mode) This section covers installation using the Novell client. Note: TROY recommends you use the Novell 32-bit client on your Windows workstation instead of the Microsoft NetWare client, because it allows direct configuration of print queues without the need for a Novell utility like NWAdmin or PCONSOLE. The EtherWind automatically makes itself known on a NetWare network.
2. Click Start, select Programs, select the XAdmin32 folder, and then select XAdmin32. 3. Click on the IPX/SPX icon under Filters to set the operating mode to IPX/SPX (TCP/IP mode will not allow you to configure NetWare print queues directly). The EtherWind should appear in the list of available printers. If it does not, try selecting Devices from the menu bar and then Search Active Devices. 4.
5. Click on New Queue. Enter any unique name for the Queue name. ◗ If you are configuring a bindery queue, click OK and proceed to step 8. ◗ If you are configuring an NDS queue, click Browse, select the file server volume where you want the queue to reside (a volume name will have a file server icon next to it), and click OK. 6. The queue name will now appear in the Available Print Queues under the selected volume (for bindery mode) or in the selected context (for NDS mode).
6-4
7 UNIX Network Configuration The EtherWind print server appears to the network as a UNIX host computer with a unique IP address running the line printer daemon (lpd) protocol. As a result, any host computer that supports the Berkeley remote-LPR command can spool jobs to the print server without the need for any special software on the host computer. Important Note: Before configuring a UNIX print queue, the EtherWind must have a valid IP address.
1. Edit the printcap file: An example of a typical entry in the printcap file is: LaserPrinter:\ :lp=:\ :rm=XCD:\ :rp=BINARY_P1:\ :sd=/usr/spool/lpd/LaserPrinter: "LaserPrinter" is the queuename. "XCD" matches the name in the hosts file. "BINARY_P1" is the print server's service name. (NOTE: Use TEXT_P1 instead of BINARY_P1 for text files.) "sd" is the spool directory. 2. Create the spool directory: The lpd spool directory is usually located in the /usr/spool directory.
Then use the Printer Manager in the Admintool utility under Open Windows as follows: ◗ ◗ ◗ ◗ ◗ Select Edit Select Add Select Add Access to Remote Printer At the PrinterName prompt, type any desired name for the print queue At the Printer Server prompt, type: name\!servicename (for example, LaserJet\!BINARY_P1), where: - name matches the print server name as entered in the hosts table. - servicename is the print service name.
9. You may accept the default values for the remaining items. 10. Click OK to configure the printer. 11. You should now be able to print using the lp -d command with the printer name. Notes: ◗ The configuration for HP Distributed Print Services and for earlier versions of HP/UX is slightly different. ◗ The print server can also be configured as a JetDirect card using HP/UX. To do this, you will need the HP UNIX Host Printing Software (part of HP's JetAdmin for UNIX).
8 DEC LAT Network Configuration Note: Only TROY EtherWind-N models include DEC LAT support. The EtherWind wireless print server acts as a node on an Ethernet network that offers printing services to other devices. The print server comes preconfigured to run on a LAT network and does not require any additional setup. Each print server has a default node name of XCD_xxxxxx (where "xxxxxx" are the last six digits of the Ethernet address of the unit).
Execute the command file. At the VMS "$" prompt type: @filename where filename is the name of the text file created in step 1. Note: The @filename command can be included in the system startup file so that the procedure is executed automatically when the system is booted. Use the VMS PRINT command with the name of the queue and the file you wish to print as shown below: PRINT/QUEUE=queuename filename Note: queuename is the name of the print queue created in step1.
9 Banyan VINES Network Configuration Note: Only TROY EtherWind-N models include Banyan VINES support. EtherWind wireless print servers support the Banyan VINES IP protocol to allow printers to be shared on a Banyan VINES network. Users on client PC’s send their jobs to any VINES file server running the Banyan PCPrint software, which in turn spools jobs to the print server.
4. Select the desired File server and press ENTER. 5. Select the disk where the print service will reside. 6. Press F10 in response to the message "The service is running but not yet available to users." 7. Type in the maximum number of jobs and maximum size of job for the queue at the Configure Queue screen. Or press F10 for unlimited number and size. 8. If desired choose a default paper format at the Configure Paper Formats screen, otherwise press F10 to select the default settings. 9.
10 PrintraNet Internet Printing Configuration TROY's PrintraNet product is a software driver for Windows that allows a PC user at one location to send a print job to a printer connected to an EtherWind wireless print server at a remote location across the Internet in a simple and transparent manner. For example, a user on a PC in New York could print a document directly from his Microsoft Excel application program to a printer in Chicago.
TCP/IP-based mail packages and dial-up Internet Service Providers. If you do not know which method you are using, consult your system manager. 2. Make sure that your E-mail server is capable of sending messages across the Internet. Alternatively, if you are communicating directly from the PC via a modem to an Internet Service Provider, make sure that you have an Internet mail account on the ISP, and that the PC is configured to send E-mail using this account. 3.
5. Select Local Printer or My Computer (not Network Printer) when you are asked how the printer is connected to your computer. 6. You will also need to know the following - The manufacturer and model of the printer at the remote site (for example, Hewlett-Packard LaserJet 5). In some cases, you will need to provide a disk with the appropriate printer driver. - The name of the PrintraNet port that you defined for the remote EtherWind print server in step 3 (PNET1 by default). 7. With PrintraNet 2.
Configuring the Remote TROY Print Server The next step is to configure the EtherWind print server at the remote site. The remote print server can be configured with TROY's XAdmin32 Windows configuration utility, or with the EtherWind WebXAdmin browser-based facility. Before configuring the print server to receive PrintraNet print jobs, check the following: 1.
4. Enter the mailbox name for the remote EtherWind print server. Usually this will be the first part of the E-mail address that you entered in step 3 of the Installing the Software on the Windows PC at the Local Site section (for example, if the E-mail address of the remote print server is emailprinter@xyz, then the mailbox name would be emailprinter. 5. Enter the password for the mailbox, if any. 6. The print server is configured by default to poll the POP3 server every 30 seconds.
If you get an SMTP error when using a WINSOCK connection, you may need to configure the hosts file on your Windows system. To do this create a file named HOSTS in the \WINDOWS\SYSTEM directory (or edit this file if it already exists) and add an entry for your mail server similar to the following using the DOS editor (substitute the actual IP address and name of your SMTP mail server): 192.189.207.222 mail.troy.
11 Troubleshooting and Maintenance Troubleshooting Printing Problems ◗ First, check the printer to be sure it is online, and has paper and ink or toner. ◗ If the printer is working fine, test the connection between the printer and the print server by pushing the test button on the back of the printer for less than 5 seconds. Note: The test page will work on most printers, but not on some inkjet printers. The test page will work on PCL, Postscript and some others like Epson and HP inkjets.
server without an access point. See the documentation for your wireless adapter for details. ◗ If you are using WEP (Wired Equivalent Privacy) encryption or security on your wireless network, you will need to temporarily disable WEP on your PC in order to configure the print server. If you are using an access point with WEP enabled and it does not allow non-wep clients to communicate with other non-wep clients, then you will also need to temporarily change the wireless mode of your computer to Ad-hoc (802.
Wireless Server Configuration Screen Fields Listed below is a description of each of the fields displayed on the Wireless Server Configuration screen and reasonable values for that field. Once these are all set, click OK to close the Configuration Screen and write the changes to the Server. If you decide NOT to CHANGE the values, select CANCEL to close the Configuration Screen and revert to the prior values. Server Name This is the name of the wireless print server.
Subnet Mask Companies often have ranges of IP Addresses that can be described by one or more Masks. For example, a mask of 255.255.255.0 allows variation in the last position only. (The first three positions are fixed. The last position can be any value between 1 and 255.) Larger organizations may have masks of 255.255.0.0 -the first two positions are static and the last two positions are variable. If the IP Address is set automatically, this mask may also be defined automatically.
Wireless Mode ◗ Ad-Hoc (sometimes referred to as Peer-to-Peer, Computer-to-Computer, 802.11 Ad-Hoc, or IBSS compliant Ad-Hoc) modes are used when your wireless enabled PC is printing straight to the printer. ◗ Infrastructure mode is used when you have an Access point or base station as the hub of your wireless network. ◗ Pseudo Ad-Hoc is only used for testing and some older 802.11b implementations of Ad-Hoc. Auto mode attempts connection with each of the other methods in turn.
2. Right-Click on the print server to be upgraded in the list, and select Load Firmware. 3. If you are using TCP/IP to upgrade, select TFTP PUT from this host. If you are upgrading using IPX/SPX on a NetWare network to upgrade, select Netware GET from a server (If you are using Netware to upgrade, you need to put the .bin firmware file in the LOGIN directory of the Netware server). Click OK. 4.
file you downloaded. Click Load. The firmware on your EtherWind will be upgraded to the new version. If you selected Netware GET from a server in step 3, enter the configuration password (default is ACCESS). Enter the name of the Netware server where you saved the .bin file as the Host Name. Enter the name of the firmware file for File. Click OK. The firmware on your EtherWind will be upgraded to the new version.
Uninstalling the EtherWind Wireless Software On Macintosh Systems, simply delete the directory that you installed the software on. Follow the instructions to uninstall the EtherWind utilities on Windows systems: 1. Click the Start Menu, go to Settings, and select Control Panel. 2. Double-Click Add/Remove Programs. 3. Select EtherWind 802.11b Wireless Print Server from the list and click Change/Remove. 4. Select Remove and follow the on-screen instructions. The software should now be removed from the system.
12 Where to Get Help TROY offers several customer support options to assist you in the event you experience difficulties with your EtherWind, including telephone support, repair services, extended warranty, and advance replacement. Worldwide Web Support The TROY worldwide web site provides a quick and easy way to answer many common technical questions. It includes a wide variety of technical support tips, as well as copies of product manuals, product literature, and firmware load images.
Returning Products If you need to return a TROY product for any reason (failures, incorrect shipments, etc.), first contact TROY at +1 (208) 955-1000 (Americas, Asia, and Australia) or +49 (0) 7032-9454-21 (Europe and Africa) and request a Return Authorization Number from the TROY Technical Support Group. Make sure that you put this number on the outside of the shipping container you use to return the product and (if out-of-warranty) on your purchase order.
13 Notices FCC Compliance Statement For United States Users This equipment has been tested and found to comply within the limits for a Class B digital device pursuant to Part 15 of the FCC Rules. These limits are designed to provide reasonable protection against harmful interference in a residential installation.
bility of the user to obtain and use a shielded equipment interface cable with this device. If this equipment has more than one interface connector, do not leave cables connected to unused interfaces. Changes or modifications not expressly approved by the manufacturer could void the user’s authority to operate the equipment.
Operation is subject to the following two conditions: (1) this device may not cause harmful interference, and (2) this device must accept any interference received, including interference that may cause undesired operation. Trade Name: Type of Product: Model TROY 802.11b Print Server EtherWind REGULATORY INFORMATION European Union (EU) TROY hereby declares that the 802.
Operation is subject to the following two conditions: (1) This device may not cause harmful interference, and (2) this device must accept any interference received, including interference that may cause undesired operation. Note that any changes or modifications to this equipment not expressly approved by the manufacturer may void the FCC authorization to operate this equipment.