
Operating Guide


9Section 3 — controlS & operation
Engaging the Drive
Lift up slightly on the handle to allow the
rubber paddles on the auger to contact the
pavement and propel the snow thrower
forward. Pushing downward on the handle will
raise the auger off the ground and stop the
forward motion.
NOTE: Excessive upward pressure on the handle
will result in premature wear on the rubber auger
blades which will not be covered by the warranty.
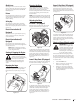
Adjusting the Chute
E-Z Chute™ (If Equipped)
Rotate the chute assembly to the left or right
using the chute handle (a). See Figure 3-5.
(a)
(c)
(b)
Figure 3-5
To adjust the pitch, stop the engine, remove the
safety key and loosen the wing knob (b) on the
side of the chute assembly and pivot the upper
portion of the chute assembly (c) upward or
downward. Retighten the wing knob (b) once
the desired position has been achieved. See
Figure 3-5.
Lower 2-Way Chute (If Equipped)
Rotate the chute assembly to the left or right using
the chute rotation control (a). See Figure 3-6.
(a)
(b)
(c)
Figure 3-6
To adjust the pitch, stop the engine, remove the
safety key, loosen the wing knob (b) on the side
of the chute assembly and pivot the upper
portion of the chute assembly (c) upward or
downward. Retighten the wing knob (b) once
the desired position has been achieved. See
Figure 3-6.
Choke Lever
Activating the choke control closes the choke
plate on carburetor and aids in starting engine.
The choke lever slides between the RUN and
CHOKE positions.
Primer
Pressing the primer, making sure to cover the
vent hole when pushing, forces fuel directly
into the engine’s carburetor to aid in cold-
weather starting.
Safety Key
The safety key is a safety device. It must be
fully inserted in order for the engine to start.
Remove the safety key when the snow thrower
is not in use.
Electric Starter Outlet (If
Equipped)
Requires the use of a grounded, three-prong
outdoor extension cord and a 120V power
source/wall outlet.
Electric Starter Button (If
Equipped)
Pressing the electric starter button engages
the engine’s electric starter when plugged into
a 120V power source.
NOTE: Refer to the Engine Operator’s
Manual for more information on how to
use the Engine Controls.
Starting & Stopping the Engine
WARNING! Always keep hands
and feet clear of moving parts.
Do not use a pressurized starting
fluid. Vapors are flammable.
Refer to the Engine Operator’s Manual for
instructions on starting and stopping the
engine.
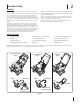
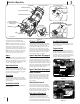
Engaging the Auger
To engage the auger and start throwing snow,
squeeze the auger control lever against the
handle. Release to stop the auger. See Figure
3-4.
Figure 3-4
Upper 2-Way Chute (If Equipped)
To increase the angle/distance snow is thrown,
pull up/back on the chute tilt control (a). To
decrease the angle/distance snow is thrown,
push down/forward on the chute tilt control (a).
See Figure 3-7.
(a)
(b)
Figure 3-7
To rotate the chute to the left, pull the trigger
and turn the chute rotation control (b) to the
left. To rotate the chute to the right, pull the
trigger and turn the chute rotation control (b)
to the right. See Figure 3-7.
Clearing a Clogged Chute Assembly
WARNING! Never use your
hands to clear a clogged chute
assembly. Shut OFF engine and
remain behind handles until all
moving parts have stopped
before using the clean-out tool
to clear the chute assembly.
Hand contact with the rotating auger inside
the chute assembly is the most common cause
of injury associated with snow throwers. Never
use your hand to clean out the chute assembly.
To clear the chute:
1. SHUT THE ENGINE OFF!
2. Wait 10 seconds to be sure the auger
blades have stopped rotating.
3. Always use a clean-out tool (Part No.
931-2643), not your hands. Refer to the
separate supplement for clean-out tool
ordering information.