
Operating Guide


12 Section 4— Product care
10. Squeeze the auger control lever against
the upper handle and reinstall the belt
cover removed in Step 4.
11. Remove the board from the auger and
chute.
12. Tip the snow thrower back to the
operating position and pull the recoil
starter handle a few times to see if it is
difficult to pull.
13. If the recoil starter handle is difficult to
pull, remove the spark plug as instructed
in your Engine Operator’s Manual and
pull the recoil starter handle several
times to ensure that any oil trapped in
the head is removed.
CAUTION: Oil may come out
of the spark plug hole when it is
removed and the recoil starter
handle is pulled.
14. Inspect the spark plug as instructed in
your Engine Operator’s Manual. If it is
wet, clean off any oil before re-installing.
Replacing the Auger Paddles
The snow thrower auger’s rubber paddles are
subject to wear and should be replaced if any
signs of excessive wear are present.
CAUTION: Do NOT allow the
auger’s rubber paddles to wear
to the point where portions of
the metal auger itself can come
in contact with the pavement.
Doing so can result in serious
damage to your snow thrower.
1. Run the snow thrower until the fuel tank
is empty.
2. Pull the recoil starter handle until
resistance is felt. Then tip the snow
thrower back until it rests on the
handles.
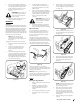
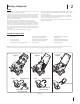
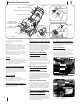
3. Remove the existing rubber paddles by
un-threading the hex washer screws (a)
which secure them to the auger. See
Figure 4-7.
(a)
(a)
(a)
(a)
(a)
(a)
Figure 4-7
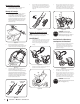
NOTE: The auger paddles should be
replaced one at a time so that the auger
still attached can be used as an example
for positioning and re-installing the new
auger.
4. Secure the replacement rubber paddles
to the auger using the hex washer
screws (a) removed in Step 3.
Replacing Shave Plate
1. The shave plate is attached to the
bottom of the auger housing and is
subject to wear. It should be checked
periodically. There are two wearing
edges and the shave plate can be
reversed.
2. Run the snow thrower until the fuel tank
is empty.
3. Pull the recoil starter handle until
resistance is felt. Then tip the snow
thrower back until it rests on the
handles.
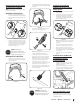
4. Remove the four carriage screws (b) and
flange lock nuts (a) which attach it to the
snow thrower housing. See Figure 4-2.
5. Install the new shave plate, making sure
the heads of the carriage screws (b) are
on the inside of the housing.
6. Adjust the shave plate as instructed in
Shave Plate Adjustment on page 11.
7. Tighten securely once adjusted.