
Operating Guide


11Section 4 — Product care
6. If the recoil starter handle is difficult to
pull, remove the spark plug as instructed
in your Engine Operator’s Manual and
pull the handle several times to ensure
that any oil trapped in the head is
removed.
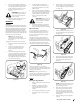
CAUTION: Oil may come out
of the spark plug hole when it is
removed and the recoil starter
handle is pulled.
7. Inspect the spark plug. If it is wet, clean
off any oil before re-installing.
Adjustments
Shave Plate
To check the adjustment of the shave plate, place
the snow thrower on a level surface. The wheels,
shave plate and auger should all contact the level
surface. Note that if the shave plate is adjusted
too high, snow may blow under the housing. If
the shave plate wears out excessively, or the snow
thrower does not self-propel, the shave plate may
be too low and needs to be adjusted.
NOTE: On new snow throwers or
machines with a new shave plate
installed, the auger may be slightly off
the ground.
To adjust the shave plate proceed as follows:
1. Run the snow thrower until the fuel tank
is empty.
2. Pull the recoil starter handle until
resistance is felt. Then tip the snow
thrower back until it rests on the
handles.
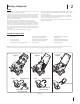
3. Loosen the four flange lock nuts (a) and
carriage screws (b) which secure the shave
plate to the housing. See Figure 4-2. Move
the shave plate to the desired position
and retighten the flange lock nuts (a) and
carriage screws (b) securely.
(a)
(b)
Figure 4-2
4. Tip the snow thrower back to the
operating position and pull the recoil
starter handle a few times to see if it is
difficult to pull.
5. If the recoil starter handle is difficult to
pull, remove the spark plug as instructed
in your Engine Operator’s Manual and
pull the handle several times to ensure
that any oil trapped in the head is
removed.
CAUTION: Oil may come out
of the spark plug hole when it is
removed and the recoil starter
handle is pulled.
6. Inspect the spark plug as instructed in
your Engine Operator’s Manual. If it is
wet, clean off any oil before re-installing.
Auger Control Cable
As a result of both the control cable and
the auger drive belt stretching due to wear,
periodic adjustments may be necessary. If
the auger seems to hesitate when rotating,
proceed as follows:
The upper hole in the auger control lever
provides for an adjustment in cable tension.
To adjust, disconnect the end of control cable
from the bottom hole in the auger control lever
and reinsert it in the upper hole. Insert the
cable from the outside as shown in Figure 4-3.
Figure 4-3
Test the snow thrower to see if there is a
noticeable difference. If after the adjustment to
the control cable the auger still hesitates when
rotating, replace the belt.
NOTE: When the auger control lever is
released, the auger should stop rotating. If the
auger continues rotating after the adjustment,
contact an authorized service center.
Service
Replacing the Auger Drive Belt
1. Run the snow thrower until the fuel tank
is empty.
2. Pull the recoil starter handle until
resistance is felt. Then tip the snow
thrower back until it rests on the
handles.
3. Slide a board up through the auger and
through the chute to secure the auger
in place.
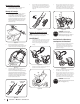
4. Remove the belt cover by removing the
two hex washer screws (a) and one hex
lock screw (b) that secure it to the frame.
See Figure 4-4.
(b)
(a)
(a)
Figure 4-4
5. Remove the flange nut (a) that secures
the auger pulley (b) to the auger shaft (c).
See Figure 4-5.
(a)
(b)
(c)
Figure 4-5
6. Remove the auger pulley and the belt.
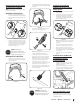
7. Route the belt around the drive pulley (a)
and under the idler pulley (b). See
Figure 4-6.
(c)
(d)
(b)
(e)
(a)
Figure 4-6
NOTE: Installing the belt may be easier
if the auger control lever is squeezed
against the upper handle.
8. Route the end of the belt around the
auger pulley (c) and slide the pulley
back on to the auger shaft. It may be
necessary to push down on the idler
pulley to get the auger pulley under the
belt keeper (d).
9. Replace the flange nut (e) and tighten
securely.