
Operating Guide


Assembly & Set-Up
3
7
Assembly
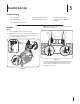
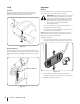
Handle
1MBDFUIFTIJGUMFWFSJOUIF'PSXBSEQPTJUJPO
2. 0CTFSWFUIFMPXFSSFBSBSFBPGUIFTOPXUISPXFSUPCFTVSF
both cables are aligned with roller guides before pivoting
UIFIBOEMFVQXBSE4FF'JHVSF
Figure 3-1
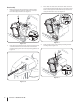
NOTE: Make certain the cables are seated properly in the
roller guides. See Figure 3-2.
Figure 3-2
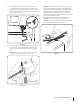
3. Secure the handle by tightening the plastic knob located
on both the left and right sides of the handle. Remove
and discard any rubber bands, if present. They are for
packaging purposes only.
Contents of Carton
t 0OF4OPX5ISPXFS t Replacement Auger Shear Pins t 0OF$IVUF$POUSPM3PE
t 0OF$IVUF"TTFNCMZ t 0OF1SPEVDU3FHJTUSBUJPO$BSE t 0OF4OPX5ISPXFS0QFSBUPST
Manual
t 0OF&OHJOF0QFSBUPST.BOVBM