
Operating Guide


11SECTION 3 — ASSEMBLY & SET-UP
Auger Control
WARNING! Prior to operating your snow thrower,
carefully read and follow all instructions below.
Perform all adjustments to verify your snow thrower
is operating safely and properly.
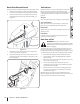
Check the adjustment of the auger control as follows:
When the auger control is released and in the disengaged
iVQwQPTJUJPOUIFDBCMFTIPVMEIBWFWFSZMJUUMFTMBDL*U
TIPVME/05CFUJHIU
2. In a well-ventilated area, start the snow thrower engine.
3FGFSUP&OHJOF0QFSBUPST.BOVBM
3. 8IJMFTUBOEJOHJOUIFPQFSBUPSTQPTJUJPOCFIJOEUIFTOPX
thrower), engage the auger.
Allow the auger to remain engaged for approximately ten
TFDPOETCFGPSFSFMFBTJOHUIFBVHFSDPOUSPM3FQFBUUIJT
several times.
5. With the throttle control in the FAST (rabbit) position and
UIFBVHFSDPOUSPMJOUIFEJTFOHBHFEiVQwQPTJUJPOXBMLUP
the front of the machine.
Confirm that the auger has completely stopped rotating
BOETIPXT/0TJHOTPGNPUJPO*GUIFBVHFSTIPXT"/:
TJHOTPGSPUBUJOHJNNFEJBUFMZSFUVSOUPUIFPQFSBUPST
position and shut off the engine. Wait for ALL moving parts
to stop before re-adjusting the auger control.
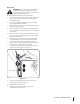
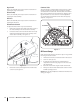
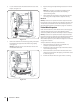
7. To readjust the control cable, loosen the upper hex screw
POUIFBVHFSDBCMFCSBDLFU4FF'JHVSF
Figure 3-13
8. Position the bracket upward to provide more slack (or
downward to increase cable tension).
Retighten the upper hex screw.
3FQFBUTUFQTUISPVHIBCPWFUPWFSJGZQSPQFS
adjustment has been achieved.