Tronxy 3D Printer X1 Operating Instruction
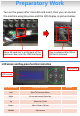
Preparatory Work Turn on the power after micro SD card insert, then you can control the machine using key-press and the LCD display, as picture below: Micro SD card slot is at the back of the electronic box, near the USB Interfaces. Plug in adaptor after Micro SD card is inserted.
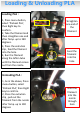
Loading & Unloading PLA Loading PLA : 1, Press menu button, select ‘Preheat PLA’, then Right key to confirm. 2, Take the filament and then straighten one end after Temp. up to 190 degrees. 3, Press the extrution clip , feed the filament into the hole. 4, Run the filament along the teflon tube until the filament comes out from the nozzle.
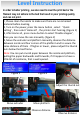
Level Instruction In order to better printing , we also need to level the print bed or the filament may not adhere to the bed that result in poor printing quality and can not print. 1, Please clean the nozzle to make sure there are no remained material before leveling. 2, Turn on the power, press the menu button , select‘Quick setting’ , then select ‘Home all’ , the printer start homing. (Figure 1) 3, After Home all , press menu button to select ‘Disable stepper’, then you can move the axis manually.
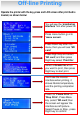
Off-line Printing Operate the printer with the key-press and LCD screen after print bed is leveled, as shown below: You will see the ‘monitoring interface’ first after power on Press menu button go into ‘menu screen’. Press Down key after into menu, then you will see ‘SD card’ Press Right key and select ‘SD card’,and then press Right key select ‘Print file’. Select a Gcode file which you want to print, then press Right key to start print.