
User Manual

2
FIG. 1
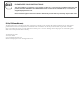
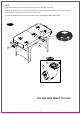
7. Lift the table assembly from the floor with two adults, turn it over, and set table on its leg in the location where you
will play. Go back and make sure that all connections are tight.
HOLD TABLE
CABINET
DO NOT
HOLD THE
LEGS
DO NOT LEAN THE
TABLE ON ITS LEGS!
CAUTION: Two adults are recommended to turn the table over as shown.
1. Lift the table off the ground.
2. Turn the table over.
3. Place it on all four feet at the same time on the ground.
4
2
2
3
3
5
4
13
6
7
Assembly Instructions
1
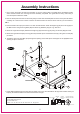
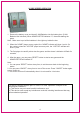
1. Find a clean, level place to begin the assembly of your Air Hockey Table. The table will be assembled upside
down and then turned over on its legs once the assembly completed. This game table is heavy, and turning it
over will require at least two adults.
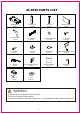
2. Remove all the parts from the box and verify that you have all of the listed parts as shown on the parts list below.
Carefully cut or tear the four corners of the box so that the bottom of the box can be used as your work surface.
FIG.1
3. Place the Main Frame (#1) face down on a clean and flat surface. Attach the Right Leg (#2) and Left Leg (#3) to
the Main Frame using three Leg Bolts (#6) and three Leg Washers (#7) per Leg. See FIG.1.
4. Attach the Leg End Panel (#4) between the Right Leg (#2) and Left Leg (#3) using six Screws (#8) per Panel.
5. Attach the Leg Side Panel (#5) to the leg (#2 or #3) and side apron of the Main Frame (#1) using four Screws (#8)
per Panel.
6. Thread the wire from Goal Box (#12) through the opening of the End Apron and support of the playfield to the
opening of apron. See FIG.1.
8
12
2A
15
Sensor Wire