
User Manual

©
2016 Escalade Sports
For Customer Service Call 1-888-996-2729
5
All Rights Reserved.
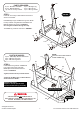
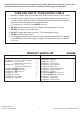
PARTS REQUIRED:
12 pcs - H1 Allen Head Bolt 2 pcs - P2 Right Leg
12 pcs - H2 Flat Washer 2 pcs - P3 Left Leg
1 pc - P1 Air Hockey Cabinet 4 pcs - P6 Leg Leveler
FIGURE 1
STEP 1:
Leave P1 Air Hockey Table Cabinet face down in
carton to assemble.
Install P2 Right Legs and P3 Left Legs onto P1 Air
Hockey Cabinet using H1 Allen Head Bolts and
H2 Flat Washers as shown in FIGURE 1.
Do not tighten H1 Bolts during this step.
Thread P6 Leg Levelers as shown in FIGURE 1.
P6
P2
P3
P3
P2
H2
H1
P1
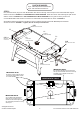
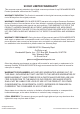
PARTS REQUIRED:
16 pcs - H4 Phillips Round Head Screw
2 pcs - P4 End Leg Panel
2 pcs - P5 Side Leg Panel
STEP 2:
Install P4 End Leg Panels and P5 Side
Leg Panels using pilot holes with
H4 Phillips Round Head Screws as
shown in FIGURE 2.
Tighten, But do not strip out H4 Screws.
Tighten all H1 Bolts with T1 Allen Wrench
at this time from STEP 1.
H2
H1
H4
H4
P5
P5
P4
P4
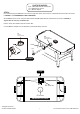
THIS STEP REQUIRES TWO OR MORE ADULTS.
VERY CAREFULLY TURN THE TABLE OVER AND SET IT ON
ITS LEGS. BE CAREFUL, THE TABLE IS HEAVY.
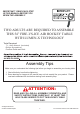
IMPORTANT NOTE:
Graphics must be upside down
and face outside during assembly.
Graphics must be upside
down and face outside.
NOTE:
Pilot holes are located inside of
the P2 and P3 Legs.
P2
P3
P2
P3
FIGURE 2