
Installation Manual User Manual


13
MoDEl Ft7000 EDU assEMbly FiElD installation GUiDE
Installation of the EDU Bezel
rEMoval oF tHE baCKEr platE anD ExistinG bEzEls
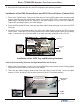
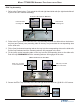
1. Loosen the 4 (four) screws on the 5” Backer plate. Do not
remove these screws at this time.
2. Lift the 5 in. Backer plate off of the screws and remove it
from the 4 (four) mounting screws.
3. Loosen the 4 (four) screws on the 3” Backer plate. Do not
remove these screws at this time.
4. Lift the 3 in. Backer plate off of the screws and remove it
from the 4 (four) mounting screws.
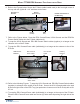
6. Remove the 4 (four) mounting screws that were retaining
the 3” Backer plate, and remove the existing 3 in. Bezel.
Retain these screws.
7. Remove the 4 (four) mounting screws that were retain-
ing the 5” Backer plate, and remove the existing 5“ Bezel.
Retain these screws.
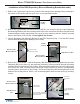
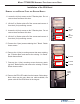
5” Bezel
3” Bezel
1” Bezel
Cable
Clamp
5. Remove the 2 (two) screws retaining the 1” Bezel. Retain
these screws.
8. Remove the EDU LED cable from the lowest Cable clamp.
Note: there may be more than one cable available, the
power cable for the EDU Bezel is the longest.
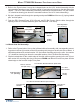
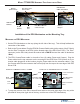
5in
Backer
Plate
3in
Backer
Plate
Mounting
Screws
Mounting
Screws
Mounting
Screws
Mounting
Screws