MODEL 97XX-SERIES CASH DISPENSER OPERATION MANUAL VERSION 2.0 TDN 07102-00042B 03/2003 CORPORATE HEADQUARTERS: RMA (RETURN MATERIAL AUTHORIZATION) RETURN ADDRESS: 522 E. Railroad Street Long Beach, MS 39560 PHONE: (228) 868-1317 FAX: (228) 868-0437 21405 B Street Long Beach, MS 39560 COPYRIGHT NOTICE Copyright © Delaware Capital Formation, Inc., 2002, 2003. All rights reserved.
CASH DISPENSER OPERATION MANUAL - MODEL 97XX-SERIES DISCLAIMER The manufacturer of the Cash Dispenser product(s) dewcribed herein makes no representations or warranties, either expressed or implied, by or with respect to anything in this manual, and shall not be liable for any implied warranties of fitness for a particular purpose or for any indirect, special or consequential damages.
CASH DISPENSER OPERATION MANUAL - MODEL 97XX-SERIES Party Lines: The Model 97XX series Cash Dispenser must not be used on party lines. Alarm Equipment: The Model 97XX series Cash Dispenser should have its own dedicated phone line. Do not install the 97XX on the same line as alarm equipment. Electrical Safety Advisory: telephone companies report that electrical surges, typically lightening transients, are very destructive to customer equipment connected to AC power sources.
CASH DISPENSER OPERATION MANUAL - MODEL 97XX-SERIES AVIS: L’étiquette d’Industrie Canada identific le matériel homologué. Cette étiquette certifie que le matériel est conforme aux normes de protection, d’exploitation et de sécurité des réseaux de télécommunications, comme le prescrivent les documents concernant les exigences techniques relatives au matériel terminal. Le Ministère n’assure toutefois pas que le matériel fonctionnera à la satisfaction de l’utilisateur.
CASH DISPENSER OPERATION MANUAL - MODEL 97XX-SERIES EMISSIONS (EMI) This device complies with Part 15 of the FCC rules. Operation is subject to the following two (2) conditions: 1) This device may not cause harmful interference. 2) This device must accept any interference received, including interference that may cause undesired operation. Note: This equipment has been tested and found to comply with the limits for a Class A digital device, pursuant to Part 15 of FCC Rules.
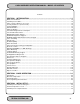
CASH DISPENSER OPERATION MANUAL - MODEL 97XX-SERIES Contents SECTION 1 - INTRODUCTION .............................................................................................. 1-1 What’s in This Manual .......................................................................................................................................... 1-2 Cash Dispenser Families .....................................................................................................................................
CASH DISPENSER OPERATION MANUAL - MODEL 97XX-SERIES SECTION 4 - CURRENCY HANDLING ................................................................................. 4-1 New or Uncirculated Note Defects ....................................................................................................................... 4-3 Preparing Notes ...................................................................................................................................................
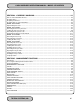
CASH DISPENSER OPERATION MANUAL - MODEL 97XX-SERIES FORMAT GRAPHIC MEMORY .......................................................................................................................... 5-22 TEST RECEIPT PRINTER ................................................................................................................................. 5-23 VERSION #’S .............................................................................................................................................
CASH DISPENSER OPERATION MANUAL - MODEL 97XX-SERIES SURCHARGE MODE ......................................................................................................................................... 5-73 SURCHARGE PERCENT .................................................................................................................................. 5-74 ENABLE/DISABLE SURCHARGE .....................................................................................................................
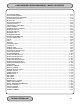
CASH DISPENSER OPERATION MANUAL - MODEL 97XX-SERIES BACKUP NUMBER .......................................................................................................................................... 5-128 ALARM NUMBERS .......................................................................................................................................... 5-129 PRIMARY ALARM NUMBER ........................................................................................................................
CASH DISPENSER OPERATION MANUAL - MODEL 97XX-SERIES APPENDIX A - MECHANICAL LOCK ................................................................................... A-1 About the Dial ....................................................................................................................................................... A-2 To Lock .................................................................................................................................................................
SECTION 1 - INTRODUCTION
OPERATION MANUAL - MODEL 97XX-Series SECTION 1 - INTRODUCTION What’s in This Manual This manual describes the operating features of the Model 97XXseries Cash Dispenser family. The setup and operating procedures given in this manual are generally applicable to any Model 97XX-series Cash Dispenser.
OPERATION MANUAL - MODEL 97XX-Series SECTION 1 - INTRODUCTION Feature Highlights Important features of the Model 97XX Cash Dispenser family are highlighted in the following list: ! Supports dial-up, LAN-based, or wireless (CDPD, VSAT and Radio-Pad) communications. ! Satisfies Americans with Disabilities Act (ADA) specifications for height and access. ! Audio output provides user-action feedback, as well as headphone accessible audible prompting for sight-impaired customers.
OPERATION MANUAL - MODEL 97XX-Series SECTION 1 - INTRODUCTION Standard Features Standard features of the 97XX Cash Dispenser are summarized in the following paragraphs. 256-Color Display The terminal LCD screen can display text and graphics in 256 colors, providing a richer visual experience to the user. Optional monochrome displays supported. Selectable Background Screen-Graphic This feature places a user-defined graphical screen or image on the screen background.
OPERATION MANUAL - MODEL 97XX-Series SECTION 1 - INTRODUCTION DATAPAK 3000 Communications Protocol Support The DATAPAK 3000 protocol enables the ATM to interface with designated DATAPAK intermediaries (in the Canadian market region), who in turn provide connectivity to the appropriate transaction processor. NOTE: This feature is only available for use in the Canadian market.
OPERATION MANUAL - MODEL 97XX-Series SECTION 1 - INTRODUCTION 3.) Scheduled transfer of electronic journal data to a remote Triton Connect host computer. This time can be set at the terminal or via Triton Connect Transaction and Account Type Configuration This feature enables the terminal operator to select the types of transactions (transfers or balance inquiries) or accounts (savings or credit card) that will be presented to the customer.
OPERATION MANUAL - MODEL 97XX-Series SECTION 1 - INTRODUCTION If the printed copy of a group of records is accidentally lost or destroyed, or the receipt printer runs out of paper before completely printing a group of records, it is a simple matter to reprint them, since they remain stored in the journal (until overwritten, as explained earlier).
OPERATION MANUAL - MODEL 97XX-Series SECTION 1 - INTRODUCTION Graphics Memory The terminal is equipped with dedicated Graphics Memory, which enables graphical Ad screens to be downloaded and displayed on the Cash Dispenser’s LCD screen. AD Screens An Ad Screen is a promotional or advertising graphic that is displayed on the Cash Dispenser LCD screen. It is displayed alternately with the Customer Welcome screen graphic (while the terminal is idle) and while a customer transaction is being processed.
OPERATION MANUAL - MODEL 97XX-Series SECTION 1 - INTRODUCTION The LEVEL approach awards a coupon to each customer that withdraws an amount equal to or greater than a specific dollar value that is set in the Management Functions. When a coupon is awarded, the cash dispenser beeps a distinctive tone, displays a message to alert the customer and prints a coupon after the money is dispensed (but before the customer receipt is printed).
OPERATION MANUAL - MODEL 97XX-Series SECTION 1 - INTRODUCTION With this data, customer transaction reports can be developed that make it easy to monitor your Cash Dispenser’s performance, schedule cash replenishment, and provide instant status for service dispatch should a problem occur. Extended Amounts The standard length of a currency amount entry field is 6 characters in U. S. domestic versions of the terminal operating software.
SECTION 2 - BASIC OPERATION
OPERATION MANUAL - MODEL 97XX-Series SECTION 2 - BASIC OPERATION Introduction This chapter describes the basic operation of the terminal. The following topics are covered: 1.) Menu-Based Operation. This section gives a general overview of the terminal display interface. 2.) Keypad Operation. Describes the layout and use of the display and alphanumeric keypads. 3.) Changing to Management Functions. Describes how to access the terminal’s Management Functions.
OPERATION MANUAL - MODEL 97XX-Series SECTION 2 - BASIC OPERATION Keypad Operation LCD Screen Receipt Chute Menu Keys See Figure 2-2. The user interface of the terminal consists of the LCD display and 24 rubber keys on three keypads. The primary menu navigation keys are arranged in two four-key groups, one group on either side of the LCD display. The main keypad consists of 10 alphanumeric keys, two arrow keys and four large control keys, all located in a 16-key group beneath the LCD display.
OPERATION MANUAL - MODEL 97XX-Series SECTION 2 - BASIC OPERATION The key can be used to clear an entry and start over. The key will abort the current transaction. The keys located beside the display are called the Screen Keys. They are used in the selection of menu functions. A Screen Key is only active when a function or menu option name is displayed beside the key.
OPERATION MANUAL - MODEL 97XX-Series SECTION 2 - BASIC OPERATION Accessing Management Functions You can enter the terminal MANAGEMENT FUNCTIONS main menu screen by performing any one of the three procedures listed below: 1. If the Customer Welcome screen is being displayed, press and hold down the key; while holding down the key, press the <1> key. Release both keys. After a moment the Top Menu screen (shown in Figure 2-1) will be displayed. Select the MANAGEMENT FUNCTIONS option. 2.
OPERATION MANUAL - MODEL 97XX-Series SECTION 2 - BASIC OPERATION The two options presented in such instances will be RESET ERROR and MANAGEMENT FUNCTIONS. Press RESET ERROR to attempt to clear the error, or enter the MANAGEMENT FUNCTIONS area, as desired. See Section 8, Error Recovery, for more information. TRITON SYSTEMS, INC.
SECTION 3 - INITIAL SETUP
OPERATION MANUAL - MODEL 97XX-Series SECTION 3 - INITIAL SETUP Cash Dispenser Parameter Categories There are a number of setup parameters that must be configured when a Cash Dispenser is installed.
OPERATION MANUAL - MODEL 97XX-Series SECTION 3 - INITIAL SETUP Parameter Importance Levels Critical The parameters with this importance level are primarily those that represent the minimum number of parameters that must be correctly configured in order to process transactions. In addition, because of the importance of protecting access to the Cash Dispenser Management Functions, the access password parameters are also included in this category.
OPERATION MANUAL - MODEL 97XX-Series SECTION 3 - INITIAL SETUP Cash Dispenser Setup Parameters Tables 3-1 through 3-4 list Critical, Required, Important and User Defined parameters, respectively. Each table lists the applicable Cash Dispenser model series (9700+, for example, represents the 9700-Series product line), Parameter Category, Name and Page Number (in Section 5, Management Functions) of each parameter listed. In most cases the factory default value for each parameter is also provided.
OPERATION MANUAL - MODEL 97XX-Series TAB LE 3-1 - SECTION 3 - INITIAL SETUP C R ITIC AL SETU P PAR AMETER S FAC TORY D EFAU LT PAGE N O. MASTER PASSWORD 123456 5-41 AD MINISTRATION PASSWORD 987654 5-42 SET TER MIN AL # NONE 5-71 C ASSETTE MU LTIPLE AMOU N T $0.
OPERATION MANUAL - MODEL 97XX-Series TAB LE 3-2 - SECTION 3 - INITIAL SETUP R EQU IR ED SETU P PAR AMETER S FAC TORY D EFAU LT PAGE N O.
OPERATION MANUAL - MODEL 97XX-Series TAB LE 3-3 - SECTION 3 - INITIAL SETUP IMPOR TAN T SETU P PAR AMETER S FAC TORY D EFAU LT PAGE N O.
OPERATION MANUAL - MODEL 97XX-Series TAB LE 3-4 - SECTION 3 - INITIAL SETUP U SER -D EFIN ED SETU P PAR AMETER S FAC TORY D EFAU LT PAGE N O. ENGLISH/INGLES * 5-32 LANGUAGES SPANISH/ESPANOL * 5-33 X LANGUAGES ENABLE/D ISABLE C UST.
SECTION 4 - CURRENCY HANDLING
SECTION 4 - CURRENCY HANDLING OPERATION MANUAL - MODEL 97XX-Series Introduction LEARNING NOTES The purpose of this section of the manual is to describe the procedures for: (1) Removing and replacing note cassettes, (2) Loading cassettes, and (3) Removing and replacing the Reject Notes (as applicable). Information concerning note handling and quality issues are explained where appropriate.
SECTION 4 - CURRENCY HANDLING OPERATION MANUAL - MODEL 97XX-Series • Tape on the surface of the currency used for repairing, patching or any other purpose. • Staples, pins, or any other foreign body attached to the notes. • Corner folds of a size greater than 1/2” on either axis. • Two or more notes joined by any means. • Excessively crumpled or crinkled. Preparing New or Uncirculated Notes • Remove the band around each bundle of notes.
OPERATION MANUAL - MODEL 97XX-Series SECTION 4 - CURRENCY HANDLING MODEL 9700-SERIES Replenishing Cassettes 1. Open the Cash Dispenser security container via the enclosure lock on the front of the unit. The combination lock must then be opened to gain access to the security container. 2. To remove the cassette, grasp the handle on the front of the Cash Dispenser mechanism with one hand while holding the mechanism in place with the other hand and pull sharply.
SECTION 4 - CURRENCY HANDLING OPERATION MANUAL - MODEL 97XX-Series 6. Pull the packer plate to the rear of the cassette (away from the shutter) until it locks to the white packer plate latch. It will be necessary to push down on the packer plate latch to lock the packer plate in place. The packer plate will be held in this position until the lid is closed or the latch is released by pushing it down. Be careful not to release the packer plate onto your fingers. 7. Place the currency into the cassette.
OPERATION MANUAL - MODEL 97XX-Series SECTION 4 - CURRENCY HANDLING Installing cassette. Place old notes together. 11. Close and lock the Cash Dispenser. • Common notes Simply place the prepared bundles in the tray. 8. Make sure the note pile is as even as possible. If necessary, use your hands to smooth and level the pile. Level the note pile. 9. Release the packer plate and lower the reject tray and the lid. The cassette can now be removed from the loading tray by sliding it away from the probes.
OPERATION MANUAL - MODEL 97XX-Series SECTION 4 - CURRENCY HANDLING MODEL 9705-SERIES Removing the Currency Cassette 1. Ensure the terminal is not in use before removing the note cassette! Removing the note cassette while the machine is in operation (processing customer transactions, performing close operations, etc.) can cause the terminal to enter an “Out of Service” condition! 4. To gain access to the cassettes, rotate the mechanism mounting platform to the service position.
OPERATION MANUAL - MODEL 97XX-Series SECTION 4 - CURRENCY HANDLING Loading the Currency Cassette 1. Unlock the cassette and open the cassette lid using the supplied key. Move the pusher plate to the rear of the cassette (toward the handle). Turn mounting platform to access position. 5. To remove the note cassette, grasp the cassette handle and pull in a firm but controlled manner to release the cassette from the snap catches.
SECTION 4 - CURRENCY HANDLING OPERATION MANUAL - MODEL 97XX-Series • Cupped bundle To avoid dispensing problems caused by cupped bundles, turn all the bundles with the cupped side towards the dispense opening of the note cassette (opposite end from the handle). Pull the packer back. Some cassettes allow the pusherplate to be latched in position using the key-lock. Dispense opening. 2.
OPERATION MANUAL - MODEL 97XX-Series SECTION 4 - CURRENCY HANDLING 5. Close and lock the cassette. Remove the key. Slide the cassette back into its compartment in the dispensing mechanism. Make sure the cassette is fully inserted! You will feel the cassette latch securely into the snap catches. Removing the Reject Cassette The reject tray is located just above the currency cassette in the dispensing mechanism. Follow these steps to remove the reject tray: Place old notes together. • 1.
OPERATION MANUAL - MODEL 97XX-Series 3. Remove any notes in the reject compartment. **WARNING** SECTION 4 - CURRENCY HANDLING If the mechanism uses a slide-rail mounting system, press in on the slide rail locking tab as you slide the mechanism back into the cabinet. 2. Close and lock the security cabinet. DO NOT RECYCLE REJECTED NOTES INTO A CASSETTE! Doing so could cause more rejects and/or currency jams. 4. Close and lock the reject tray. Remove the key.
OPERATION MANUAL - MODEL 97XX-Series SECTION 4 - CURRENCY HANDLING MODEL 9710-SERIES Removing the Note Tray 1. Ensure the terminal is not in use before removing the note tray! Removing the note tray while the machine is in operation (processing customer transactions, performing close operations, etc.) can cause the terminal to enter an “Out of Service” condition! 2. Open the outer fascia panel to gain access to the security container door, using the key lock on the front of the panel.
SECTION 4 - CURRENCY HANDLING OPERATION MANUAL - MODEL 97XX-Series • Slanting pile • To avoid dispensing problems caused by a “slanting” pile, put the notes in neat bundles of no more than ½ to ¾ inches in thickness (100-200 notes). Turn every other bundle around to minimize slanting of the pile (bundle should have the same height on both sides, if possible). Separate the mixed currency into neat bundles of 100-200 notes of each type.
OPERATION MANUAL - MODEL 97XX-Series SECTION 4 - CURRENCY HANDLING Level the note pile. 4. Release the pusher plate against the notes. When loading the note tray to full capacity, make sure that the pusher plate has a leeway of approximately 1/4-inch (5 mm) between the wall plate and the pusher plate . Release packer plate. 5. Using the handle, slide the note tray into the dispensing mechanism. Make sure the note tray is fully inserted! Slide note tray into dispenser mechanism. 6.
OPERATION MANUAL - MODEL 97XX-Series SECTION 4 - CURRENCY HANDLING MODEL 9750-SERIES Removing Note Cassettes 1. UNLOCK the cassettes, using the Cassette Lock/ Unlock procedure in Section 5, Management Functions. 2. Open the outer fascia panel of the security container, using the key lock on the front of the panel. Open the combination lock on the security container door and open the door to gain access to the dispensing mechanism. Opening Note Cassettes 1.
SECTION 4 - CURRENCY HANDLING OPERATION MANUAL - MODEL 97XX-Series Loading Note Cassettes Follow these steps to load the cassette with notes. When loaded, the notes must lean evenly against the packer plate. IMPORTANT: The shape of some notes may be affected by conditions of storage or bundling, preventing them from forming neat, even piles. If not corrected, such conditions may cause notes to be rejected by the dispensing mechanism.
OPERATION MANUAL - MODEL 97XX-Series SECTION 4 - CURRENCY HANDLING Installing Note Cassettes Once the cassettes have been loaded with currency, replace them using the reverse of the steps used to remove the cassettes from the mechanism. Slide each Note Cassette into its slot in the mechanism. Make sure each cassette is fully inserted. Notes lean against packer plate. 2.
OPERATION MANUAL - MODEL 97XX-Series 3. To remove the Reject Vault, grasp the Vault handle with one hand while holding the mechanism in place with the other hand. Pull the Vault out slightly. Place one hand underneath to support the Vault as you slide it completely out of the unit. Place it on a level surface. SECTION 4 - CURRENCY HANDLING **WARNING** DO NOT RECYCLE REJECTED NOTES INTO A CASSETTE! Doing so could cause more rejects and/or currency jams.
OPERATION MANUAL - MODEL 97XX-Series SECTION 4 - CURRENCY HANDLING Replacing reject vault. Verify Operation 1. Close and lock the security cabinet. Restore power to the cash dispenser. 2. Enter quantity of notes in each cassette. Use the ENTER QTY. IN CASSETTE function, in Management Functions. 3. Perform a TRIAL CASSETTE CLOSE on each cassette. Check the Management Report to ensure the quantity value matches what you entered in the previous step. 4. Check the VALUE parameter for each cassette.
SECTION 5 - MANAGEMENT FUNCTIONS
OPERATION MANUAL - MODEL 97XX-Series SECTION 5 - MANAGEMENT FUNCTIONS INTRODUCTION This section describes the Management Functions available for controlling the Cash Dispenser. When the CUSTOMER WELCOME screen is displayed, you can access the MANAGEMENT FUNCTIONS menu by following the procedure described next. ACCESSING THE MANAGEMENT FUNCTIONS MENU 1. Press and hold down the key; while holding down the key, press the <1> key. Release both keys.
OPERATION MANUAL - MODEL 97XX-Series SECTION 5 - MANAGEMENT FUNCTIONS In other cases a function screen or option described here may not even be present in the Management Functions for your particular Cash Dispenser. In such cases this is because the function is not available in the version of terminal operating software currently loaded in the unit. You may also notice that the factory default values for some functions on your terminal may differ from the values shown in this manual.
OPERATION MANUAL - MODEL 97XX-Series 9700-SERIES 9705-SERIES 9710-SERIES SECTION 5 - MANAGEMENT FUNCTIONS 9750-SERIES MANAGEMENT FUNCTIONS FACTORY DEFAULT: N/A ACCESS INSTRUCTIONS: Select the MANAGEMENT FUNCTIONS option from the Top Menu (see page 5-2 for instructions on how to access the Top Menu). DESCRIPTION: The MANAGEMENT FUNCTIONS menu offers the following options: 9700-SERIES 1. 2. 3. 4. 5. 6.
OPERATION MANUAL - MODEL 97XX-Series 9700-SERIES 9705-SERIES 9710-SERIES SECTION 5 - MANAGEMENT FUNCTIONS 9750-SERIES CLOSE FACTORY DEFAULT: N/A ACCESS INSTRUCTIONS: Select the CLOSE option from the MANAGEMENT FUNCTIONS screen to view the options available from the SELECT CLOSE FUNCTION menu. DESCRIPTION: The SELECT CLOSE FUNCTION menu offers the following options: 9700-SERIES 1. 2. 3. 4. 5. 6. 7.
OPERATION MANUAL - MODEL 97XX-Series 9700-SERIES 9705-SERIES 9710-SERIES SECTION 5 - MANAGEMENT FUNCTIONS 9750-SERIES SCHEDULE CLOSE FACTORY DEFAULT: OFF ACCESS INSTRUCTIONS: 1. Select CLOSE from the MANAGEMENT FUNCTION screen. 2. Select SCHEDULE CLOSE. DESCRIPTION: This function allows you to turn on or off the SCHEDULE CLOSE feature.
OPERATION MANUAL - MODEL 97XX-Series 9700-SERIES 9705-SERIES 9710-SERIES SECTION 5 - MANAGEMENT FUNCTIONS 9750-SERIES CHANGE SCHEDULE FACTORY DEFAULT: N/A ACCESS INSTRUCTIONS: 1. Select CLOSE from the MANAGEMENT FUNCTION screen. 2. Select SCHEDULE CLOSE. 3. Select CHANGE SCHEDULE. DESCRIPTION: This function is used to set the time, in hours and minutes, at which the terminal will automatically initiate contact with the processor and perform a close operation.
OPERATION MANUAL - MODEL 97XX-Series 9700-SERIES 9705-SERIES 9710-SERIES SECTION 5 - MANAGEMENT FUNCTIONS 9750-SERIES SEND TERMINAL TOTALS FACTORY DEFAULT: OFF ACCESS INSTRUCTIONS: 1. Select CLOSE from the MANAGEMENT FUNCTION screen. 2. Select SEND TERMINAL TOTALS. DESCRIPTION: This function allows you to turn on or off the REPORT TERMINAL TOTALS feature. When the feature is turned ON, the terminal will send accumulated totals information to the processor during the close operation.
OPERATION MANUAL - MODEL 97XX-Series 9700-SERIES 9705-SERIES 9710-SERIES SECTION 5 - MANAGEMENT FUNCTIONS 9750-SERIES TRIAL CLOSE ** THIS IS LINE 1 OF THE STORE MESSAGE * ** THIS IS LINE 2 OF THE STORE MESSAGE * ** THIS IS LINE 3 OF THE STORE MESSAGE * ** THIS IS LINE 4 OF THE STORE MESSAGE * FACTORY DEFAULT: N/A ACCESS INSTRUCTIONS: Term# 000000000000000 1. Select CLOSE from the MANAGEMENT FUNCTIONS screen. 2. Select TRIAL CLOSE.
OPERATION MANUAL - MODEL 97XX-Series 9700-SERIES 9705-SERIES 9710-SERIES SECTION 5 - MANAGEMENT FUNCTIONS 9750-SERIES DAY CLOSE ** THIS IS LINE 1 OF THE STORE MESSAGE * ** THIS IS LINE 2 OF THE STORE MESSAGE * ** THIS IS LINE 3 OF THE STORE MESSAGE * ** THIS IS LINE 4 OF THE STORE MESSAGE * FACTORY DEFAULT: N/A ACCESS INSTRUCTIONS: Term# 000000000000000 1. Select CLOSE from the MANAGEMENT FUNCTIONS screen. 2. Select DAY CLOSE.
OPERATION MANUAL - MODEL 97XX-Series 9700-SERIES 9705-SERIES 9710-SERIES SECTION 5 - MANAGEMENT FUNCTIONS 9750-SERIES CASSETTE CLOSE FACTORY DEFAULT: N/A ACCESS INSTRUCTIONS: 1. Select CLOSE from the MANAGEMENT FUNCTIONS screen. 2. Select CASSETTE CLOSE. DESCRIPTION: This function is available in 9750-series Cash Dispensers only! The CASSETTE CLOSE option is used to perform cassette-specific close operations.
OPERATION MANUAL - MODEL 97XX-Series 9700-SERIES 9705-SERIES 9710-SERIES SECTION 5 - MANAGEMENT FUNCTIONS 9750-SERIES TRIAL CASSETTE CLOSE ** THIS IS LINE 1 OF THE STORE MESSAGE * ** THIS IS LINE 2 OF THE STORE MESSAGE * ** THIS IS LINE 3 OF THE STORE MESSAGE * ** THIS IS LINE 4 OF THE STORE MESSAGE * FACTORY DEFAULT: N/A ACCESS INSTRUCTIONS: Term# 000000000000000 9700-SERIES 9705-SERIES 9710-SERIES 9750-SERIES Date: 03/11/01 1. Select CLOSE from the MANAGEMENT FUNCTION screen. 2.
OPERATION MANUAL - MODEL 97XX-Series 9700-SERIES 9705-SERIES 9710-SERIES SECTION 5 - MANAGEMENT FUNCTIONS 9750-SERIES CASSETTE CLOSE ** THIS IS LINE 1 OF THE STORE MESSAGE * ** THIS IS LINE 2 OF THE STORE MESSAGE * ** THIS IS LINE 3 OF THE STORE MESSAGE * ** THIS IS LINE 4 OF THE STORE MESSAGE * FACTORY DEFAULT: N/A ACCESS INSTRUCTIONS: Term# 000000000000000 9700-SERIES 9705-SERIES 9710-SERIES 9750-SERIES Date: 03/11/01 1. Select CLOSE from the MANAGEMENT FUNCTION screen. 2.
OPERATION MANUAL - MODEL 97XX-Series 9700-SERIES 9705-SERIES 9710-SERIES SECTION 5 - MANAGEMENT FUNCTIONS 9750-SERIES ENTER QTY. IN CASSETTE FACTORY DEFAULT: ‘0’ ACCESS INSTRUCTIONS: 9700-SERIES 9705-SERIES 9710-SERIES 9750-SERIES 1. Select CLOSE from the MANAGEMENT FUNCTION screen. 2. Select ENTER QTY. IN CASSETTE. 9700-SERIES 9705-SERIES 9710-SERIES 9750-SERIES 1. Select CLOSE from the MANAGEMENT FUNCTION screen. 2. Select CASSETTE CLOSE. Choose a cassette (A, B, C, or D). 3.
OPERATION MANUAL - MODEL 97XX-Series 9700-SERIES 9705-SERIES 9710-SERIES SECTION 5 - MANAGEMENT FUNCTIONS 9750-SERIES SELECT CASSETTE FACTORY DEFAULT: ‘N/A ACCESS INSTRUCTIONS: 1. Select CLOSE from the MANAGEMENT FUNCTION screen. 2. Select CASSETTE CLOSE. Choose a cassette (A, B, C, or D). 3. Choose the SELECT CASSETTE option. DESCRIPTION: This option provides a convenient way to switch between cassettes when performing cassette-specific close operations.
OPERATION MANUAL - MODEL 97XX-Series 9700-SERIES 9705-SERIES 9710-SERIES SECTION 5 - MANAGEMENT FUNCTIONS 9750-SERIES TRIAL CASSETTE CLOSE (ALL) FACTORY DEFAULT: N/A ACCESS INSTRUCTIONS: 1. Select CLOSE from the MANAGEMENT FUNCTIONS screen. 2. Select TRIAL CASSETTE CLOSE (ALL). DESCRIPTION: Selecting the TRIAL CASSETTE CLOSE (ALL) function prints a summary of all cassettes present with out clearing any totals. The host is not contacted.
OPERATION MANUAL - MODEL 97XX-Series 9700-SERIES 9705-SERIES 9710-SERIES SECTION 5 - MANAGEMENT FUNCTIONS 9750-SERIES DIAGNOSTICS FACTORY DEFAULT: N/A ACCESS INSTRUCTIONS: Select DIAGNOSTICS from the MANAGEMENT FUNCTIONS screen. DESCRIPTION: • • • • • • • Select STATUS to determine the operational status of the four Feed Channels, the Reject Channel and the Transport Channel of the dispensing mechanism. Select PURGE to complete a PURGE cycle on the mechanism.
OPERATION MANUAL - MODEL 97XX-Series 9700-SERIES 9705-SERIES 9710-SERIES SECTION 5 - MANAGEMENT FUNCTIONS 9750-SERIES STATUS FACTORY DEFAULT: N/A ACCESS INSTRUCTIONS: 1. Select DIAGNOSTICS from the MANAGEMENT FUNCTIONS screen 2. Select the STATUS option. DESCRIPTION: The STATUS feature presents a screen with options for initiating status checks on the primary functional areas of the dispensing mechanism.
OPERATION MANUAL - MODEL 97XX-Series SECTION 5 - MANAGEMENT FUNCTIONS The Return Code received as a result of initiating status testing may provide indications of error conditions in the specified channel. ERROR CONDITIONS: If any code other than what is indicated above is displayed contact your service provider for assistance. TRITON SYSTEMS, INC.
OPERATION MANUAL - MODEL 97XX-Series 9700-SERIES 9705-SERIES 9710-SERIES SECTION 5 - MANAGEMENT FUNCTIONS 9750-SERIES PURGE FACTORY DEFAULT: N/A ACCESS INSTRUCTIONS: 1. Select DIAGNOSTICS from the MANAGEMENT FUNCTIONS screen 2. Select the PURGE option. DESCRIPTION: When the PURGE option is selected, a PURGE command is sent to the dispenser, instructing it to exercise its note transport system.
OPERATION MANUAL - MODEL 97XX-Series 9700-SERIES 9705-SERIES 9710-SERIES SECTION 5 - MANAGEMENT FUNCTIONS 9750-SERIES TEST DISPENSE FACTORY DEFAULT: N/A ACCESS INSTRUCTIONS: 1. Select DIAGNOSTICS from the MANAGEMENT FUNCTIONS screen 2. Select the TEST DISPENSE option. DESCRIPTION: The TEST DISPENSE command instructs the dispensing mechanism in the Cash Dispenser to dispense a single note from each Note Cassette, sending each note into the Reject Cassette.
OPERATION MANUAL - MODEL 97XX-Series 9700-SERIES 9705-SERIES 9710-SERIES SECTION 5 - MANAGEMENT FUNCTIONS 9750-SERIES FORMAT GRAPHIC MEMORY FACTORY DEFAULT: N/A ACCESS INSTRUCTIONS: 1. Select DIAGNOSTICS from the MANAGEMENT FUNCTIONS screen. 2. Select the FORMAT GRAPHIC MEMORY option. DESCRIPTION: Graphics Memory must be formatted so that it is ready to accept downloaded files from a Triton Connect Host Computer. Graphics Memory is factory formatted.
OPERATION MANUAL - MODEL 97XX-Series 9700-SERIES 9705-SERIES SECTION 5 - MANAGEMENT FUNCTIONS 9710-SERIES 9750-SERIES TEST RECEIPT PRINTER FACTORY DEFAULT: N/A ACCESS INSTRUCTIONS: 1. Select DIAGNOSTICS from the MANAGEMENT FUNCTIONS screen. 2. Select the TEST RECEIPT PRINTER option. DESCRIPTION: This command will print two lines of text on the receipt printer and then advance and cut the paper. The text should be 42 characters wide.
OPERATION MANUAL - MODEL 97XX-Series 9700-SERIES 9705-SERIES 9710-SERIES SECTION 5 - MANAGEMENT FUNCTIONS 9750-SERIES VERSION #’S FACTORY DEFAULT: N/A ACCESS INSTRUCTIONS: 1. Select DIAGNOSTICS from the MANAGEMENT FUNCTIONS screen. 2. Select the VERSION #’S option. DESCRIPTION: This function displays the version information for the terminal software that is running in the Cash Dispenser. Normally you do not need to access this function unless you are asked to by service personnel.
OPERATION MANUAL - MODEL 97XX-Series 9700-SERIES 9705-SERIES 9710-SERIES SECTION 5 - MANAGEMENT FUNCTIONS 9750-SERIES MORE DIAGNOSTICS FACTORY DEFAULT: N/A ACCESS INSTRUCTIONS: 1. Select DIAGNOSTICS from the MANAGEMENT FUNCTIONS screen. 2. Select the MORE DIAGNOSTICS option. DESCRIPTION: For 9700-series, 9705-series and 9710-series Cash Dispensers, the MORE DIAGNOSTICS menu offers the following options: 9700, 9705 and 9710-Series Cash Dispensers 1.
OPERATION MANUAL - MODEL 97XX-Series 9700-SERIES 9705-SERIES 9710-SERIES SECTION 5 - MANAGEMENT FUNCTIONS 9750-SERIES INJECT NEW CASSETTE ID FACTORY DEFAULT: N/A ACCESS INSTRUCTIONS: 1. Select DIAGNOSTICS from the MANAGEMENT FUNCTIONS screen. 2. Select the MORE DIAGNOSTICS option. 3. Select the INJECT NEW CASSETTE ID option. DESCRIPTION: Each Note Cassette contains onboard memory that enables it to store it’s own identification code. This option allows you to inject a new ID into a Note Cassette.
OPERATION MANUAL - MODEL 97XX-Series 9700-SERIES 9705-SERIES 9710-SERIES SECTION 5 - MANAGEMENT FUNCTIONS 9750-SERIES RESET/TEST MODEM FACTORY DEFAULT: N/A ACCESS INSTRUCTIONS: 1. Select DIAGNOSTICS from the MANAGEMENT FUNCTIONS screen. 2. Select MORE DIAGNOSTICS. 3. Select the RESET/TEST MODEM option. DESCRIPTION: This test confirms that the CPU Module can communicate with the modem and that the modem can be configured.
OPERATION MANUAL - MODEL 97XX-Series 9700-SERIES 9705-SERIES 9710-SERIES SECTION 5 - MANAGEMENT FUNCTIONS 9750-SERIES FORCE UNLOCK CASSETTE FACTORY DEFAULT: N/A ACCESS INSTRUCTIONS: 1. Select the DIAGNOSTICS option from the MANAGEMENT FUNCTIONS menu. 2. Select MORE DIAGNOSTICS. 3. Select FORCE UNLOCK CASSETTE. DESCRIPTION: This function provides a means of overriding the unlocking mechanism associated with a particular cassette.
OPERATION MANUAL - MODEL 97XX-Series SECTION 5 - MANAGEMENT FUNCTIONS Once the cassette has been removed from the dispensing mechanism, gently remove any notes that are sticking out of the cassette. Re-insert the cassette into the dispensing mechanism and perform a normal LOCK operation, followed by a normal UNLOCK operation. You may now remove and replenish the cassette as normal. ERROR CONDITIONS: If the FORCE UNLOCK operation is unsuccessful, contact your Triton authorized sales and service provider.
OPERATION MANUAL - MODEL 97XX-Series 9700-SERIES 9705-SERIES 9710-SERIES SECTION 5 - MANAGEMENT FUNCTIONS 9750-SERIES SCAN CARD FACTORY DEFAULT: N/A ACCESS INSTRUCTIONS: 1. Select DIAGNOSTICS from the MANAGEMENT FUNCTIONS screen. 2. Select MORE DIAGNOSTICS. 3. Select the SCAN CARD option. DESCRIPTION: The SCAN CARD function reads a card and displays the information imprinted on its magnetic strip. This can be done on a customer card that doesn’t seem to work in the Cash Dispenser.
OPERATION MANUAL - MODEL 97XX-Series 9700-SERIES 9705-SERIES 9710-SERIES SECTION 5 - MANAGEMENT FUNCTIONS 9750-SERIES LANGUAGE/IDIOMA FACTORY DEFAULT: COUNTRY-SPECIFIC ACCESS INSTRUCTIONS: Select the LANGUAGE/IDIOMA option from the MANAGEMENT FUNCTIONS screen to view the additional options available. DESCRIPTION: This function provides access to the options that control the language that is displayed on the Cash Dispenser LCD Display.
OPERATION MANUAL - MODEL 97XX-Series 9700-SERIES 9705-SERIES 9710-SERIES SECTION 5 - MANAGEMENT FUNCTIONS 9750-SERIES ENGLISH/INGLES FACTORY DEFAULT: N/A ACCESS INSTRUCTIONS: 1. Select the LANGUAGE / IDIOMA option from the MANAGEMENT FUNCTIONS screen. 2. Select the ENGLISH/INGLES option. DESCRIPTION: Choosing this function when the DISABLE CUST. OPTION is selected will set the LCD screen to display only English text during a transaction. Choosing this function when the ENABLE CUST.
OPERATION MANUAL - MODEL 97XX-Series 9700-SERIES 9705-SERIES 9710-SERIES SECTION 5 - MANAGEMENT FUNCTIONS 9750-SERIES SPANISH/ESPANOL FACTORY DEFAULT: N/A ACCESS INSTRUCTIONS: 1. Select the LANGUAGE / IDIOMA option from the MANAGEMENT FUNCTIONS screen. 2. Select the SPANISH/ESPANOL option. DESCRIPTION: NOTE: Some versions of international software replace the Spanish language option with French. Choosing this option when the DISABLE CUST.
OPERATION MANUAL - MODEL 97XX-Series 9700-SERIES 9705-SERIES 9710-SERIES SECTION 5 - MANAGEMENT FUNCTIONS 9750-SERIES ENABLE/DISABLE CUST. OPTION FACTORY DEFAULT: ‘OPTION IS: DISABLED’ ACCESS INSTRUCTIONS: 1. Select the LANGUAGE / IDIOMA option from the MANAGEMENT FUNCTIONS screen. 2. Select either option, as appropriate: ENABLE CUST. OPTION. DISABLE CUST. OPTION.
OPERATION MANUAL - MODEL 97XX-Series 9700-SERIES 9705-SERIES 9710-SERIES SECTION 5 - MANAGEMENT FUNCTIONS 9750-SERIES JOURNAL FACTORY DEFAULT: N/A ACCESS INSTRUCTIONS: Select JOURNAL from the options available at the MANAGEMENT FUNCTIONS screen. DESCRIPTION: Select the JOURNAL function from the MANAGEMENT FUNCTIONS screen to: 1. PRINT THE JOURNAL 2. CLEAR JOURNAL 3. PRINT THE LAST X ENTRIES ERROR CONDITIONS: There are no error conditions directly associated with this function. TRITON SYSTEMS, INC.
OPERATION MANUAL - MODEL 97XX-Series 9700-SERIES 9705-SERIES 9710-SERIES SECTION 5 - MANAGEMENT FUNCTIONS 9750-SERIES PRINT JOURNAL FACTORY DEFAULT: N/A ACCESS INSTRUCTIONS: 1. Select JOURNAL from the options available at the MANAGEMENT FUNCTIONS screen. 2. Select the PRINT JOURNAL option to print all unaudited records stored in the Electronic Journal. DESCRIPTION: The PRINT JOURNAL command is used to automatically print out any journal entries collected since the last time the journal was printed.
OPERATION MANUAL - MODEL 97XX-Series 9700-SERIES 9705-SERIES 9710-SERIES SECTION 5 - MANAGEMENT FUNCTIONS 9750-SERIES CLEAR JOURNAL FACTORY DEFAULT: N/A ACCESS INSTRUCTIONS: 1. Select JOURNAL from the options available at the MANAGEMENT FUNCTIONS screen. 2. Select the CLEAR JOURNAL option to mark all journal entries stored in the Electronic Journal since the last time the CLEAR JOURNAL or PRINT JOURNAL functions were completed.
OPERATION MANUAL - MODEL 97XX-Series 9700-SERIES 9705-SERIES 9710-SERIES SECTION 5 - MANAGEMENT FUNCTIONS 9750-SERIES PRINT LAST X ENTRIES FACTORY DEFAULT: N/A ACCESS INSTRUCTIONS: 1. Select JOURNAL from the options available at the MANAGEMENT FUNCTIONS screen. 2. Select the PRINT LAST X ENTRIES option to print the last X (where ‘X’ is a number from 1 to 2045) entries stored in the Electronic Journal.
OPERATION MANUAL - MODEL 97XX-Series 9700-SERIES 9705-SERIES 9710-SERIES SECTION 5 - MANAGEMENT FUNCTIONS 9750-SERIES CASSETTE SERVICE FACTORY DEFAULT: N/A ACCESS INSTRUCTIONS: Select the CASSETTE SERVICE option from the MANAGEMENT FUNCTIONS screen. DESCRIPTION: The CASSETTE SERVICE option provides the terminal operator with the ability to quickly lock and unlock cassettes, or to place selected cassettes into service.
OPERATION MANUAL - MODEL 97XX-Series 9700-SERIES 9705-SERIES 9710-SERIES SECTION 5 - MANAGEMENT FUNCTIONS 9750-SERIES PASSWORD MAINTENANCE FACTORY DEFAULT: N/A ACCESS INSTRUCTIONS: Select the PASSWORD MAINTENANCE option from the MANAGEMENT FUNCTIONS screen. DESCRIPTION: The PASSWORD MAINTENANCE Function of MANAGEMENT FUNCTIONS menu allows access to menus for viewing and changing the following: 1. MASTER PASSWORD 2.
OPERATION MANUAL - MODEL 97XX-Series 9700-SERIES 9705-SERIES 9710-SERIES SECTION 5 - MANAGEMENT FUNCTIONS 9750-SERIES MASTER PASSWORD FACTORY DEFAULT: ‘123456’ ACCESS INSTRUCTIONS: 1. Select the PASSWORD MAINTENANCE option from the MANAGEMENT FUNCTIONS screen. 2. Select the MASTER PASSWORD option. DESCRIPTION: The MASTER PASSWORD is the highest level password on the Cash Dispenser. It allows access to all functions except downloading of new software.
OPERATION MANUAL - MODEL 97XX-Series 9700-SERIES 9705-SERIES 9710-SERIES SECTION 5 - MANAGEMENT FUNCTIONS 9750-SERIES ADMINISTRATION PASSWORD FACTORY DEFAULT: ‘987654’ ACCESS INSTRUCTIONS: 1. Select the PASSWORD MAINTENANCE option from the MANAGEMENT FUNCTIONS screen. 2. Select the ADMINISTRATION PASSWORD option. DESCRIPTION: The ADMINISTRATION PASSWORD is used to perform daily management functions. This password DOES NOT allow access to the TERMINAL CONFIGURATION menu.
OPERATION MANUAL - MODEL 97XX-Series 9700-SERIES 9705-SERIES 9710-SERIES SECTION 5 - MANAGEMENT FUNCTIONS 9750-SERIES TERMINAL CONFIGURATION FACTORY DEFAULT: N/A ACCESS INSTRUCTIONS: Select the TERMINAL CONFIGURATION option from the MANAGEMENT FUNCTIONS screen. DESCRIPTION: The TERMINAL CONFIGURATION option provides access to functions that allow the following parameters to be viewed and changed: 1. 2. 3. 4. 5. 6. 7.
OPERATION MANUAL - MODEL 97XX-Series 9700-SERIES 9705-SERIES 9710-SERIES SECTION 5 - MANAGEMENT FUNCTIONS 9750-SERIES PRINTER SETTINGS FACTORY DEFAULT: N/A ACCESS INSTRUCTIONS: 1. Select the TERMINAL CONFIGURATION option from the MANAGEMENT FUNCTIONS screen. 2. Select the PRINTER SETTINGS option. DESCRIPTION: This menu provides access to the following functions: 1. SET PRINT LENGTH 2. LOW RECEIPT PAPER 3.
OPERATION MANUAL - MODEL 97XX-Series 9700-SERIES 9705-SERIES 9710-SERIES SECTION 5 - MANAGEMENT FUNCTIONS 9750-SERIES SET PRINT LENGTH FACTORY DEFAULT: ‘35’ ACCESS INSTRUCTIONS: 1. Select the TERMINAL CONFIGURATION option from the MANAGEMENT FUNCTIONS screen. 2. Select the PRINTER SETTINGS option. 3. Select SET PRINT LENGTH. DESCRIPTION: This function sets the minimum length of the receipt provided to the customer after each transaction.
OPERATION MANUAL - MODEL 97XX-Series 9700-SERIES 9705-SERIES 9710-SERIES SECTION 5 - MANAGEMENT FUNCTIONS 9750-SERIES LOW RECEIPT PAPER FACTORY DEFAULT: ‘OUT OF SERVICE’ ACCESS INSTRUCTIONS: 1. Select TERMINAL CONFIGURATION from the MANAGEMENT FUNCTIONS menu. 2. Select the PRINTER SETTINGS option. 3. Choose the LOW RECEIPT PAPER option.
OPERATION MANUAL - MODEL 97XX-Series 9700-SERIES 9705-SERIES 9710-SERIES SECTION 5 - MANAGEMENT FUNCTIONS 9750-SERIES PRINTER GRAPHICS FACTORY DEFAULT: ENABLED ACCESS INSTRUCTIONS: 1. Select TERMINAL CONFIGURATION optioN from the MANAGEMENT FUNCTIONS screen. 2. Select the PRINTER SETTINGS option. 3. Select PRINTER GRAPHICS. DESCRIPTION: The Printed Graphics feature can only be used when an optional Memory Expansion Card is installed in the terminal. Triton Connect Software Release 1.
OPERATION MANUAL - MODEL 97XX-Series 9700-SERIES 9705-SERIES 9710-SERIES SECTION 5 - MANAGEMENT FUNCTIONS 9750-SERIES RANDOM/LEVEL PRIZE COUPONS FACTORY DEFAULT: N/A ACCESS INSTRUCTIONS: 1. Select TERMINAL CONFIGURATION from the MANAGEMENT FUNCTIONS menu. 2. Select RANDOM/LEVEL PRIZE COUPONS from the TERMINAL CONFIGURATION menu. DESCRIPTION: The SELECT COUPON TYPE screen allows the operator to access the functions specific to managing either printed or dispensed prize coupons.
OPERATION MANUAL - MODEL 97XX-Series 9700-SERIES 9705-SERIES 9710-SERIES SECTION 5 - MANAGEMENT FUNCTIONS 9750-SERIES PRINTED COUPONS FACTORY DEFAULT: N/A ACCESS INSTRUCTIONS: 1. Select TERMINAL CONFIGURATION from the MANAGEMENT FUNCTIONS menu. 2. Select RANDOM/LEVEL PRIZE COUPONS from the TERMINAL CONFIGURATION menu. 3. Select PRINTED COUPONS. DESCRIPTION: This function provides access to the following options, which will set up terminal operations for issuing printed prize coupons: 1. 2. 3. 4. 5.
OPERATION MANUAL - MODEL 97XX-Series 9700-SERIES 9705-SERIES 9710-SERIES SECTION 5 - MANAGEMENT FUNCTIONS 9750-SERIES ENTER LEVEL PRIZE MSG. FACTORY DEFAULT: NONE ACCESS INSTRUCTIONS: 9700-SERIES 9705-SERIES 9710-SERIES 9750-SERIES 1. Select TERMINAL CONFIGURATION from the MANAGEMENT FUNCTIONS menu. 2. Select RANDOM/LEVEL PRIZE COUPONS from the TERMINAL CONFIGURATION menu. 3. Select ENTER LEVEL PRIZE MSG.
OPERATION MANUAL - MODEL 97XX-Series 9700-SERIES 9705-SERIES 9710-SERIES SECTION 5 - MANAGEMENT FUNCTIONS 9750-SERIES ENTER RANDOM PRIZE MSG. FACTORY DEFAULT: NONE ACCESS INSTRUCTIONS: 9700-SERIES 9705-SERIES 9710-SERIES 9750-SERIES 1. Select TERMINAL CONFIGURATION from the MANAGEMENT FUNCTIONS menu. 2. Select RANDOM/LEVEL PRIZE COUPONS from the TERMINAL CONFIGURATION menu. 3. Select ENTER RANDOM PRIZE MSG.
OPERATION MANUAL - MODEL 97XX-Series 9700-SERIES 9705-SERIES 9710-SERIES SECTION 5 - MANAGEMENT FUNCTIONS 9750-SERIES ENABLE/DISABLE COUPON AWARDS FACTORY DEFAULT: DISABLED ACCESS INSTRUCTIONS: 9700-SERIES 9705-SERIES 9710-SERIES 9750-SERIES 1. Select TERMINAL CONFIGURATION from the MANAGEMENT FUNCTIONS menu. 2. Select RANDOM/LEVEL PRIZE COUPONS from the TERMINAL CONFIGURATION menu. 3. Select the ENABLE/DISABLE COUPON AWARDS option. 9700-SERIES 9705-SERIES 9710-SERIES 9750-SERIES 1.
OPERATION MANUAL - MODEL 97XX-Series 9700-SERIES 9705-SERIES 9710-SERIES SECTION 5 - MANAGEMENT FUNCTIONS 9750-SERIES SET LEVEL PRIZE AMOUNT FACTORY DEFAULT: ‘$0.00’ ACCESS INSTRUCTIONS: 9700-SERIES 9705-SERIES 9710-SERIES 9750-SERIES 1. Select TERMINAL CONFIGURATION from the MANAGEMENT FUNCTIONS menu. 2. Select RANDOM/LEVEL PRIZE COUPONS from the TERMINAL CONFIGURATION menu. 3. Select the SET LEVEL PRIZE AMOUNT option. 9700-SERIES 9705-SERIES 9710-SERIES 9750-SERIES 1.
OPERATION MANUAL - MODEL 97XX-Series 9700-SERIES 9705-SERIES SECTION 5 - MANAGEMENT FUNCTIONS 9710-SERIES 9750-SERIES 9710-SERIES 9750-SERIES SET RANDOM WINNING % FACTORY DEFAULT: ‘0%’ ACCESS INSTRUCTIONS: 9700-SERIES 9705-SERIES 1. Select TERMINAL CONFIGURATION from the MANAGEMENT FUNCTIONS menu. 2. Select RANDOM/LEVEL PRIZE COUPONS from the TERMINAL CONFIGURATION menu. 3. Select the SET RANDOM WINNING % option. 9700-SERIES 9705-SERIES 9710-SERIES 9750-SERIES 1.
OPERATION MANUAL - MODEL 97XX-Series 9700-SERIES 9705-SERIES 9710-SERIES SECTION 5 - MANAGEMENT FUNCTIONS 9750-SERIES DISPENSED COUPONS FACTORY DEFAULT: N/A ACCESS INSTRUCTIONS: 1. Select TERMINAL CONFIGURATION from the MANAGEMENT FUNCTIONS menu. 2. Select RANDOM/LEVEL PRIZE COUPONS from the TERMINAL CONFIGURATION menu. 3. Select DISPENSED COUPONS. DESCRIPTION: This function provides access to the following options, which will set up terminal operations for issuing printed prize coupons: 1. 2. 3. 4.
OPERATION MANUAL - MODEL 97XX-Series 9700-SERIES 9705-SERIES 9710-SERIES SECTION 5 - MANAGEMENT FUNCTIONS 9750-SERIES SELECT LEVEL COUPON CASS. FACTORY DEFAULT: N/A ACCESS INSTRUCTIONS: 1. Select TERMINAL CONFIGURATION from the MANAGEMENT FUNCTIONS menu. 2. Select RANDOM/LEVEL PRIZE COUPONS from the TERMINAL CONFIGURATION menu. 3. Select DISPENSED COUPONS. 4. Choose SELECT LEVEL COUPON CASS.
OPERATION MANUAL - MODEL 97XX-Series 9700-SERIES 9705-SERIES 9710-SERIES SECTION 5 - MANAGEMENT FUNCTIONS 9750-SERIES SELECT RANDOM COUPON CASS. FACTORY DEFAULT: N/A ACCESS INSTRUCTIONS: 1. Select TERMINAL CONFIGURATION from the MANAGEMENT FUNCTIONS menu. 2. Select RANDOM/LEVEL PRIZE COUPONS from the TERMINAL CONFIGURATION menu. 3. Select DISPENSED COUPONS. 4. Choose SELECT RANDOM COUPON CASS.
OPERATION MANUAL - MODEL 97XX-Series 9700-SERIES 9705-SERIES 9710-SERIES SECTION 5 - MANAGEMENT FUNCTIONS 9750-SERIES ENABLE/DISABLE COUPON AWARDS FACTORY DEFAULT: DISABLED ACCESS INSTRUCTIONS: 1. Select TERMINAL CONFIGURATION from the MANAGEMENT FUNCTIONS menu. 2. Select RANDOM/LEVEL PRIZE COUPONS from the TERMINAL CONFIGURATION menu. 3. Select DISPENSED COUPONS. 4. Select the ENABLE/DISABLE COUPON AWARDS option.
OPERATION MANUAL - MODEL 97XX-Series 9700-SERIES 9705-SERIES 9710-SERIES SECTION 5 - MANAGEMENT FUNCTIONS 9750-SERIES SET LEVEL PRIZE AMOUNT FACTORY DEFAULT: ‘$0.00’ ACCESS INSTRUCTIONS: 1. Select TERMINAL CONFIGURATION from the MANAGEMENT FUNCTIONS menu. 2. Select RANDOM/LEVEL PRIZE COUPONS from the TERMINAL CONFIGURATION menu. 3. Select DISPENSED COUPONS. 4. Select the SET LEVEL PRIZE AMOUNT option.
OPERATION MANUAL - MODEL 97XX-Series 9700-SERIES 9705-SERIES 9710-SERIES SECTION 5 - MANAGEMENT FUNCTIONS 9750-SERIES SET RANDOM WINNING % FACTORY DEFAULT: ‘0%’ ACCESS INSTRUCTIONS: 1. Select TERMINAL CONFIGURATION from the MANAGEMENT FUNCTIONS menu. 2. Select RANDOM/LEVEL PRIZE COUPONS from the TERMINAL CONFIGURATION menu. 3. Select DISPENSED COUPONS. 3. Select the SET RANDOM WINNING % option. DESCRIPTION: This function sets the frequency at which the random prize coupons will be dispensed.
OPERATION MANUAL - MODEL 97XX-Series 9700-SERIES 9705-SERIES 9710-SERIES SECTION 5 - MANAGEMENT FUNCTIONS 9750-SERIES CHANGE MESSAGES FACTORY DEFAULT: N/A ACCESS INSTRUCTIONS: 1. Select TERMINAL CONFIGURATION from the MANAGEMENT FUNCTIONS menu. 2. Select CHANGE MESSAGES. DESCRIPTION: The CHANGE MESSAGES option of the TERMINAL CONFIGURATION menu allows information for the following screens to be changed by the terminal operator or a service technician: 1. 2. 3. 4. 5. 6. 7.
OPERATION MANUAL - MODEL 97XX-Series 9700-SERIES 9705-SERIES 9710-SERIES SECTION 5 - MANAGEMENT FUNCTIONS 9750-SERIES MARKETING MESSAGE FACTORY DEFAULT: NONE ACCESS INSTRUCTIONS: 1. Select TERMINAL CONFIGURATION from the MANAGEMENT FUNCTIONS menu. 2. Select CHANGE MESSAGES. 3. Select MARKETING MESSAGE. DESCRIPTION: The MARKETING MESSAGE function allows you to compose a message that will appear on any printed products that include the store message (e.g. customer receipts, day closes, coupons, etc..
OPERATION MANUAL - MODEL 97XX-Series 9700-SERIES 9705-SERIES 9710-SERIES SECTION 5 - MANAGEMENT FUNCTIONS 9750-SERIES SURCHARGE MESSAGES FACTORY DEFAULT: ‘STANDARD’ ACCESS INSTRUCTIONS: 1. Select TERMINAL CONFIGURATION from the MANAGEMENT FUNCTIONS menu. 2. Select CHANGE MESSAGES. 3. Select SURCHARGE MESSAGES DESCRIPTION: This function is used to select the surcharge message that will be displayed to the customer. Press the button next to the desired message to select it.
OPERATION MANUAL - MODEL 97XX-Series CUSTOM-C SECTION 5 - MANAGEMENT FUNCTIONS CUSTOM-F CUSTOM-D CUSTOM-G CUSTOM-E CUSTOM-H TRITON SYSTEMS, INC.
OPERATION MANUAL - MODEL 97XX-Series 9700-SERIES 9705-SERIES 9710-SERIES SECTION 5 - MANAGEMENT FUNCTIONS 9750-SERIES WELCOME MESSAGE FACTORY DEFAULT: ‘WELCOME TO MINIATM’ ACCESS INSTRUCTIONS: 1. Select TERMINAL CONFIGURATION from the MANAGEMENT FUNCTIONS menu. 2. Select CHANGE MESSAGES. 3. Select Welcome Message. DESCRIPTION: The Welcome Message consists of three lines of text that are printed at the top of the customer welcome screen.
OPERATION MANUAL - MODEL 97XX-Series 9700-SERIES 9705-SERIES 9710-SERIES SECTION 5 - MANAGEMENT FUNCTIONS 9750-SERIES SURCHARGE OWNER FACTORY DEFAULT: NONE ACCESS INSTRUCTIONS: 1. Select TERMINAL CONFIGURATION from the MANAGEMENT FUNCTIONS menu. 2. Select CHANGE MESSAGES. 3. Select SURCHARGE OWNER. DESCRIPTION: The name of the SURCHARGE OWNER is stored in the terminal and printed on the Receipt Printer Test Report. The name of the SURCHARGE OWNER is entered directly into the terminal.
OPERATION MANUAL - MODEL 97XX-Series 9700-SERIES 9705-SERIES 9710-SERIES SECTION 5 - MANAGEMENT FUNCTIONS 9750-SERIES EXIT MESSAGE FACTORY DEFAULT: ‘THANKS FOR USING MINIATM’ ACCESS INSTRUCTIONS: 1. Select TERMINAL CONFIGURATION from the MANAGEMENT FUNCTIONS menu. 2. Select CHANGE MESSAGES. 3. Select EXIT MESSAGE. DESCRIPTION: The Exit Message consists of three lines of text that are printed on the terminal display at the conclusion of a transaction.
OPERATION MANUAL - MODEL 97XX-Series 9700-SERIES 9705-SERIES 9710-SERIES SECTION 5 - MANAGEMENT FUNCTIONS 9750-SERIES STORE MESSAGE FACTORY DEFAULT: SEE NOTE 1. Select TERMINAL CONFIGURATION from the MANAGEMENT FUNCTIONS menu. 2. Select CHANGE MESSAGES. 3. Select STORE MESSAGE. ACCESS INSTRUCTIONS: DESCRIPTION: The STORE MESSAGE consists of four lines of text that are printed on the customer receipt. Enter letters, numbers and punctuation as described in the following paragraphs.
OPERATION MANUAL - MODEL 97XX-Series 9700-SERIES 9705-SERIES 9710-SERIES SECTION 5 - MANAGEMENT FUNCTIONS 9750-SERIES TERMINAL OWNER FACTORY DEFAULT: NONE ACCESS INSTRUCTIONS: 1. Select TERMINAL CONFIGURATION from the MANAGEMENT FUNCTIONS menu. 2. Select CHANGE MESSAGES. 3. Select TERMINAL OWNER. DESCRIPTION: The name of the TERMINAL OWNER is stored in the terminal and displayed to the customer in the surcharge warning message. The name is entered directly into the terminal.
OPERATION MANUAL - MODEL 97XX-Series 9700-SERIES 9705-SERIES 9710-SERIES SECTION 5 - MANAGEMENT FUNCTIONS 9750-SERIES TERMINAL PARAMETERS FACTORY DEFAULT: N/A ACCESS INSTRUCTIONS: 1. Select TERMINAL CONFIGURATION from the MANAGEMENT FUNCTIONS menu. 2. Select SET TERMINAL PARAMETERS. DESCRIPTION: Selecting SET TERMINAL PARAMETERS from the TERMINAL CONFIGURATION menu allows the following Cash Dispenser operating parameters to be viewed or changed: 1. 2. 3. 4. 5. 6. 7.
OPERATION MANUAL - MODEL 97XX-Series 9700-SERIES 9705-SERIES 9710-SERIES SECTION 5 - MANAGEMENT FUNCTIONS 9750-SERIES SET TERMINAL # FACTORY DEFAULT: NONE ACCESS INSTRUCTIONS: 1. Select TERMINAL CONFIGURATION from the MANAGEMENT FUNCTIONS menu. 2. Select SET TERMINAL PARAMETERS. 3. Choose the SET TERMINAL # option. DESCRIPTION: The TERMINAL # is a unique string of characters provided by your processor to identify the Cash Dispenser when a transaction is taking place.
OPERATION MANUAL - MODEL 97XX-Series 9700-SERIES 9705-SERIES 9710-SERIES SECTION 5 - MANAGEMENT FUNCTIONS 9750-SERIES RESET SEQ # FACTORY DEFAULT: N/A ACCESS INSTRUCTIONS: 1. Select TERMINAL CONFIGURATION from the MANAGEMENT FUNCTIONS menu. 2. Select SET TERMINAL PARAMETERS. 3. Choose the RESET SEQ # option. DESCRIPTION: Select the RESET SEQ. # option from the TERMINAL PARAMETER menu to reset the sequence number that is printed on the journal printout and receipt to ‘00000000’.
OPERATION MANUAL - MODEL 97XX-Series 9700-SERIES 9705-SERIES 9710-SERIES SECTION 5 - MANAGEMENT FUNCTIONS 9750-SERIES SURCHARGE MODE FACTORY DEFAULT: N/A ACCESS INSTRUCTIONS: 1. Select TERMINAL CONFIGURATION from the MANAGEMENT FUNCTIONS menu. 2. Select SET TERMINAL PARAMETERS. 3. Choose the SURCHARGE MODE option. DESCRIPTION: Selecting the SURCHARGE MODE option from the SET TERMINAL PARAMETERS menu allows the terminal operator or service technician to change the following surcharge options: 1. 2. 3.
OPERATION MANUAL - MODEL 97XX-Series 9700-SERIES 9705-SERIES 9710-SERIES SECTION 5 - MANAGEMENT FUNCTIONS 9750-SERIES SURCHARGE PERCENT FACTORY DEFAULT: N/A ACCESS INSTRUCTIONS: 1. Select TERMINAL CONFIGURATION from the MANAGEMENT FUNCTIONS menu. 2. Select SET TERMINAL PARAMETERS. 3. Choose the SURCHARGE MODE option. 4. Select SURCHARGE PERCENT.
OPERATION MANUAL - MODEL 97XX-Series 9700-SERIES 9705-SERIES 9710-SERIES SECTION 5 - MANAGEMENT FUNCTIONS 9750-SERIES ENABLE/DISABLE SURCHARGE FACTORY DEFAULT: DISABLED ACCESS INSTRUCTIONS: 1. Select TERMINAL CONFIGURATION from the MANAGEMENT FUNCTIONS menu. 2. Select SET TERMINAL PARAMETERS. 3. Choose the SURCHARGE MODE option. 4. Select ENABLE or DISABLE, as appropriate. DESCRIPTION: Some networks allow a surcharge, or terminal fee, to be imposed on withdrawal transactions.
OPERATION MANUAL - MODEL 97XX-Series 9700-SERIES 9705-SERIES 9710-SERIES SECTION 5 - MANAGEMENT FUNCTIONS 9750-SERIES SURCHARGE LOCATION FACTORY DEFAULT: BEGINNING ACCESS INSTRUCTIONS: 1. Select TERMINAL CONFIGURATION from the MANAGEMENT FUNCTIONS menu. 2. Select SET TERMINAL PARAMETERS. 3. Choose the SURCHARGE MODE option. 4. Choose the SURCHARGE LOCATION option. DESCRIPTION: The SURCHARGE LOCATION function determines where the terminal user is presented with the surcharge notification message.
OPERATION MANUAL - MODEL 97XX-Series 9700-SERIES 9705-SERIES 9710-SERIES SECTION 5 - MANAGEMENT FUNCTIONS 9750-SERIES BLOCK ISO’S FACTORY DEFAULT: NONE ACCESS INSTRUCTIONS: 1. Select TERMINAL CONFIGURATION from the MANAGEMENT FUNCTIONS menu. 2. Select SET TERMINAL PARAMETERS. 3. Choose the SURCHARGE MODE option. 4. Choose the BLOCK ISO’S option.
OPERATION MANUAL - MODEL 97XX-Series SECTION 5 - MANAGEMENT FUNCTIONS To enter or change an ISO go to the SELECT ISO TO CHANGE screen and perform the following: 1. Press the Screen Key next to the block where the new ISO will be entered or an ISO changed. 2. Enter the ISO number (up to six digits in length). 3. Press the “” key. If more than one ISO must be entered repeat steps 1 through 3 until all ISO are entered (up to five ISO numbers may be entered).
OPERATION MANUAL - MODEL 97XX-Series 9700-SERIES 9705-SERIES 9710-SERIES SECTION 5 - MANAGEMENT FUNCTIONS 9750-SERIES SURCHARGE AMOUNT FACTORY DEFAULT: ‘$0.00’ ACCESS INSTRUCTIONS: 1. Select TERMINAL CONFIGURATION from the MANAGEMENT FUNCTIONS menu. 2. Select SET TERMINAL PARAMETERS. 3. Choose the SURCHARGE MODE option. 4. Choose the SURCHARGE AMOUNT option. DESCRIPTION: The surcharge amount will be entered directly on the SURCHARGE MODE screen.
OPERATION MANUAL - MODEL 97XX-Series 9700-SERIES 9705-SERIES 9710-SERIES SECTION 5 - MANAGEMENT FUNCTIONS 9750-SERIES CASSETTE SETUP FACTORY DEFAULT: N/A ACCESS INSTRUCTIONS: 1. Select TERMINAL CONFIGURATION from the MANAGEMENT FUNCTIONS menu. 2. Select SET TERMINAL PARAMETERS. 3. Select CASSETTE SETUP.
OPERATION MANUAL - MODEL 97XX-Series 9700-SERIES 9705-SERIES 9710-SERIES SECTION 5 - MANAGEMENT FUNCTIONS 9750-SERIES RELEARN BILL THICKNESS FACTORY DEFAULT: N/A ACCESS INSTRUCTIONS: 1. Select TERMINAL CONFIGURATION from the MANAGEMENT FUNCTIONS menu. 2. Select SET TERMINAL PARAMETERS. 3. Select CASSETTE SETUP. 4. Choose the RELEARN BILL THICKNESS option.
OPERATION MANUAL - MODEL 97XX-Series 9700-SERIES 9705-SERIES 9710-SERIES SECTION 5 - MANAGEMENT FUNCTIONS 9750-SERIES LOW CURRENCY FACTORY DEFAULT: ENABLED ACCESS INSTRUCTIONS: 1. Select TERMINAL CONFIGURATION from the MANAGEMENT FUNCTIONS menu. 2. Select SET TERMINAL PARAMETERS. 3. Select CASSETTE SETUP. 4. Choose the LOW CURRENCY option. DESCRIPTION: This function is used to enable or disable low currency checking on the dispenser mechanism.
OPERATION MANUAL - MODEL 97XX-Series 9700-SERIES 9705-SERIES 9710-SERIES SECTION 5 - MANAGEMENT FUNCTIONS 9750-SERIES INTERNATIONAL CURRENCY FACTORY DEFAULT: COUNTRY-SPECIFIC ACCESS INSTRUCTIONS: 1. Select TERMINAL CONFIGURATION from the MANAGEMENT FUNCTIONS menu. 2. Select SET TERMINAL PARAMETERS. 3. Select CASSETTE SETUP. 4. Choose the INTERNATIONAL CURRENCY option. DESCRIPTION: This feature will allow operator personnel to select one of nine possible monetary symbols (C, ¢, $, ƒ, L, Pt.
OPERATION MANUAL - MODEL 97XX-Series 9700-SERIES 9705-SERIES 9710-SERIES SECTION 5 - MANAGEMENT FUNCTIONS 9750-SERIES MAXIMUM AMOUNT FACTORY DEFAULT: ‘$500.00’ ACCESS INSTRUCTIONS: 1. Select TERMINAL CONFIGURATION from the MANAGEMENT FUNCTIONS menu. 2. Select SET TERMINAL PARAMETERS. 3. Select CASSETTE SETUP. 4. Choose the MAXIMUM AMOUNT option. DESCRIPTION: The maximum cash withdrawal limit must be set in the Cash Dispenser before any transactions can be completed.
OPERATION MANUAL - MODEL 97XX-Series 9700-SERIES 9705-SERIES 9710-SERIES SECTION 5 - MANAGEMENT FUNCTIONS 9750-SERIES MULTIPLE AMOUNT FACTORY DEFAULT: ‘$0.00’ ACCESS INSTRUCTIONS: 1. Select TERMINAL CONFIGURATION from the MANAGEMENT FUNCTIONS menu. 2. Select SET TERMINAL PARAMETERS. 3. Select CASSETTE SETUP. 4. Choose the MULTIPLE AMOUNT option. DESCRIPTION: The MULTIPLE AMOUNT must be set in the Cash Dispenser before any transactions can be processed.
OPERATION MANUAL - MODEL 97XX-Series 9700-SERIES 9705-SERIES 9710-SERIES SECTION 5 - MANAGEMENT FUNCTIONS 9750-SERIES MAX NON-CASH FACTORY DEFAULT: ‘$500.00’ ACCESS INSTRUCTIONS: 1. Select TERMINAL CONFIGURATION from the MANAGEMENT FUNCTIONS menu. 2. Select SET TERMINAL PARAMETERS. 3. Select CASSETTE SETUP. 4. Choose the MAX NON-CASH. DESCRIPTION: The maximum non-cash purchase limit must be set in the Cash Dispenser before any purchases of non-cash items can be completed.
OPERATION MANUAL - MODEL 97XX-Series 9700-SERIES 9705-SERIES 9710-SERIES SECTION 5 - MANAGEMENT FUNCTIONS 9750-SERIES EXTENDED AMOUNT FACTORY DEFAULT: DISABLED ACCESS INSTRUCTIONS: 1. Select TERMINAL CONFIGURATION from the MANAGEMENT FUNCTIONS menu. 2. Select SET TERMINAL PARAMETERS. 3. Select CASSETTE SETUP. 4. Choose the EXTENDED AMOUNT option. DESCRIPTION: The standard length of a currency amount entry field is 8 digits.
OPERATION MANUAL - MODEL 97XX-Series 9700-SERIES 9705-SERIES 9710-SERIES SECTION 5 - MANAGEMENT FUNCTIONS 9750-SERIES CASSETTE PARAMETERS FACTORY DEFAULT: N/A ACCESS INSTRUCTIONS: 1. Select TERMINAL CONFIGURATION from the MANAGEMENT FUNCTIONS menu. 2. Select SET TERMINAL PARAMETERS. 3. Select CASSETTE SETUP. 4. Select CASSETTE PARAMETERS. DESCRIPTION: The CASSETTE PARAMETERS option is used to perform cassette-specific configuration and setup operations.
OPERATION MANUAL - MODEL 97XX-Series 9700-SERIES 9705-SERIES 9710-SERIES SECTION 5 - MANAGEMENT FUNCTIONS 9750-SERIES SET BILL DIMENSION FACTORY DEFAULT: COUNTRY-SPECIFIC ACCESS INSTRUCTIONS: 1. Select TERMINAL CONFIGURATION from the MANAGEMENT FUNCTIONS menu. 2. Select SET TERMINAL PARAMETERS. 3. Select CASSETTE SETUP. 4. Choose the CASSETTE PARAMETERS option. 5. Select a cassette (A, B, C, or D). 6. Choose SET BILL DIMENSION.
OPERATION MANUAL - MODEL 97XX-Series 9700-SERIES 9705-SERIES 9710-SERIES SECTION 5 - MANAGEMENT FUNCTIONS 9750-SERIES VALUE FACTORY DEFAULT: ‘$0.00’ ACCESS INSTRUCTIONS: 1. Select TERMINAL CONFIGURATION from the MANAGEMENT FUNCTIONS menu. 2. Select SET TERMINAL PARAMETERS. 3. Select CASSETTE SETUP. 4. Choose the CASSETTE PARAMETERS option. 5. Choose a cassette (A, B, C, or D). 6. Select the VALUE option.
OPERATION MANUAL - MODEL 97XX-Series 9700-SERIES 9705-SERIES 9710-SERIES SECTION 5 - MANAGEMENT FUNCTIONS 9750-SERIES TYPE FACTORY DEFAULT: CASH ACCESS INSTRUCTIONS: 1. Select TERMINAL CONFIGURATION from the MANAGEMENT FUNCTIONS menu. 2. Select SET TERMINAL PARAMETERS. 3. Select CASSETTE SETUP. 4. Choose the CASSETTE PARAMETERS option. 5. Choose a cassette (A, B, C, or D). 6. Select the TYPE option.
OPERATION MANUAL - MODEL 97XX-Series 9700-SERIES 9705-SERIES 9710-SERIES SECTION 5 - MANAGEMENT FUNCTIONS 9750-SERIES SERVICE FACTORY DEFAULT: IN SERVICE ACCESS INSTRUCTIONS: 1. Select TERMINAL CONFIGURATION from the MANAGEMENT FUNCTIONS menu. 2. Select SET TERMINAL PARAMETERS. 3. Select CASSETTE SETUP. 4. Choose the CASSETTE PARAMETERS option. 5. Choose a cassette (A, B, C, or D). 6. Select the SERVICE option.
OPERATION MANUAL - MODEL 97XX-Series 9700-SERIES 9705-SERIES 9710-SERIES SECTION 5 - MANAGEMENT FUNCTIONS 9750-SERIES CURRENCY DATA FACTORY DEFAULT: COUNTRY-SPECIFIC ACCESS INSTRUCTIONS: 1. Select TERMINAL CONFIGURATION from the MANAGEMENT FUNCTIONS menu. 2. Select SET TERMINAL PARAMETERS. 3. Select CASSETTE SETUP. 4. Choose the CASSETTE PARAMETERS option. 5. Choose a cassette (A, B, C, or D). 6. Select the CURRENCY DATA option.
OPERATION MANUAL - MODEL 97XX-Series SECTION 5 - MANAGEMENT FUNCTIONS The current values of the above listed data will be displayed near the top of the screen as a string of seven characters. When the CHANGE button is pressed, an input field appears, allowing you to enter new data. To enter a digit 0-9, simply press the key that has that digit. To enter a letter, first press the key, then press the key that has the letter you want on it.
OPERATION MANUAL - MODEL 97XX-Series 9700-SERIES 9705-SERIES 9710-SERIES SECTION 5 - MANAGEMENT FUNCTIONS 9750-SERIES CASSETTE FACTORY DEFAULT: N/A ACCESS INSTRUCTIONS: 1. Select TERMINAL CONFIGURATION from the MANAGEMENT FUNCTIONS menu. 2. Select SET TERMINAL PARAMETERS. 3. Select CASSETTE SETUP. 4. Choose the CASSETTE PARAMETERS option. 5. Select the CASSETTE option. DESCRIPTION: This option provides a convenient way to switch between cassettes when performing cassette-specific operations.
OPERATION MANUAL - MODEL 97XX-Series 9700-SERIES 9705-SERIES 9710-SERIES SECTION 5 - MANAGEMENT FUNCTIONS 9750-SERIES DESCRIPTION FACTORY DEFAULT: N/A ACCESS INSTRUCTIONS: 1. Select TERMINAL CONFIGURATION from the MANAGEMENT FUNCTIONS menu. 2. Select SET TERMINAL PARAMETERS. 3. Select CASSETTE SETUP. 4. Choose the CASSETTE PARAMETERS option. 5. Choose a cassette (A, B, C, or D). 6. Select the DESCRIPTION option.
OPERATION MANUAL - MODEL 97XX-Series 9700-SERIES 9705-SERIES 9710-SERIES SECTION 5 - MANAGEMENT FUNCTIONS 9750-SERIES PRIMARY DESCRIPTION FACTORY DEFAULT: NONE ACCESS INSTRUCTIONS: 1. Select TERMINAL CONFIGURATION from the MANAGEMENT FUNCTIONS menu. 2. Select SET TERMINAL PARAMETERS. 3. Select CASSETTE SETUP. 4. Choose the CASSETTE PARAMETERS option. 5. Choose a cassette (A, B, C, or D). 6. Select the DESCRIPTION option. 7. Choose the PRIMARY DESCRIPTION option.
OPERATION MANUAL - MODEL 97XX-Series 9700-SERIES 9705-SERIES 9710-SERIES SECTION 5 - MANAGEMENT FUNCTIONS 9750-SERIES SECONDARY DESCRIPTION FACTORY DEFAULT: ‘NONE ACCESS INSTRUCTIONS: 1. Select TERMINAL CONFIGURATION from the MANAGEMENT FUNCTIONS menu. 2. Select SET TERMINAL PARAMETERS. 3. Select CASSETTE SETUP. 4. Choose the CASSETTE PARAMETERS option. 5. Choose a cassette (A, B, C, or D). 6. Select the DESCRIPTION option. 7. Choose the SECONDARY DESCRIPTION option.
OPERATION MANUAL - MODEL 97XX-Series 9700-SERIES 9705-SERIES 9710-SERIES SECTION 5 - MANAGEMENT FUNCTIONS 9750-SERIES FAST CASH AMOUNT FACTORY DEFAULT: PROCESSOR-SPECIFIC ACCESS INSTRUCTIONS: 1. Select TERMINAL CONFIGURATION from the MANAGEMENT FUNCTIONS menu. 2. Select SET TERMINAL PARAMETERS. 3. Select CASSETTE SETUP. 4. Choose the FAST CASH AMOUNT option.
OPERATION MANUAL - MODEL 97XX-Series 9700-SERIES 9705-SERIES 9710-SERIES SECTION 5 - MANAGEMENT FUNCTIONS 9750-SERIES KEY MANAGEMENT FACTORY DEFAULT: N/A ACCESS INSTRUCTIONS: 1. Select TERMINAL CONFIGURATION from the MANAGEMENT FUNCTIONS menu. 2. Select SET TERMINAL PARAMETERS. 3. Choose the KEY MANAGEMENT option. DESCRIPTION: The KEY MANAGEMENT function provides access to Cash Dispenser functions that control the method of entry for the Master Key and the Comms (Communications) Key.
OPERATION MANUAL - MODEL 97XX-Series 9700-SERIES 9705-SERIES 9710-SERIES SECTION 5 - MANAGEMENT FUNCTIONS 9750-SERIES ENTER MAC MASTER KEY FACTORY DEFAULT: PROCESSOR-SPECIFIC ACCESS INSTRUCTIONS: 1. Select TERMINAL CONFIGURATION from the MANAGEMENT FUNCTIONS menu. 2. Select SET TERMINAL PARAMETERS. 3. Select KEY MANAGEMENT. 4. Choose the ENTER MAC MASTER KEY option.
OPERATION MANUAL - MODEL 97XX-Series SECTION 5 - MANAGEMENT FUNCTIONS Normally, the MAC MASTER KEY contains only one part. However, some keys may contain multiple parts. If this is the case, separate individuals will hold the parts. If your key has multiple parts you must answer the question “ANOTHER KEY PART?”, with a YES until all parts are entered.
OPERATION MANUAL - MODEL 97XX-Series 9700-SERIES 9705-SERIES 9710-SERIES SECTION 5 - MANAGEMENT FUNCTIONS 9750-SERIES ENTER PIN MASTER KEY FACTORY DEFAULT: PROCESSOR-SPECIFIC ACCESS INSTRUCTIONS: 1. Select TERMINAL CONFIGURATION from the MANAGEMENT FUNCTIONS menu. 2. Select SET TERMINAL PARAMETERS. 3. Select KEY MANAGEMENT. 4. Choose the ENTER PIN MASTER KEY option. DESCRIPTION: IMPORTANT: The PIN MASTER KEY must be entered before the PIN Working key.
OPERATION MANUAL - MODEL 97XX-Series SECTION 5 - MANAGEMENT FUNCTIONS The CHECK DIGIT that appears after all parts of the PIN MASTER KEY have been entered is similar to the checksum that is used to verify that the data programmed into a memory device such as an EPROM is correct. The CHECK DIGIT can be verified by doing a RECEIPT PRINTER TEST from the DIAGNOSTICS Menu and comparing the PIN MASTER KEY CHECK DIGIT on the printout to the original receipt printout from the initial terminal setup.
OPERATION MANUAL - MODEL 97XX-Series 9700-SERIES 9705-SERIES 9710-SERIES SECTION 5 - MANAGEMENT FUNCTIONS 9750-SERIES INJECT MASTER KEYS FACTORY DEFAULT: N/A ACCESS INSTRUCTIONS: 1. Select TERMINAL CONFIGURATION from the MANAGEMENT FUNCTIONS menu. 2. Select SET TERMINAL PARAMETERS. 3. Select KEY MANAGEMENT. 4. Choose the INJECT MASTER KEYS option.
OPERATION MANUAL - MODEL 97XX-Series 9700-SERIES 9705-SERIES 9710-SERIES SECTION 5 - MANAGEMENT FUNCTIONS 9750-SERIES ENTER MAC WORKING KEY FACTORY DEFAULT: PROCESSOR-SPECIFIC ACCESS INSTRUCTIONS: 1. Select TERMINAL CONFIGURATION from the MANAGEMENT FUNCTIONS menu. 2. Select SET TERMINAL PARAMETERS. 3. Select KEY MANAGEMENT. 4. Choose the ENTER MAC WORKING KEY option. DESCRIPTION: MAC is an acronym for Message Authentication Code.
OPERATION MANUAL - MODEL 97XX-Series SECTION 5 - MANAGEMENT FUNCTIONS The CHECK DIGIT that appears after all parts of the MAC WORKING KEY have been entered is similar to the checksum that is used to verify that the data programmed into a memory device such as an EPROM is correct. The CHECK DIGIT can be verified by doing a RECEIPT PRINTER TEST from the DIAGNOSTICS Menu and comparing the MAC WORKING KEY CHECK DIGIT on the printout to the original receipt printout from the initial terminal setup.
OPERATION MANUAL - MODEL 97XX-Series 9700-SERIES 9705-SERIES 9710-SERIES SECTION 5 - MANAGEMENT FUNCTIONS 9750-SERIES ENTER PIN WORKING KEY FACTORY DEFAULT: PROCESSOR-SPECIFIC ACCESS INSTRUCTIONS: 1. Select TERMINAL CONFIGURATION from the MANAGEMENT FUNCTIONS menu. 2. Select SET TERMINAL PARAMETERS. 3. Select KEY MANAGEMENT. 4. Choose the ENTER PIN WORKING KEY option.
OPERATION MANUAL - MODEL 97XX-Series SECTION 5 - MANAGEMENT FUNCTIONS Normally, the PIN WORKINGKEY contains only one part. However, some keys may contain multiple parts. If this is the case, separate individuals will hold the parts. If your key has multiple parts you must answer the question “ANOTHER KEY PART?”, with a YES until all parts are entered.
OPERATION MANUAL - MODEL 97XX-Series 9700-SERIES 9705-SERIES 9710-SERIES SECTION 5 - MANAGEMENT FUNCTIONS 9750-SERIES DOWNLOAD WORKING KEYS FACTORY DEFAULT: PROCESSOR-SPECIFIC ACCESS INSTRUCTIONS: 1. Select TERMINAL CONFIGURATION from the MANAGEMENT FUNCTIONS menu. 2. Select SET TERMINAL PARAMETERS. 3. Select KEY MANAGEMENT. 4. Choose the DOWNLOAD WORKING KEYS option. DESCRIPTION: The WORKING KEYS are the MAC and PIN WORKING KEYS, as described earlier.
OPERATION MANUAL - MODEL 97XX-Series 9700-SERIES 9705-SERIES 9710-SERIES SECTION 5 - MANAGEMENT FUNCTIONS 9750-SERIES TELEPHONE FACTORY DEFAULT: N/A ACCESS INSTRUCTIONS: 1. Select TERMINAL CONFIGURATION from the MANAGEMENT FUNCTIONS menu. 2. Select SET TERMINAL PARAMETERS. 3. Select TELEPHONE. DESCRIPTION: The TELEPHONE function is used to set up parameters that control telephone communications between the Cash Dispenser and the Processor. The following parameters are accessed through this function.
OPERATION MANUAL - MODEL 97XX-Series 9700-SERIES 9705-SERIES 9710-SERIES SECTION 5 - MANAGEMENT FUNCTIONS 9750-SERIES PRIMARY NUMBER FACTORY DEFAULT: NONE ACCESS INSTRUCTIONS: 1. Select TERMINAL CONFIGURATION from the MANAGEMENT FUNCTIONS menu. 2. Select SET TERMINAL PARAMETERS. 3. Select TELEPHONE. 4. Select the PRIMARY NUMBER option. DESCRIPTION: The Cash Dispenser communicates to your host processor over a dial up phone line.
OPERATION MANUAL - MODEL 97XX-Series 9700-SERIES 9705-SERIES 9710-SERIES SECTION 5 - MANAGEMENT FUNCTIONS 9750-SERIES BACKUP NUMBER FACTORY DEFAULT: NONE ACCESS INSTRUCTIONS: 1. Select TERMINAL CONFIGURATION from the MANAGEMENT FUNCTIONS menu. 2. Select SET TERMINAL PARAMETERS. 3. Select TELEPHONE. 4. Select the BACKUP NUMBER option. DESCRIPTION: The Cash Dispenser communicates with your Processors’ host computer over a dial up phone line.
OPERATION MANUAL - MODEL 97XX-Series 9700-SERIES 9705-SERIES 9710-SERIES SECTION 5 - MANAGEMENT FUNCTIONS 9750-SERIES DATAPAK ACCESS CODE FACTORY DEFAULT: N/A ACCESS INSTRUCTIONS: 1. Select TERMINAL CONFIGURATION from the MANAGEMENT FUNCTIONS menu. 2. Select SET TERMINAL PARAMETERS. 3. Select TELEPHONE. 4. Select DATAPAK ACCESS CODE. DESCRIPTION: NOTE: This feature is only available for Canadian-region ATMs.
OPERATION MANUAL - MODEL 97XX-Series 9700-SERIES 9705-SERIES 9710-SERIES SECTION 5 - MANAGEMENT FUNCTIONS 9750-SERIES PREDIAL ON/OFF FACTORY DEFAULT: OFF ACCESS INSTRUCTIONS: 1. Select TERMINAL CONFIGURATION from the MANAGEMENT FUNCTIONS menu. 2. Select SET TERMINAL PARAMETERS. 3. Select TELEPHONE. DESCRIPTION: This function allows you to turn on or off the PREDIAL feature.
OPERATION MANUAL - MODEL 97XX-Series 9700-SERIES 9705-SERIES 9710-SERIES SECTION 5 - MANAGEMENT FUNCTIONS 9750-SERIES COMPUSERVE ID FACTORY DEFAULT: NONE ACCESS INSTRUCTIONS: 1. Select TERMINAL CONFIGURATION from the MANAGEMENT FUNCTIONS menu. 2. Select SET TERMINAL PARAMETERS. 3. Select TELEPHONE. 4. Select the COMPUSERVE ID option. DESCRIPTION: The CompuServe Network is used by some processors to route transactions.
OPERATION MANUAL - MODEL 97XX-Series 9700-SERIES 9705-SERIES 9710-SERIES SECTION 5 - MANAGEMENT FUNCTIONS 9750-SERIES MODEM SETUP FACTORY DEFAULT: N/A ACCESS INSTRUCTIONS: 1. Select TERMINAL CONFIGURATION from the MANAGEMENT FUNCTIONS menu. 2. Select SET TERMINAL PARAMETERS. 3. Select TELEPHONE. 4. Select the MODEM SETUP option. DESCRIPTION: Selecting the MODEM SETUP OPTION from the TELEPHONE screen allows the terminal operator to select the following parameters: 1. 2. 3. 4. 5.
OPERATION MANUAL - MODEL 97XX-Series 9700-SERIES 9705-SERIES 9710-SERIES SECTION 5 - MANAGEMENT FUNCTIONS 9750-SERIES DIAL MODE FACTORY DEFAULT: ‘DTMF’ ACCESS INSTRUCTIONS: 1. Select TERMINAL CONFIGURATION from the MANAGEMENT FUNCTIONS menu. 2. Select SET TERMINAL PARAMETERS. 3. Select TELEPHONE. 4. Select the MODEM SETUP option. 5. Select DIAL MODE. DESCRIPTION: The modem is configured to dial in either the touch-tone mode (DTMF), or in the rotary (PULSE) mode.
OPERATION MANUAL - MODEL 97XX-Series 9700-SERIES 9705-SERIES 9710-SERIES SECTION 5 - MANAGEMENT FUNCTIONS 9750-SERIES DIAL RATE FACTORY DEFAULT: ‘FAST’ ACCESS INSTRUCTIONS: 1. Select TERMINAL CONFIGURATION from the MANAGEMENT FUNCTIONS menu. 2. Select SET TERMINAL PARAMETERS. 3. Select TELEPHONE. 4. Select the MODEM SETUP option. 5. Select DIAL RATE. DESCRIPTION: The internal modem can be configured to send dial tones at one of three speeds. The possible values are FAST (70 milliseconds), MED.
OPERATION MANUAL - MODEL 97XX-Series 9700-SERIES 9705-SERIES 9710-SERIES SECTION 5 - MANAGEMENT FUNCTIONS 9750-SERIES BAUD RATE FACTORY DEFAULT: ‘1200’ ACCESS INSTRUCTIONS: 1. Select TERMINAL CONFIGURATION from the MANAGEMENT FUNCTIONS menu. 2. Select SET TERMINAL PARAMETERS. 3. Select TELEPHONE. 4. Select the MODEM SETUP option. 5. Select BAUD RATE. DESCRIPTION: The bit rate of the modem can be controlled with this function. The rate can be set to 2400 or 1200 bits per second (bps).
OPERATION MANUAL - MODEL 97XX-Series 9700-SERIES 9705-SERIES 9710-SERIES SECTION 5 - MANAGEMENT FUNCTIONS 9750-SERIES MODEM SETUP STRING FACTORY DEFAULT: MODEM-SPECIFIC ACCESS INSTRUCTIONS: 1. Select TERMINAL CONFIGURATION from the MANAGEMENT FUNCTIONS menu. 2. Select SET TERMINAL PARAMETERS. 3. Select TELEPHONE. 4. Select the MODEM SETUP option. 5. Select MODEM SETUP STRING.
OPERATION MANUAL - MODEL 97XX-Series 9700-SERIES 9705-SERIES 9710-SERIES SECTION 5 - MANAGEMENT FUNCTIONS 9750-SERIES RESET/TEST MODEM FACTORY DEFAULT: N/A ACCESS INSTRUCTIONS: 1. Select TERMINAL CONFIGURATION from the MANAGEMENT FUNCTIONS menu. 2. Select SET TERMINAL PARAMETERS. 3. Select TELEPHONE. 4. Select the MODEM SETUP option. 5. Select RESET/TEST MODEM. DESCRIPTION: This function is used to reset and test the internal modem.
OPERATION MANUAL - MODEL 97XX-Series 9700-SERIES 9705-SERIES 9710-SERIES SECTION 5 - MANAGEMENT FUNCTIONS 9750-SERIES MORE (TERMINAL PARAMETERS) FACTORY DEFAULT: N/A ACCESS INSTRUCTIONS: 1. Select TERMINAL CONFIGURATION from the MANAGEMENT FUNCTIONS menu. 2. Select SET TERMINAL PARAMETERS. 3. Choose MORE. DESCRIPTION: Selecting the MORE TERMINAL PARAMETERS option from the TERMINAL PARAMETERS allows the terminal operator or a service technician to view or change the following: 1. 2. 3. 4. 5. 6. 7.
OPERATION MANUAL - MODEL 97XX-Series 9700-SERIES 9705-SERIES 9710-SERIES SECTION 5 - MANAGEMENT FUNCTIONS 9750-SERIES ADJUST CONTRAST FACTORY DEFAULT: CONTRAST: MID-RANGE ACCESS INSTRUCTIONS: 1. Select TERMINAL CONFIGURATION from the MANAGEMENT FUNCTIONS menu. 2. Select SET TERMINAL PARAMETERS. 3. Select MORE. 4. Choose ADJUST CONTRAST. DESCRIPTION: This feature allows the terminal operator to adjust the contrast of the display.
OPERATION MANUAL - MODEL 97XX-Series 9700-SERIES 9705-SERIES 9710-SERIES SECTION 5 - MANAGEMENT FUNCTIONS 9750-SERIES RECEIPT OPTION FACTORY DEFAULT: DISABLED ACCESS INSTRUCTIONS: 1. Select TERMINAL CONFIGURATION from the MANAGEMENT FUNCTIONS menu. 2. Select SET TERMINAL PARAMETERS. 3. Select MORE. 4. Choose RECEIPT OPTION. DESCRIPTION: This feature allows the customer to select the option of receiving or not receiving a receipt at the completion of a transaction.
OPERATION MANUAL - MODEL 97XX-Series 9700-SERIES 9705-SERIES 9710-SERIES SECTION 5 - MANAGEMENT FUNCTIONS 9750-SERIES TRITON CONNECT FACTORY DEFAULT: DISABLED ACCESS INSTRUCTIONS: 1. Select TERMINAL CONFIGURATION from the MANAGEMENT FUNCTIONS menu. 2. Select SET TERMINAL PARAMETERS. 3. Select MORE. 4. Choose TRITON CONNECT. DESCRIPTION: Selecting the TRITON CONNECT function allows the terminal operator to set up the following parameters associated with Triton Connect: 1. 2. 3. 4. 5.
OPERATION MANUAL - MODEL 97XX-Series 9700-SERIES 9705-SERIES 9710-SERIES SECTION 5 - MANAGEMENT FUNCTIONS 9750-SERIES PRIMARY NUMBER FACTORY DEFAULT: NONE ACCESS INSTRUCTIONS: 1. Select TERMINAL CONFIGURATION from the MANAGEMENT FUNCTIONS menu. 2. Select SET TERMINAL PARAMETERS. 3. Select MORE. 4. Select TRITON CONNECT. 5. Choose PRIMARY NUMBER. DESCRIPTION: The PRIMARY NUMBER function is used to enter the number that the terminal can use for calling back the Triton Connect Host Computer.
OPERATION MANUAL - MODEL 97XX-Series 9700-SERIES 9705-SERIES 9710-SERIES SECTION 5 - MANAGEMENT FUNCTIONS 9750-SERIES BACKUP NUMBER FACTORY DEFAULT: NONE ACCESS INSTRUCTIONS: 1. Select TERMINAL CONFIGURATION from the MANAGEMENT FUNCTIONS menu. 2. Select SET TERMINAL PARAMETERS. 3. Select MORE. 4. Select TRITON CONNECT. 5. Choose BACKUP NUMBER. DESCRIPTION: The BACKUP NUMBER function is used to enter a backup number that the terminal can use for calling back the Triton Connect computer.
OPERATION MANUAL - MODEL 97XX-Series 9700-SERIES 9705-SERIES 9710-SERIES SECTION 5 - MANAGEMENT FUNCTIONS 9750-SERIES ALARM NUMBERS FACTORY DEFAULT: N/A ACCESS INSTRUCTIONS: 1. Select TERMINAL CONFIGURATION from the MANAGEMENT FUNCTIONS menu. 2. Select SET TERMINAL PARAMETERS. 3. Select MORE. 4. Choose TRITON CONNECT. 5. Choose ALARM NUMBERS. DESCRIPTION: In some applications the terminal monitoring organization may require different telephone numbers for alarm reporting purposes.
OPERATION MANUAL - MODEL 97XX-Series 9700-SERIES 9705-SERIES 9710-SERIES SECTION 5 - MANAGEMENT FUNCTIONS 9750-SERIES PRIMARY ALARM NUMBER FACTORY DEFAULT: NONE ACCESS INSTRUCTIONS: 1. Select TERMINAL CONFIGURATION from the MANAGEMENT FUNCTIONS menu. 2. Select SET TERMINAL PARAMETERS. 3. Select MORE. 4. Select TRITON CONNECT. 5. Select ALARM NUMBERS. 6. Choose PRIMARY.
OPERATION MANUAL - MODEL 97XX-Series 9700-SERIES 9705-SERIES 9710-SERIES SECTION 5 - MANAGEMENT FUNCTIONS 9750-SERIES BACKUP ALARM NUMBER FACTORY DEFAULT: NONE ACCESS INSTRUCTIONS: 1. Select TERMINAL CONFIGURATION from the MANAGEMENT FUNCTIONS menu. 2. Select SET TERMINAL PARAMETERS. 3. Select MORE. 4. Select TRITON CONNECT. 5. Select ALARM NUMBERS. 6. Choose BACKUP.
OPERATION MANUAL - MODEL 97XX-Series 9700-SERIES 9705-SERIES 9710-SERIES SECTION 5 - MANAGEMENT FUNCTIONS 9750-SERIES ENABLE/DISABLE CALL BACK FACTORY DEFAULT: DISABLED ACCESS INSTRUCTIONS: 1. Select TERMINAL CONFIGURATION from the MANAGEMENT FUNCTIONS menu. 2. Select SET TERMINAL PARAMETERS. 3. Select MORE. 4. Select TRITON CONNECT. DESCRIPTION: Normally, when the Triton Connect Host Computer contacts a terminal, it will hang up and wait for the terminal to CALL BACK.
OPERATION MANUAL - MODEL 97XX-Series 9700-SERIES 9705-SERIES 9710-SERIES SECTION 5 - MANAGEMENT FUNCTIONS 9750-SERIES ENABLE/DISABLE TRITON CONNECT FACTORY DEFAULT: DISABLED ACCESS INSTRUCTIONS: 1. Select TERMINAL CONFIGURATION from the MANAGEMENT FUNCTIONS menu. 2. Select SET TERMINAL PARAMETERS. 3. Select MORE. 4. Select TRITON CONNECT.
OPERATION MANUAL - MODEL 97XX-Series 9700-SERIES 9705-SERIES 9710-SERIES SECTION 5 - MANAGEMENT FUNCTIONS 9750-SERIES ATM MONITORING FACTORY DEFAULT: N/A ACCESS INSTRUCTIONS: 1. Select TERMINAL CONFIGURATION from the MANAGEMENT FUNCTIONS menu. 2. Select SET TERMINAL PARAMETERS. 3. Select MORE. 4. Select ATM monitoring. DESCRIPTION: The ATM Monitoring screen provides access to the following functions: 1. STATUS MONITORING.
OPERATION MANUAL - MODEL 97XX-Series 9700-SERIES 9705-SERIES 9710-SERIES SECTION 5 - MANAGEMENT FUNCTIONS 9750-SERIES STATUS MONITORING FACTORY DEFAULT: DISABLED ACCESS INSTRUCTIONS: 1. Select TERMINAL CONFIGURATION from the MANAGEMENT FUNCTIONS menu. 2. Select SET TERMINAL PARAMETERS. 3. Select MORE. 3. Select ATM MONITORING. 4. Select Status monitoring. DESCRIPTION: Status monitoring is a feature that is available with selected processor software.
OPERATION MANUAL - MODEL 97XX-Series 9700-SERIES 9705-SERIES 9710-SERIES SECTION 5 - MANAGEMENT FUNCTIONS 9750-SERIES HEARTBEAT MESSAGE FACTORY DEFAULT: DISABLED ACCESS INSTRUCTIONS: 1. Select TERMINAL CONFIGURATION from the MANAGEMENT FUNCTIONS menu. 2. Select SET TERMINAL PARAMETERS. 3. Select MORE. 4. Select ATM MONITORING. 5. Select HEARTBEAT MESSAGE. DESCRIPTION: The HEARTBEAT MESSAGE feature is designed to provide a means of reporting communications system status to the host processor.
OPERATION MANUAL - MODEL 97XX-Series SECTION 5 - MANAGEMENT FUNCTIONS Once the Heartbeat Message call feature is enabled at the terminal, an internal timer will be initialized to the number of minutes set in the DELAY PERIOD parameter at system power-up and after a reset. This timer is restarted each time a call is made to the host.
OPERATION MANUAL - MODEL 97XX-Series SECTION 5 - MANAGEMENT FUNCTIONS Terminal is Turned Off or Power Has Failed If the terminal is turned off, no calls will be made. While an obvious point, it means that for this feature to be of any value, the terminal must always remain on. Communications System Has Failed A failure of any piece of the communications system will result in missed calls. This includes the terminal modem, the phone line to the terminal, and any intermediate telecommunications providers.
OPERATION MANUAL - MODEL 97XX-Series 9700-SERIES 9705-SERIES 9710-SERIES SECTION 5 - MANAGEMENT FUNCTIONS 9750-SERIES AD SCREENS FACTORY DEFAULT: ENABLED ACCESS INSTRUCTIONS: 1. Select TERMINAL CONFIGURATION from the MANAGEMENT FUNCTIONS menu. 2. Select SET TERMINAL PARAMETERS. 3. Select MORE. 4. Select AD SCREENS. DESCRIPTION: The terminal must have at least one Memory Expansion Card installed for this feature to operate.
OPERATION MANUAL - MODEL 97XX-Series 9700-SERIES 9705-SERIES 9710-SERIES SECTION 5 - MANAGEMENT FUNCTIONS 9750-SERIES COMMUNICATION HEADER FACTORY DEFAULT: PROCESSOR-SPECIFIC ACCESS INSTRUCTIONS: 1. Select TERMINAL CONFIGURATION from the MANAGEMENT FUNCTIONS menu. 2. Select SET TERMINAL PARAMETERS. 3. Select MORE. 4. Select COMMUNICATION HEADER. DESCRIPTION: The COMMUNICATION HEADER is an optional feature that is only applicable to certain processors.
OPERATION MANUAL - MODEL 97XX-Series 9700-SERIES 9705-SERIES 9710-SERIES SECTION 5 - MANAGEMENT FUNCTIONS 9750-SERIES MORE (TERMINAL PARAMETERS) FACTORY DEFAULT: N/A ACCESS INSTRUCTIONS: 1. Select TERMINAL CONFIGURATION from the MANAGEMENT FUNCTIONS menu. 2. Select SET TERMINAL PARAMETERS. 3. Select MORE. 4. Select MORE. DESCRIPTION: This screen allows you to select additional terminal parameters functions. The functions available are: 1. ALARM THRESHOLDS 2. BACKGROUND GRAPHICS 3.
OPERATION MANUAL - MODEL 97XX-Series 9700-SERIES 9705-SERIES 9710-SERIES SECTION 5 - MANAGEMENT FUNCTIONS 9750-SERIES ALARM THRESHOLDS FACTORY DEFAULT: OFF ACCESS INSTRUCTIONS: 1. Select TERMINAL CONFIGURATION from the MANAGEMENT FUNCTIONS menu. 2. Select SET TERMINAL PARAMETERS. 3. Select MORE. 4. Select MORE. 5. Select ALARM THRESHOLDS. DESCRIPTION: This function allows you to turn on or off the LOW CASH THRESHOLD, JOURNAL THRESHOLD, and SCHEDULED JOURNAL features. 1. LOW CASH THRESHOLD.
OPERATION MANUAL - MODEL 97XX-Series 9700-SERIES 9705-SERIES 9710-SERIES SECTION 5 - MANAGEMENT FUNCTIONS 9750-SERIES SET LOW CASH THRESHOLD FACTORY DEFAULT: 0 ACCESS INSTRUCTIONS: 1. Select TERMINAL CONFIGURATION from the MANAGEMENT FUNCTIONS menu. 2. Select SET TERMINAL PARAMETERS. 3. Select MORE. 4. Select MORE. 5. Select ALARM THRESHOLDS. 6. Select SET LOW CASH THRESHOLD. DESCRIPTION: This function allows you to enter the number of bills that will act as a low cash threshold.
OPERATION MANUAL - MODEL 97XX-Series 9700-SERIES 9705-SERIES 9710-SERIES SECTION 5 - MANAGEMENT FUNCTIONS 9750-SERIES SET JOURNAL THRESHOLD FACTORY DEFAULT: 0 ACCESS INSTRUCTIONS: 1. Select TERMINAL CONFIGURATION from the MANAGEMENT FUNCTIONS menu. 2. Select SET TERMINAL PARAMETERS. 3. Select MORE. 4. Select MORE. 5. Select ALARM THRESHOLDS. 6. Select SET JOURNAL THRESHOLD. DESCRIPTION: This function allows you to enter the number of journal entries that will act as a threshold.
OPERATION MANUAL - MODEL 97XX-Series 9700-SERIES 9705-SERIES 9710-SERIES SECTION 5 - MANAGEMENT FUNCTIONS 9750-SERIES SET SCHEDULED JOURNAL FACTORY DEFAULT: 0 ACCESS INSTRUCTIONS: 1. Select TERMINAL CONFIGURATION from the MANAGEMENT FUNCTIONS menu. 2. Select SET TERMINAL PARAMETERS. 3. Select MORE. 4. Select MORE. 5. Select ALARM THRESHOLDS. 6. Select SET SCHEDULED JOURNAL.
OPERATION MANUAL - MODEL 97XX-Series 9700-SERIES 9705-SERIES 9710-SERIES SECTION 5 - MANAGEMENT FUNCTIONS 9750-SERIES BACKGROUND GRAPHICS FACTORY DEFAULT: OFF ACCESS INSTRUCTIONS: 1. Select TERMINAL CONFIGURATION from the MANAGEMENT FUNCTIONS menu. 2. Select SET TERMINAL PARAMETERS. 3. Select MORE. 4. Select MORE. 5. Select BACKGROUND GRAPHICS.
OPERATION MANUAL - MODEL 97XX-Series 9700-SERIES 9705-SERIES 9710-SERIES SECTION 5 - MANAGEMENT FUNCTIONS 9750-SERIES VIEW/MODIFY OPTIONS FACTORY DEFAULT: N/A ACCESS INSTRUCTIONS: 1. Select TERMINAL CONFIGURATION from the MANAGEMENT FUNCTIONS menu. 2. Select SET TERMINAL PARAMETERS. 3. Select MORE. 4. Select MORE. 5. Select VIEW/MODIFY OPTIONS. DESCRIPTION: The VIEW/MODIFY OPTIONS FUNCTION provides access to terminal parameters for setting the following: 1. ACTIVATE (A selected feature. 2.
OPERATION MANUAL - MODEL 97XX-Series 9700-SERIES 9705-SERIES 9710-SERIES SECTION 5 - MANAGEMENT FUNCTIONS 9750-SERIES ACTIVATE FACTORY DEFAULT: N/A ACCESS INSTRUCTIONS: 1. Select TERMINAL CONFIGURATION from the MANAGEMENT FUNCTIONS menu. 2. Select SET TERMINAL PARAMETERS. 3. Select MORE. 4. Select MORE. 5. Select VIEW/MODIFY OPTIONS. 6. Choose ACTIVATE. DESCRIPTION: To activate a FEATURE an activation code must be obtained from the Triton Systems, Inc., Technical Support Department.
OPERATION MANUAL - MODEL 97XX-Series 9700-SERIES 9705-SERIES 9710-SERIES SECTION 5 - MANAGEMENT FUNCTIONS 9750-SERIES DEACTIVATE FACTORY DEFAULT: N/A ACCESS INSTRUCTIONS: 1. Select TERMINAL CONFIGURATION from the MANAGEMENT FUNCTIONS menu. 2. Select SET TERMINAL PARAMETERS. 3. Select MORE. 4. Select MORE. 5. Select VIEW/MODIFY OPTIONS. 6. Choose DEACTIVATE. DESCRIPTION: To DEACTIVATE a Feature select the DEACTIVATE option from the FEATURE menu.
OPERATION MANUAL - MODEL 97XX-Series 9700-SERIES 9705-SERIES 9710-SERIES SECTION 5 - MANAGEMENT FUNCTIONS 9750-SERIES SELECT FEATURE NUMBER FACTORY DEFAULT: N/A ACCESS INSTRUCTIONS: 1. Select TERMINAL CONFIGURATION from the MANAGEMENT FUNCTIONS menu. 2. Select SET TERMINAL PARAMETERS. 3. Select MORE. 4. Select MORE. 5. Select VIEW/MODIFY OPTIONS. 6. Choose SELECT FEATURE NUMBER. DESCRIPTION: Selects the feature number to examine or to activate/deactivate.
OPERATION MANUAL - MODEL 97XX-Series 9700-SERIES 9705-SERIES 9710-SERIES SECTION 5 - MANAGEMENT FUNCTIONS 9750-SERIES DATE / TIME FUNCTIONS FACTORY DEFAULT: N/A ACCESS INSTRUCTIONS: 1. Select TERMINAL CONFIGURATION from the MANAGEMENT FUNCTIONS menu. 2. Choose DATE / TIME FUNCTIONS. DESCRIPTION: This screen provides a menu of functions related to configuration of date and time parameters for the Cash Dispenser: 1. SET DATE FORMAT.
OPERATION MANUAL - MODEL 97XX-Series 9700-SERIES 9705-SERIES 9710-SERIES SECTION 5 - MANAGEMENT FUNCTIONS 9750-SERIES SET DATE FORMAT FACTORY DEFAULT: MM/DD/YY ACCESS INSTRUCTIONS: 1. Select TERMINAL CONFIGURATION from the MANAGEMENT FUNCTIONS menu. 2. Choose DATE / TIME FUNCTIONS. 3. Choose SET DATE FORMAT. DESCRIPTION: This function provides a way to change the date format the terminal uses when printing a date field on receipts and reports.
OPERATION MANUAL - MODEL 97XX-Series 9700-SERIES 9705-SERIES 9710-SERIES SECTION 5 - MANAGEMENT FUNCTIONS 9750-SERIES SET DATE / TIME FACTORY DEFAULT: N/A ACCESS INSTRUCTIONS: 1. Select TERMINAL CONFIGURATION from the MANAGEMENT FUNCTIONS menu. 2. Choose DATE/TIME FUNCTIONS. 3. Choose SET DATE / TIME DESCRIPTION: The Cash Dispenser contains an internal clock that maintains the date and time, even when power is disconnected from the unit. Press SET DATE to begin the date entry process.
OPERATION MANUAL - MODEL 97XX-Series 9700-SERIES 9705-SERIES 9710-SERIES SECTION 5 - MANAGEMENT FUNCTIONS 9750-SERIES SET DATE FACTORY DEFAULT: N/A ACCESS INSTRUCTIONS: 1. Select TERMINAL CONFIGURATION from the MANAGEMENT FUNCTIONS menu. 2. Choose DATE/TIME FUNCTIONS. 3. Select SET DATE / TIME. 4. Select SET DATE. DESCRIPTION: Press SET DATE to begin the date entry process. The date is entered in the form ‘MM/DD/YY’ (month, day, year).
OPERATION MANUAL - MODEL 97XX-Series 9700-SERIES 9705-SERIES 9710-SERIES SECTION 5 - MANAGEMENT FUNCTIONS 9750-SERIES SET TIME FACTORY DEFAULT: N/A ACCESS INSTRUCTIONS: 1. Select TERMINAL CONFIGURATION from the MANAGEMENT FUNCTIONS menu. 2. Choose DATE/TIME FUNCTIONS. 3. Select SET DATE / TIME. 4. Select SET TIME. DESCRIPTION: The time is entered in the form ‘HH:MM:SS’ (hours, minutes, seconds). Do not enter the ‘:’ characters separating the fields, just the fields themselves.
OPERATION MANUAL - MODEL 97XX-Series 9700-SERIES 9705-SERIES 9710-SERIES SECTION 5 - MANAGEMENT FUNCTIONS 9750-SERIES TRANSACTION TYPES FACTORY DEFAULT: ON ACCESS INSTRUCTIONS: 1. Select the TERMINAL CONFIGURATION option from the MANAGEMENT FUNCTIONS screen. 2. Select TRANSACTION TYPES. DESCRIPTION: This function allows you to turn on or off the availability of the two transaction types: TRANSFERS and BALANCE INQUIRIES.
OPERATION MANUAL - MODEL 97XX-Series 9700-SERIES 9705-SERIES 9710-SERIES SECTION 5 - MANAGEMENT FUNCTIONS 9750-SERIES ACCOUNT TYPES FACTORY DEFAULT: ON ACCESS INSTRUCTIONS: 1. Select the TERMINAL CONFIGURATION option from the MANAGEMENT FUNCTIONS screen. 2. Select ACCOUNT TYPES. DESCRIPTION: This function allows you to turn on or off the availability of two account types: SAVINGS and CREDIT CARD. When an account type is turned ON, the terminal will provide that option to the customer.
SECTION 6 - MAINTENANCE
OPERATION MANUAL - MODEL 97XX-Series SECTION 6 - MAINTENANCE Introduction This section of the user manual covers preventive and corrective maintenance procedures appropriate for user personnel. The following areas are covered: 1. Replenishing Receipt Paper. Describes how to replace a spent receipt paper roll. 2. Cleaning the Enclosure. The proper way to clean the ATM housing. 3. Card Reader Cleaning. The recommended card reader cleaning technique. Figure 6-1.
OPERATION MANUAL - MODEL 97XX-Series SECTION 6 - MAINTENANCE 2. If paper remains on the roll, cut the paper between the roll and the printer with a pair of scissors, as shown in Figure 1. 3. Use the RECEIPT PRINTER PAPER FEED BUTTON (Figure 6-2) to feed the paper through the paper path until all paper comes out the front of the printer. WARNING Do not pull the paper backward through the printer. This may leave paper fragments that can cause paper jams.
OPERATION MANUAL - MODEL 97XX-Series SECTION 6 - MAINTENANCE Cleaning the Enclosure The Cash Dispenser front panel is highly durable, resisting scratches and finger smudges. However, occasional cleaning of the front panel and the plastic enclosure may be desirable. A soft dry or slightly damp cloth may be used for cleaning. For best results, use a weak solution of a mild detergent and water. WARNING Figure 6-5B. Paper roll and spool in place for operation.
OPERATION MANUAL - MODEL 97XX-Series SECTION 6 - MAINTENANCE Card Reader Problems The following procedures provide help in recovering from card reader problems. Can’t Read Customer Card 1. Reset the ATM. If the problem still exists, continue with next step. 2. Access Management Functions main menu. 3. Select the DIAGNOSTICS option. Select the MORE DIAGNOSTICS option. Figure 6-8. Use the cleaning cards on a monthly basis to maintain effective card reader operation. 4. Select the SCAN CARD option. 5.
OPERATION MANUAL - MODEL 97XX-Series SECTION 6 - MAINTENANCE Communication Problems Follow these steps to recover from “System Unavailable” and “Communication Error” conditions. 1. Reset the ATM. If the problem still exists, continue with next step. 2. Open the ATM control panel. Plug the base unit of a telephone (NOT the handset) into the phone jack on the third card from the top in the card cage. 3. Listen for a dial tone. If there is a dial tone, unplug the telephone. Close the ATM control panel.
SECTION 7 - JOURNAL ENTRIES
OPERATION MANUAL - MODEL 97XX-Series SECTION 7 - JOURNAL ENTRIES JOURNAL ENTRIES Journal entries are printed on a per transaction basis. Each new entry begins with a blank line. The following is an example of a typical journal entry. In the case of a communications error, most of this information is omitted and an error code would be printed. 1 13 12 2 3 4 5 6 09/l9/94 5:32:29 PM OK 9999 TERM # 000000 1234567890123456 0004 1 50.00 Dispensed: 50.
OPERATION MANUAL - MODEL 97XX-Series SECTION 7 - JOURNAL ENTRIES TRANSACTION TYPES Transaction Code Transaction Type 0 Invalid Transaction Type 1 Withdraw al from Checking 2 Withdraw al from Savings 3 Withdraw al from Credit Card 4 Transfer from Checking to Savings 5 Transfer from Saving to Checking 6 Transfer from Credit Card to Checking 7 Transfer from Credit Card to Savings 8 Balance Inquiry Checking 9 Balance Inquiry Savings 10 Balance Inquiry Credit Card 11 Reversal 12 Non-
SECTION 8 - ERROR RECOVERY
OPERATION MANUAL - MODEL 97XX-Series SECTION 8 - ERROR RECOVERY Introduction This section of the operation manual describes how user personnel can respond to Cash Dispenser error conditions. Error Codes / Recovery Procedures The Cash Dispenser operating system determines the operational status of each of its components by routinely performing a system status check. A status check is performed: 1. During power up. TEMPORARILY OUT OF SERVICE ERROR CODE #XXX CONTACT SERVICE PERSONNEL NOTIFY ATTENDANT 2.
OPERATION MANUAL - MODEL 97XX-Series SECTION 8 - ERROR RECOVERY Resetting the Cash Dispenser In the “OUT OF SERVICE” mode of operation the dispenser will not respond to any inputs to the keypad or card reader. Try to return the dispenser to normal operation by performing a RESET. To do this, open the top enclosure access door (see CAUTION) and turn the AC Power Switch OFF for a few seconds, then turn it back ON. After resetting the Cash Dispenser, the RESET ERROR/MANAGEMENT Menu (refer to Figure 8-2.
OPERATION MANUAL - MODEL 97XX-Series SECTION 8 - ERROR RECOVERY ERROR CODES / RECOVERY PROCEDURES Error C ode 9700+ 33 X X 9705+ 9710+ 9750+ Meaning Feed Failure Recovery Procedure 2 34 X X Mistracked note at feed 2 35 X X Mistracked note at double detect 2 36 X X Mistracked note at exit 2 37 X X Note too long at exit 2 38 X X Blocked exit 2 39 X X Too many notes 2 42 X X Timing w heel error 1 44 X X Bad roller profile 1 45 X X Diverter error 1 46 X
OPERATION MANUAL - MODEL 97XX-Series SECTION 8 - ERROR RECOVERY ERROR CODES / RECOVERY PROCEDURES Error C ode 9700+ 9705+ 124 X 125 126 9710+ 9750+ Meaning Recovery Procedure Diverter moved to exit position during Reject/Purge 1 X Initial status check failed 2 X Diverter moved to reject position during dispense 1 128 X X X X Error in reply from dispenser 1 129 X X X X Dispenser not responding 1 130 X X X X No acknow ledge from dispenser 1 X No CTS (Ready) from dispe
OPERATION MANUAL - MODEL 97XX-Series SECTION 8 - ERROR RECOVERY ERROR CODES / RECOVERY PROCEDURES Error C ode 9700+ 9705+ 9710+ 166 X X X 9750+ Meaning Recovery Procedure Bad dispenser 1 167 X X X X Reported Low Cash to Triton Connect 5 168 X X X X Softw are Dow nload to Terminal Failed 1 182 X X X X Currency cassette low 5 183 X X X X Receipt printer paper low 10 185 X X X X Phone number not configured 3 186 X X X X Bill siz e not configured correctly
OPERATION MANUAL - MODEL 97XX-Series SECTION 8 - ERROR RECOVERY ERROR CODES / RECOVERY PROCEDURES Error C ode 9700+ 9705+ 9710+ 9750+ Meaning Recovery Procedure 316 X Delivery Failure 1 317 X Reject Failure 1 318 X Too Many Notes Requested 1 319 X Jam in Note Transport 1 320 X Reject Cassette Almost Full 7 321 X Cassette Data Corrupted 1 322 X Main Motor Failure 1 323 X Dispense Count Check Error 1 325 X Note Qualifier Faulty 1 326 X Cassette exit sensor failur
OPERATION MANUAL - MODEL 97XX-Series SECTION 8 - ERROR RECOVERY ERROR RECOVERY PROCEDURE 1 1. Reset the Cash Dispenser. 2. If the error clears, perform a Test Dispense. This Procedure applies to the following error codes: 3. If the dispense works, place the unit back in service. 4. If the test dispense does not work, or the error occurs again, contact your service provider. TRITON SYSTEMS, INC.
OPERATION MANUAL - MODEL 97XX-Series SECTION 8 - ERROR RECOVERY ERROR RECOVERY PROCEDURE 2 1. Turn off the Cash Dispenser and open the security container. 2. Inspect the dispensing mechanism feed path for jammed currency and currency sticking together. Clear the feed path as needed. 3. Remove and inspect the cassette(s) for damage that could prevent proper dispensing. Also, make sure the currency is fit for dispensing.
OPERATION MANUAL - MODEL 97XX-Series SECTION 8 - ERROR RECOVERY ERROR RECOVERY PROCEDURE Refer to your ATM Operations Manual for procedures on checking and setting this parameter. 3 This Procedure applies to the following error codes: 185, 186, 187, 188, 189, 190 TRITON SYSTEMS, INC.
OPERATION MANUAL - MODEL 97XX-Series SECTION 8 - ERROR RECOVERY ERROR RECOVERY PROCEDURE 1. Unlock and open the Cash Dispenser control panel and turn power OFF. 2. Check the paper feed path. Ensure no cables or ground wire is impeding paper path between paper roll and printer. 4 This Procedure applies to the following error codes: 138, 139, 140, 141 3. Cut paper between paper roll and printer with a set of scissors. Open printer by loosening the thumb screw on side of printer mechanism.
OPERATION MANUAL - MODEL 97XX-Series SECTION 8 - ERROR RECOVERY ERROR RECOVERY PROCEDURE 5 1. Turn off the Cash Dispenser and open the security container. 2. Check the currency level in the cassette(s). If there is no currency in the cassette(s), or the currency level is too low, fill the cassette(s) and reinstall. This Procedure applies to the following error codes: 167, 182, 301, 302 3. Close and lock the security container. Reset the Cash Dispenser. 4. If the error clears, perform a Test Dispense.
OPERATION MANUAL - MODEL 97XX-Series SECTION 8 - ERROR RECOVERY ERROR RECOVERY PROCEDURE 1. Ensure all cassettes are actually present in the mechanism. If they are, remove and re-install each cassette. 2. Ensure all cassettes are LOCKED into position in the mechanism, using the cassette LOCK/UNLOCK function. 6 This Procedure applies to the following error codes: 303, 310, 315 3. Close and lock the security container. Reset the Cash Dispenser. 4. If the error clears, perform a Test Dispense. 5.
OPERATION MANUAL - MODEL 97XX-Series SECTION 8 - ERROR RECOVERY ERROR RECOVERY PROCEDURE 1. Remove and empty the Reject Cassette. Reinstall the Reject Cassette. 2. Close and lock the security container. Reset the Cash Dispenser. 7 This Procedure applies to the following error codes: 320 3. If the error clears, perform a Test Dispense. 4. If the dispense works, place the unit back in service. 5. If the test dispense does not work, or the error occurs again, contact your service provider.
OPERATION MANUAL - MODEL 97XX-Series SECTION 8 - ERROR RECOVERY ERROR RECOVERY PROCEDURE 8 1. Turn off the Cash Dispenser and open the security container. 2. Ensure all cassettes are present. Remove and reinstall the cassettes. 3. Close and lock the security container. Reset the Cash Dispenser. This Procedure applies to the following error codes: 156 4. If the error clears, perform a Test Dispense. 5. If the dispense works, place the unit back in service. 6.
OPERATION MANUAL - MODEL 97XX-Series SECTION 8 - ERROR RECOVERY ERROR RECOVERY PROCEDURE 9 1. Turn off the Cash Dispenser and open the security container. 2. Inspect the dispensing mechanism feed path for jammed currency and currency sticking together. Clear the feed path as needed. This Procedure applies to the following error codes: 134, 135 3. Close and lock the security container. Reset the Cash Dispenser. 4. If the error clears, perform a Test Dispense. 5.
OPERATION MANUAL - MODEL 97XX-Series ERROR RECOVERY PROCEDURE SECTION 8 - ERROR RECOVERY 10 1. Unlock and open the Cash Dispenser control panel. 2. Check the receipt paper spool. If the paper spool is low or out of paper, replace the paper roll. See the applicable Operations Manual for paper roll replacement procedure. This Procedure applies to the following error codes: 183, 195 3. Reset the terminal. If the error clears, place the unit back in service. 4.
OPERATION MANUAL - MODEL 97XX-Series ERROR RECOVERY PROCEDURE SECTION 8 - ERROR RECOVERY 11 1. Unlock an open the security container. 2. Check the labels on the cassettes. If a duplicate cassette is installed, replace it with the correct non-duplicate cassette. If necessary, use the INJECT NEW CASSETTE ID procedure to ensure each cassette has a unique ID (A, B, C, or D). This Procedure applies to the following error codes: 95 3. Make sure all cassettes are IN SERVICE. 4.
OPERATION MANUAL - MODEL 97XX-Series ERROR RECOVERY PROCEDURE SECTION 8 - ERROR RECOVERY 12 1. Archive or Print the journal. 2. Reset the Cash Dispenser. This Procedure applies to the following error codes: 3. If the error clears, perform a Test Dispense. 151 4. If the dispense works, place the unit back in service. 5. If the test dispense does not work, or the error occurs again, contact your service provider. TRITON SYSTEMS, INC.
OPERATION MANUAL - MODEL 97XX-Series ERROR RECOVERY PROCEDURE SECTION 8 - ERROR RECOVERY 13 1. Turn off the Cash Dispenser and open the security container. 2. Inspect the EJ Module. The EJ should be yellow in color. This Procedure applies to the following error codes: 3. Close and lock the security container. 193 4. If the EJ Module is the correct color, reset the Cash Dispenser. 5. If the error clears, perform a Test Dispense. 6. If the dispense works, place the unit back in service. 7.
OPERATION MANUAL - MODEL 97XX-Series ERROR RECOVERY PROCEDURE SECTION 8 - ERROR RECOVERY 14 1. Use the Lock/Unlock function to ensure the cassettes are locked. 2. Reset the Cash Dispenser. 3. If the error clears, perform a Test Dispense. This Procedure applies to the following error codes: 194 4. If the dispense works, place the unit back in service. 5. If the dispense does not work, or the error occurs again, contact your service provider. TRITON SYSTEMS, INC.
OPERATION MANUAL - MODEL 97XX-Series SECTION 8 - ERROR RECOVERY TABLE 8-2 - MISCELLANEOUS ERROR CODES Error/Status C ode Meaning Recommended Actions 1 Timeout Contact your service provider for assistance. 3 BGD_NOANSWER Contact your service provider for assistance. 4 Error in modem data Contact your service provider for assistance. 6 BGD_NODIALTONE Contact your service provider for assistance. 7 BGD_BUSY Contact your service provider for assistance.
SECTION 9 - CUSTOMER TRANSACTIONS
OPERATION MANUAL - MODEL 97XX-Series SECTION 9 - Customer Transactions Introduction The daily operation of the Cash Dispenser is quite simple and straightforward. Once the terminal has been properly configured (see Section 3, Setup), the only management functions that will be used on a regular basis are the CLOSE and JOURNAL functions (see Section 5, Management Functions). This section discusses the day-to-day operation of the Cash Dispenser from a customer standpoint.
OPERATION MANUAL - MODEL 97XX-Series SECTION 9 - Customer Transactions 1 2 3 4 8a 7a 6 5 8b 7b 9 10a 8c 8d 10b Figure 10-1, Transaction Flow. TRITON SYSTEMS, INC.
OPERATION MANUAL - MODEL 97XX-Series SECTION 9 - Customer Transactions TABLE 9-1 - TRANSACTION FLOW DESCRIPTION S TE P DESCRIPTION 1 Welcome screen prompts to INSERT a CARD to begin a transaction. 2 Screen prompts user to REMOVE the CARD to continue w ith transaction. 3 If the Surcharge Option is enabled, surcharging is not blocked for this customer card, and the Surcharge Location option is set for Beginning, a Surcharge Message is displayed here.
OPERATION MANUAL - MODEL 97XX-Series SECTION 9 - Customer Transactions Voice-Enabled Transactions The terminal provides voice feedback via an integrated output jack, enabling sight-impaired users to plug in a set of headphones and receive spoken instructions to assist them in using the Cash Dispenser. Figure 9-2, Headphone Jack Location, shows the location of the headhone jack on the Cash Dispenser. Figure 9-2, Headphone Jack Location. A raised symbol helps a user locate the headphone jack.
APPENDIX A - MECHANICAL LOCK
OPERATION MANUAL - MODEL 97XX-Series APPENDIX A - MECHANICAL LOCK About the Dial There are two marks on the dial ring (see drawing). The index at the top is used for opening the lock, The index 30 degrees to the left is used only when changing the combination. The dial should always be turned slowly and evenly. A revolution is counted each time the selected number is aligned with the opening index. DO NOT TURN THE DIAL BACK TO COMPENSATE FOR OVER DIALING A NUMBER.
OPERATION MANUAL - MODEL 97XX-Series APPENDIX A - MECHANICAL LOCK 3. With the last number set at the changing index, hold the dial securely and insert the change key in the keyhole in the back of the lock. Make sure the wing is entirely inside the lock and comes to a positive stop (see Figure 1) before turning the key. ***WARNING*** NEVER INSERT THE CHANGE KEY IN THE LOCK WHEN THE COVER IS REMOVED. BEFORE TURNING THE CHANGE KEY, MAKE SURE THE WING OF THE KEY IS FULLY INSERTED INTO THE LOCK. Figure 1 4.
APPENDIX B - ELECTRONIC LOCK
OPERATION MANUAL - MODEL 97XX-Series APPENDIX B - ELECTRONIC LOCK Entering the Combination The electronic lock combination consists of six digits. Upon arrival, the combination of the lock should already be set at 1-2-3-45-6. After installation of the safe has been completed, 1. Enter the preset combination and check for proper operation. After each keypress, the lock will beep. After the final digit has been entered, the lock will beep twice, and the open period will begin. 2.
OPERATION MANUAL - MODEL 97XX-Series APPENDIX B - ELECTRONIC LOCK SCREWS Bad Battery/Battery Replacement If the lock beeps repeatedly while open, or beeps twice and refuses to open, the 9-volt battery, located in the battery box on the inside of the door, is weak or dead and needs to be replaced. Note: If the lock will not operate (i.e.
APPENDIX C - WARRANTY POLICY
OPERATION MANUAL - MODEL 97XX-Series APPENDIX C - WARRANTY POLICY Notices Copyright ©2001 - Triton Systems, Inc.; 21405 B Street.; Long Beach, MS 39560 USA All Rights Reserved This publication is protected by copyright and all rights are reserved. No part of it may be reproduced or transmitted by any means or in any form, without prior consent in writing from Triton Systems, Inc. The information in this publication has been carefully checked and is believed to be accurate. However, Triton Systems, Inc.
OPERATION MANUAL - MODEL 97XX-Series APPENDIX C - WARRANTY POLICY TRITON SYSTEMS, Inc. Warranty Statement Parts Only Limited Manufacturer’s Warranty Triton Systems, Inc. warrants the components of each Model 97XX Series Cash Dispenser, excluding software and related documentation, against any defect in materials and/or workmanship for a period of 13 months from the shipping date. The additional 30 days are intended to allow for the elapsed time between the shipment of the unit and its installation.
OPERATION MANUAL - MODEL 97XX-Series APPENDIX C - WARRANTY POLICY Other Claims Shipping Damage All equipment is shipped FOB, Triton’s facilities. The organization or individual who has purchased the equipment assumes responsibility for the equipment once it leaves Triton’s facilities.
OPERATION MANUAL - MODEL 97XX-Series APPENDIX C - WARRANTY POLICY Triton’s Technical Services Department The primary purpose of the Technical Services Department is to provide assistance to customers in the operation, trouble shooting, and repair of equipment manufactured by Triton. A toll-free phone number (1-800-2596672) is provided for convenience. The Technical Services Department operates to serve our customers.
OPERATION MANUAL - MODEL 97XX-Series APPENDIX C - WARRANTY POLICY CONTACT INFORMATION TRITON SYSTEMS, IN21405 B STREET 21405 B STREET LONG BEACH, MS 39560 Sales: (800) 367-7191 (228) 868-1317 (228) 868-0437 FAX Service: (800) 259-6672 (228) 868-0859 FAX TRITON SYSTEMS, INC.