
Owner Manual


6
TDM ENHANCEMENT KIT INSTALLATION PROCEDURES
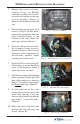
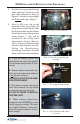
Fig. 6. Feed tie wrap through
opening.
Fig. 7. Tie wrap started (loop).
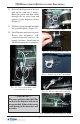
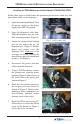
9. Install a Flat wire clip on the
underside of the vault ceiling. To
gauge where to affix the clip, slide
the dispenser fully into the cabinet.
Notice the location of the presenter
motor (Figure 7). Clip will be
installed on the ceiling above
where motor is located. (Figure 8)
After you have marked/measured
location, slide dispenser out fully.
Follow the Manufacturers
installation procedures descibed
below for Flat wire clip installation.
Fig. 8. Clip installed and cables
secured.
8. Feed the tie wrap provided through
either openings located near the
data cable connector.as shown in
Figure 6. Start the tie wrap slightly
but Do Not pull tight. (Figure 7)
A. Clean the cabinet surface area
where the Flat wire clip is to be applied.
Use the alcohol pad provided. Let sur-
face dry.
B. Remove adhesive liner from clip.
Place clip in desired location (adhesive
is not pressure sensitive).
CAUTION: DO NOT TOUCH ADHE-
SIVE WITH FINGERS!!
C. If the adhesive touches the cabinet
and is then removed, the clip should
be disposed and a new clip used.
DO NOT ATTEMPT TO REPOSI-
TION THE CLIP!!
D. When running cables/wires
through the clip, DO NOT stress the
clip by tugging or pulling. The adhe-
sive requires 24 hours of “curing time”
before the chemical bond is at maxi-
mum strength.
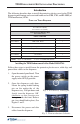
Fig. 5. Torx screw locations.
Presenter
motor
Tie wrap
openings