
Owner Manual

4
TDM-100/150 BASE PLATE UPGRADE PROCEDURES
REMOVING THE TDM FROM A SLIDE TRAY
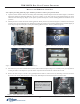
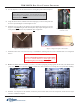
2. Pull the pin down to release the swivel mounting platform. Slowly turn the tray clockwise (Figure 3) so that the note and reject
cassettes can be accessed from the front. Release the locking pin and move the mounting platform back and forth slightly to
ensure the pin snaps back into place, locking the mounting platform into the “Service” position (Figure 4).
Figure 4. Mechanism in “Service” position.
3. Disconnect the power and communication (Comms) cables from the dispenser (Figure 5). Carefully cut any Ty wraps that are
securing the cables to the dispenser. Open the ferrite component that surrounds the 2 cables and set aside.
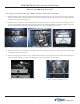
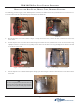
1. Open the cabinet vault door. Release the locking slide rail and fully extend the dispenser from the cabinet (Figure 1). Rotate the
dispensing mechanism mounting platform to the service position. To do this, locate the spring-loaded locking pin on the
underside of the mounting tray (Figure 2). This pin lets you lock the dispenser’s swivel mounting platform into half-turn access
positions.
Figure 3. Rotate mechanism to service position (clockwise).
4. Remove the note and reject cassettes. Using a phillips-head screwdriver, remove the six (6) mounting screws that secure the
dispenser to the swivel platform (Figure 6). Remove the TDM dispenser mechanism and place on a flat surface.
Figure 1. Dispenser fully extended.
Figure 2. Pull release pin for swivel platform.
Note: Before proceeding, follow the proper shutdown procedures to remove power from the ATM:
Figure 5. Power and Comm cable disconnected.
Figure 6. Remove mounting screws.
Note
Some older model units have a
different swivel platform. The
dispenser was mounted using
four (4) screws.