
Owner Manual

18
MODEL RT2000 (X2) INSTALLATION GUIDE
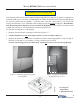
6. If a plinth is used (either built or purchased), mount the cabinet on the plinth. Anchor the cabinet to
the plinth using the bolts provided (optional plinth) or secure to your built plinth. Tighten bolts enough
to secure the two together for moving the unit.
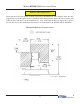
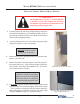
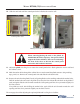
7. Slide/move the unit forward towards the wall opening so the
sleeve protrudes slightly out the front exterior. This is needed to
raising the unit can be made using the plinths leveling feet (see
“Adjusting Height of Unit page 20).
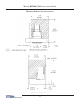
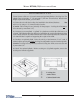
8. Locate the control panel trim included with the unit accessories.
On the back side are four (4) clips that will align with four (4)
slots on the sleeve control panel.
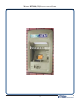
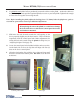
9. Align the trim bracket clips with the sleeve slots and insert until
the trim is seated on the control panel. DO NOT secure the trim
at this time.
-
Sleeve protrudes slightly.
Control panel trim.
Trim clips.
**CAUTION**
When placing the unit on the plinth, be careful not to damage
the front of the sleeve as this has the control panel electronics
and hardware mounted.