
Owner Manual


A-4
T5 PCI-EPP CONVERSION PROCEDURES
SAVE JOURNAL RECORDS
DESCRIPTION:
To view/save journal records, select the DISPLAY SELECTED RECORDS function. This allows you the option to specify if you want to
save just “UNAUDITED” records, “AUDITED” or “both (ALL)”. You may also select the “type” of journal records to save (All,
transaction, text record, cassette close, day close, or parameter change).
NOTE: FOR THIS UPGRADE, RECOMMEND SAVING ALL JOURNAL RECORD TYPES (AUDITED/UNAUDITED) WITH NO START/END DATES (FILTER BY DATE
OPTION
<3> - ALL.
The journal records are displayed in a management report dialog that can be printed to the receipt printer or saved to an external
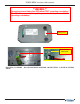
memory device. If used, an external memory device must be installed in a USB port “before” this option is selected. The Display
Unaudited Records saves journal files in a text (.txt) format. They can be viewed by a text editor (Wordpad, Notepad).
ACCESS INSTRUCTIONS:
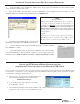
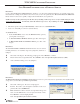
1. From the ELECTRONIC JOURNAL menu screen, select the DISPLAY SELECTED RECORDS option by pressing <3> on the keypad.
ALL/AUDITED/UNAUDITED. Press <1> to toggle through the available options: ALL records, all unaudited records, or all audited
records.
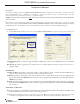
RECORD TYPE. Press <2> to toggle the type of journal record to view: ALL, transaction, text record, cassette close, day close, or
parameter change.
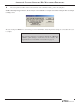
FILTER BY DATE
ALL/SELECTED DATES. Press <3> to toggle between “ALL” or “Selected Dates”. If “all” is selected, the Start and End dates are
“grayed” out. If “Selected Dates” is selected, specify the start date and end date.
START DATE. Specify the starting date for the range of journal records to consider. When selected, a date-entry dialog appears.
Type the date in the format MMDDYYYY. Use the arrow key to toggle between the Month, Day, and Year fields. Press the
<ENTER> key to accept it.
END DATE. Specify the ending date for the range of journal records to consider. When selected, a date-entry dialog appears. Type
the date in the format MMDDYYYY. Use the arrow key to toggle between the Month, Day, and Year fields. Press the <ENTER>
key to accept it.
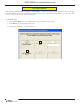
FILTER BY RECORD FIELD TEXT
FIELD. To see only those records that match a certain field criteria, select the applicable field here. The field types available to select
will be determined by the current record type (see Record type above).
CONTAINS. When this button is selected, a text-entry dialog appears. Enter a text string to search for. Only those records that
contain the text string will be returned in the management report. This function is only applicable to the text record.