
Owner Manual

LIGHTED HIGHTOPPER - FIELD INSTALLATION GUIDE
5
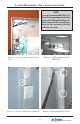
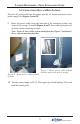
9. Route the power cable along the backside of the mounting bracket and
secure with ty wraps, if needed. Figures 6 and 7 show cable routing for old
and new cabinet mounting brackets.
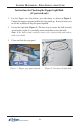
Note: Figure 6 shows older style mounting bracket. Figure 7 (and insert)
shows current mounting bracket.
Figure 6. Route power cable behind
bracket.
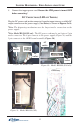
10. Turn the power supply to ON (I). The topper sign should light up. Close and
lock the control panel.
Figure 7. Route power cable behind
bracket and secure with ty wraps.
AC CONNECTIONS (BALLAST/BULB TOPPER)
Plug the AC power cord from the topper into the AC output connector on the
power supply. See Figures 5a and 5b.