
Owner Manual

4
TDM-100/150 TO NMD-50 CONVERSION PROCEDURES
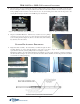
Figure 11. Remove slide rails w/tray.
UPGRADE KIT ASSEMBLY PROCEDURES
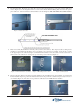
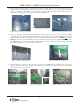
1. Right Side Slide Assembly - On a flat surface, assemble the right side slide
assembly. Extend one of the slide rails (Figure 1) and secure to the slide
spacer bracket with four (4) Truss phillip head screws (Figures 1 and 2).
Mount this assembly to the right cabinet bracket shown in Figure 3. Using a 7/16" nut driver, secure the assembly to
the cabinet bracket using two (2) 3/8" hex bolts and lock washers. When installed, the slide rail (pushed in) should be
even with the door flange (Figure 4).
Figure 1. Slide rail extended.
Figure 2. Slide rail/spacer assembly.
Figure 4. Assembly mounted to cabinet.
Figure 3. Cabinet bracket.
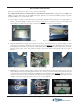
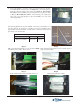
4. Disconnect the power and communication (Comms) cables from the dispenser (Figure 9). Carefully cut any Ty wraps
that are securing the cables to the dispenser. Remove the cables from the cabinet. Remove the note and reject cassettes.
Using a phillips-head screwdriver, remove the four (4) or six (6) mounting screws that secure the dispenser to the
swivel platform (Figure 10). Remove the TDM dispenser mechanism.
Ferrite
Figure 10. Remove mounting screws.
Figure 9. Power and Comm cable disconnected.
6. Dispenser Slide Rail Hardware - With the tray extended out, use a phillips
screwdriver to remove the screws (3 on each side) that secure the slide rails
to the mounting brackets (Figure 11). Remove the slide rails (with mounting
tray attached) from the cabinet.