NMD 50 to SDD Conversion TDN 07103-00344 Nov 29, 2012 Corporate Headquarters: 21405 B Street Long Beach, MS. 39560 PHONE: (800) 259-6672 FAX: (228) 868-9445 © 2012 Triton. All Rights Reserved. TRITON logo is a registered trademark of Triton Systems of Delaware, LLC.
NMD to SDD Conversion Introduction Contents Purpose..............................................................................................................................................................2 Scope .................................................................................................................................................................2 Application........................................................................................................................
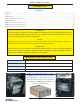
NMD to SDD Conversion NMD Removal WARNING: Abnormal shutdowns can cause internal file system corruption if the power switch is turned off while the system is performing a write operation. Follow instructions below to properly shut down unit before beginning upgrade. Before proceeding, follow these steps to remove power from the ATM: Enter Management Functions > System Parameters > Shut Down the Terminal.
NMD to SDD Conversion SDD Installation (Section 1) This section contains information necessary for the installation of the SDD single dispenser unit on RL 2000 ATMs. Installation instructions vary, depending on cabinet configuration. Determine the section necessary to conform to a specific unit and configuration. Not all sections apply to all units. To determine cabinet model number, locate sticker on inside left panel of cabinet.
NMD to SDD Conversion SDD Installation (Section 2) This section contains information necessary for the installation of the SDD single dispenser unit on RL 5000 ATMs. Installation instructions vary, depending on cabinet configuration. Determine the section necessary to conform to a specific unit and configuration. Not all sections apply to all units.
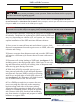
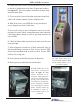
NMD to SDD Conversion 5. Before securing SDD to deck, rest unit on deck and attach power cable, communication cable and data cable to appropriate connections at rear of unit. Make sure all wiring is clear of deck and in rear of cabinet before mounting SDD to deck. Attach deck to slides on both sides using six (6) hex nuts provided, (see figure 7). 6. Slide rear of SDD into flange at rear of deck. Lower front of SDD onto two threaded studs and secure with wing nuts, (see figure 6).
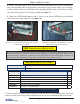
NMD to SDD Conversion 2. Open door fully. Secure top and bottom bill tray pieces to inside of cabinet door with four (4) nuts and washers, (see figure 5). Trays fit together at notches in edges then mount to inner door. 3. To secure deck, lower deck plate onto pins located on either side of inner cabinet. Secure with hex nuts. 4. With deck secure, rest SDD unit on top, but do not secure dispenser to deck at this time. 5. Secure all wiring to rear of dispenser unit.