Blossman Propane Printer Field Upgrade Procedures 07103-00262 Rev. A Corporate Headquarters: 21405 B Street Long Beach, MS 39560 Phone: (800) 259-6672 Fax: (228) 868-9445 COPYRIGHT NOTICE © 2015 Triton. All Rights Reserved.
Blossman Propane Printer Document Updates Rev. A..............................Oringinal Tools Required KIT P/N 06200-00277 April 24, 2015 #2 Phillips head screwdriver Electric drill 13/64 drill bit 11/32 nut driver Center punch Hammer Propane Printer Field Upgrade Kit Parts supplied Description Propane printer assembly Bracket, printer DC Jumper wire - 16AWG - Red DC Jumper wire - 16AWG - Black Screw/#8-32/5/8 Inch/Truss Phillips Head Nut|#8-32/Hex Nut/Ext.
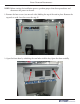
Field Upgrade Procedures NOTE: Before starting the installation process, perform proper shut down procedures and disconnect the power to the unit. 1. Remove the four screws (two on each side) holding the top of the unit in place. Remove the top and set aside. Save the screws for step 35. 2. Open the front door by unlocking the two locks with the key. Open the door carefully.
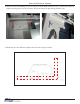
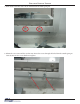
Blossman Propane Printer 3. Remove the two nuts holding the slot cover in place on the inside of the front cover. A flat head screwdriver may be used to pry the cover up to remove. Be sure to remove the gasket along with the cover. 4. Obtain the rear view drill hole template and cut out the L shape as shown.
Field Upgrade Procedures 5. Apply the drill hole template to the inside bottom left corner of the opening. Looking from the back, it will be on the bottom right corner. Two or three pieces of tape may be use to hold the template in place. 6. Place a center punch in the middle of the circle on the template and strike with hammer to mark the metal. Use the same process on the other circle.
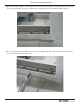
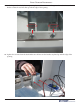
Blossman Propane Printer 7. Drill out the two holes with a 11/32” drill bit from the inside going out. 8. Obtain the two screws and the two hex nuts. Insert the screws through the holes form the outside going in. Start the nuts on the screws but do not tighten.
Field Upgrade Procedures 9. Attach the printer bracket by lowering it into place with the two screws fitting into the notches. Lower the bracket so that the two lines line up with the edge of the opening. 10. Tighten the two nuts from the back. Make sure the lines on the bracket stay lined up with the edge of the opening.
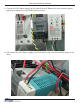
Blossman Propane Printer 11. Locate the SOLA Power Supply on the inside back wall. Remove the wires from the power supply by lossening the screws holding them in place. 12. To remove the SOLA Power Supply, push the button on top at the back and lift gently on the front.
Field Upgrade Procedures 13. Obtain the SDR-120-12 power supply. Install the power supply in the same location that the old one was removed from. Tilt the Power supply back and connect the two hooks in the back to the DIN rail. 14. Lower the front of the power supply until it snaps into place.
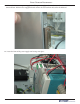
Blossman Propane Printer 15. Obtain one lever nut. Open the end lever as shown. Make sure that the lever is straight up. 16. Obtain the black jumper wire. Insert one end into the lever nut until it touches the back. Lower the lever until it snaps into place. Tug the wire gently to make sure it is secure.
Field Upgrade Procedures 17. Obtain the other lever nut and red jumper wire. Insert one end of the wire into the lever nut until it touches the back. Lower the lever until it snaps into place. Tug the wire gently to make sure it is secure. 18. Obtain the printer power cable. Connect the two black wires to the lever nut next to the black jumper wire. Connect the red wires to the lever nut next to the red jump wire.
Blossman Propane Printer 19. Obtain the wireles modem power cable (black and yellow wires) that were removed from the old power supply. Connect the black wire to the lever nut next to the black wires. Connect the yellow wire to the lever nut next to the red wires. 20. Obtain the red and black wires that were removed from the old power supply. Connect the black wire to the lever nut with the black wires. Connect the red wire to the lever nut with the red and yellow wires.
Field Upgrade Procedures 21. Connect the red and black jumper wires from the lever nuts to the power supply by connecting the red wire to the +V terminal and the black wire to the -V terminal. 22. Obtain the wires that were removed from the bottom of the old power supply. Connect the wires to the bottom of the SDR-120-12 power supply by connecting the black wire to L, The white wire to N, and the ground wire to the ground terminal as shown.
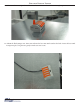
Blossman Propane Printer 23. Arange the printer power cable so that it is routed along the bottom of the unit through the clip. 24. Hold the end of the printer power cable with the tab facing down. Insert the power cable in the small white square on top of the printer. Tug the wire to make sure the connection is secure. NOTE: If the connection is not secure it may cause damage when the power is turned on.
Field Upgrade Procedures 25. Obtain the communications cable. Connect the small end to the top of the printer assembly in the large white square. 26. Obtain the ty-wrap. Ty-wrap the power cable and communications cable to the printer as shown.
Blossman Propane Printer 27. Remove the docking board cover by lifting up on the knob and pushing the cover back slightly. 28. Connect the printer communication cable to the printer port on the docking board. Tighten the screws to secure the cable.
Field Upgrade Procedures 29. Install the docking board cover by inserting the tabs into the slots in the bracket. Slide the cover forward until it snaps into place. 30. Set the printer on the bracket with the chute facing out as shown.
Blossman Propane Printer 31. Close the front cover carefully. Make sure that the printer chute fits through the opening without interference. If the chute fits, open the door for step 32. NOTE: If the chute does not fit through the slot properly, loosen the screws in the door hinge and adjust the door as needed. Tighten the screws after adjustments are made.
Field Upgrade Procedures NOTE: If the unit has not been updated with the latest version of the software, it will need to be updated for the printer to be recognized. 32. Turn on the power to the unit. When the unit boots up, it will automatically recognize the new printer. It may take several minutes for the unit to boot. 33. Obtain the roll of paper. Lifting the printer off the bracket may make it easier to install the paper.
Blossman Propane Printer 34. Insert the end of the paper into the slot above the roll. The motor will catch the paper and feed it through automatically. Set the printer back on the bracket. 35. Mount the top cover back in place and secure it with the screws that were removed in step 1.
Field Upgrade Procedures 36, Close the front door and lock with the key. 37. Run a transaction to make sure the printer is working properly.