CONFIGURATION MANUAL ©2018 Triton Systems of Delaware, LLC. All Rights Reserved. ATMGurus®, the ATMGurus logo and tagline, Triton®, and the Triton logo are all registered trademarks of Triton Systems of Delaware, LLC. The third party trademarks that may be identified herein are the trademark of their respective owners.
revision history Contact Information Triton© 21405 B Street Long Beach, MS 39560 USA 1 (877) 787-4866 (228) 575-3101 (fax) CSS@triton.com TechSupport@triton.com Manufacturer warrants that the products delivered to a distributor will perform in accordance with the Manufacturer’s published specifications for thirteen months from date of shipment from Long Beach, MS.
table of contents revision history................................................................................................................. 2 purpose................................................................................................................................. 2 scope...................................................................................................................................... 2 application......................................................................
device status (printer)............................................................................................... 45 reset/test printer........................................................................................................ 45 configure printer........................................................................................................ 46 device status (modem/ethernet)............................................................................... 47 test (modem/ethernet).....
optional screen buttons.......................................................................................... 101 more options................................................................................................................ 102 key management............................................................................................................. 105 enter master keys.......................................................................................................
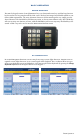
basic operation keypad operation The main T9 keypad consists of ten alphanumeric keys, two directional arrow keys, and four large function keys located in a 16-key group beneath the LCD screen. The keys have integral raised braille symbols to conform to ADA requirements. The entry of numeric characters via the main keypad is easy; simply press the desired character. The CANCEL key will abort any action, or clear an entire numeric entry.
rear service panel The rear service panel (RSP) for FT models is a touchscreen display that provides convenient user access for day-to-day management functions from inside the facility. For RSP to function, ATM may not be in the midst of a customer transaction or logged into Management Functions menu from the front control panel. The RSP will remain in idle mode until a user logs in. menu-based operation The terminal operates as a menu-driven system.
management functions options Some management functions may not be available based upon user access; therefore, some options may be “grayed out” or otherwise disabled. The master user (00) has the ability to access all functions, including the ability to limit other users’ access. Once logged in to the Management Functions menu, users may perform any available functions based on user access level. management reports Many of the management functions produce a report summarizing the results of the operation.
setup basics Triton ATMs require a certain amount of configuration in order to place them into operation. This section lists the minimum configuration requirements to bring an X3 ATM into service. **Note** An error code of 246 will be displayed upon the first startup. You must change the master password before the ATM will go into service. An appropriate password must be entered to view the Management Functions menu. log on Once the ATM is powered on, log into Management Functions by: 1.
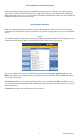
using the triton configuration wizard Triton ATMs require a minimum amount of configuration in order to place them into service. These configuration requirements are covered in the Triton Configuration Wizard, which will walk users through setting the minimum requirements, and allow users to access optional configurations that may be required by the host processor. **Note** An error code of 246 will be displayed upon the first startup. You must change the master password before ATM can be put into service.
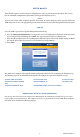
5. Press Set Master Password. Using on-screen numeric keypad, enter new master password. Do not include user ID. Password may be 4-12 numeric characters. Press Enter to save and return to Configuration Wizard menu. 6. Press Terminal ID. 7. Enter the terminal ID provided by host processor. **Note** Users can toggle between three on-screen keyboards by pressing the Change Keyboard Style button. 8. Press Enter and Return button to save and return to the Configuration Wizard menu. 9. Press Surcharge Amount.
11. Press Set Date. Using numeric on-screen keypad, enter the current date, then press Enter and Return. **Note** Use the < and > buttons on the numeric on-screen keypad to toggle between the month, day and year. The Left and Right buttons perform the same function. 12. Press Set Time. Using numeric on-screen keypad, enter the current time. 13. Press Enter and Return button to save and return to the Configuration Wizard menu. 14.
17. Enter Multiple Amount (i.e. $5, $10, $20), then press Enter and Return. 18. Press Start Quantity and follow on-screen instructions. Remove cassette, replenish cash, then press Enter. 19. Enter the number of notes loaded into cassette. This is not the value of the cashed added. Press Enter and Return.
20. ATM will automatically perform a Trial Cassette Close. Print or save to file for record keeping purposes. 21. Press Back button to return to the Configuration Wizard menu. 22. After these steps have been completed, press the Next button in the bottom, right corner of the screen to continue to the next set of requirements. **Note** Notice the yellow information box in the top, left portion of the screen on the Configuration Wizard.
25. Press Message Format. 26. Select desired value, then press Enter and Return. This information is provided by the host processor. **Note** The selections made in the Protocol menu will affect option 3 on the Configuration Wizard menu. If using a dial-up connection, user will see the option Primary Phone. If using TCP/IP, the user will see the option Primary Address and port number. 27. Press Primary Phone, or Primary Address. 28.
34. Press Enable Communication Header to toggle the option on or off. This information is provided by the host processor. 35. If Enable Communications Header is toggled on and shows a check mark, press Communications Header. 36. Enter communications header using the on-screen keyboard. This case-sensitive information is provided by the host processor. 37. Press Enter and Return. 38.
41. Re-enter new password, then press Enter. 42. Enter new user 2 password using the T9 keypad. Press Enter. Password must be 8 characters. 43. Re-enter new password, then press Enter. Caution Master keys and instructions are provided by host processor and vary from customer to customer. Steps 44 through 47 are an example of what a user should see when entering master keys. Check digits shown are for example purposes only. 44.
45. Using the T9 keypad, user 1 enter master keys per host processor instructions, then press Enter. Compare check digits on screen to check digits provided by host processor. Press Enter. **Note** If on-screen check digits do not match check digits provided by host processor, press Cancel to terminate key entry. Press either Enter PIN Master Keys or Enter MAC Master Keys, and follow on-screen instructions. 46. Press Enter. User 2 add second set of master keys, then press Enter.
47. Press Enter. If master keys were entered successfully, press Enter to return to the Configuration Wizard menu. 48. Press Download Working Keys. 49. Press Enter to contact the host and begin working key download. 50. After keys are downloaded successfully, press Enter to return to Configuration Wizard menu. 51. After these steps have been completed, press the Next button in the bottom, right corner of the screen to continue to the final requirements in the Configuration Wizard. 52.
terminal close functions (pg 21-29) The Terminal Close menu allows the user to manage various close functions necessary to the management and accounting of an X3 ATM. Options, such as configuring automatic day closes, automatically sending close totals to host processor, and various cassette balance functions are available in this menu.
schedule close This function is used to enable/disable and/or set times for automatic day closes. 1. Navigate to Management Functions > Terminal Close Functions > Schedule Close. 2. Press Enable Schedule to toggle option on (check mark) or off (no check mark). 3. If Enable Schedule is toggled on (showing a check mark), press Set Time. **Note** Use the < and > buttons on the numeric on-screen keypad to toggle between the hour, minute, and second. The Left and Right buttons perform the same function. 4.
send terminal totals This function enables or disables automatic transmission of terminal close totals to host processor. When toggled on, the terminal will send accumulated totals information to the processor during the Day Close operation. If toggled off, these totals will not be sent. Terminal totals include the total number of all withdrawal, inquiry, and transfer transactions that have occurred since the last Day Close operation, as well as settlement and surcharge amounts. 1.
trial close This function option is used to complete daily balancing of the cash dispenser with the processor. A summary of all transactions since the last Day Close was completed can be printed, and totals are downloaded and sent to host processor. This function does not clear totals or change the business date. A Trial Close is used to balance the ATM before actually balancing with the processor.
day close This function completes daily balancing of the cash dispenser with the processor. This function clears totals and resets the business date. A summary of all transactions since the last Day Close was completed can be printed and totals are downloaded and sent to host processor. This function contacts the processor and downloads all totals accumulated since last Day Close was performed. The Day Close function is generally the final step in the daily balancing process.
trial cassette close This function generates a report to help balance specific cassette(s) in the dispenser without resetting the value(s) to zero. The report summarizes all activity for chosen cassette(s) since the last cassette close, including a total of all transactions. The Trail Cassette Close is normally used to provide a quick look at the current status of a cassette, and does not clear the cassette totals from the terminal.
cassette close This function generates a report to help balance specific cassette(s) in the dispenser. The report summarizes all activity for chosen cassette(s) since the last cassette close and clears cassette totals from the terminal. The Cassette Close function is usually completed as the final step in balancing a currency cassette before removing the cassette to replenish it. **Note** Steps may vary slightly based on cassette close options and configuration. 1.
7. Press Enter and Return. Trial cassette close report will be displayed on screen. Press Print to print a hard copy via the receipt printer, or press Save To File to save on a USB drive. 8. When report has been printed or saved, press Back button to return to the previous menu.
cassette close options 1. Navigate to Management Functions > Terminal Close Functions. Select desired cassette close option. Cassette close options allow the user to customize close experience. 2. Press Perform Day Close to toggle on (check mark) or off (no check mark). This option, when enabled (checked), will automatically perform a day close at the end of a cassette close. 3. Press Show Current Cassette Totals to toggle on (check mark) or off (no check mark).
add cash This function allows a user to add notes to one or more cassettes without performing a cassette close operation, and automatically provides additional journal entries for documentation. 1. Navigate to Management Functions > Terminal Close Functions. 2. Press Add Cash. 3. Press Note Count Cassette # on desired cassette, then press Enter. 4. Remove and replenish selected cassettes, then press Enter. 5. Using the on-screen numeric keypad, enter the number of bills added to cassette(s).
diagnostics (pg 31-54) The Diagnostics menu allows the user to view various parameters and/or statuses on the terminal, or check the status and function of various components on the ATM. Options, such as device status for printer, keypad, or dispenser; testing the connectivity with host processor; and component configuration functions are available in this menu.
terminal status The Terminal Status menu allows the user to view terminal errors and history; reset current terminal errors; view, import, export parameters, or restore default parameters; and navigate to software update history. To Navigate to Terminal Status menu, go to Management Functions > Diagnostics > Terminal Status. current terminal error This function generates a management report that shows the most current terminal status error code.
terminal error history This function displays a management report showing all status error codes that have been recorded since the initial terminal set up. A short description of each code is provided. 1. Navigate to Management Functions > Diagnostics > Terminal Status. 2. Press Terminal Error History. 3. Error code history is displayed on screen. Press Print to print a hard copy via the receipt printer, or press Save To File to save on a USB drive. 4.
configuration summary This function generates a management report that contains current terminal configuration and hardware status information. Information is provided for all terminal configuration areas, including software, peripherals, communications, and messaging. 1. Navigate to Management Functions > Diagnostics > Terminal Status. 2. Press Configuration Summary. 3. Report is displayed on screen. Use Page Up and Page Down buttons to navigate through report.
save parameters to external storage This function saves the current terminal parameters to a USB drive inserted into an available USB port on the main board. 1. 2. 3. 4. Navigate to Management Functions > Diagnostics > Terminal Status. Ensure USB drive is installed into an empty USB port on main board. Press Save Parameters to External Storage. Press Enter on the pop-up dialog.
software update history This function allows user to generate a report of all software updates that have been installed onto the machine. 1. Navigate to Management Functions > Diagnostics > Terminal Status. 2. Press Software Update History. 3. Report is displayed on screen. Use Page Up and Page Down buttons to navigate through report. Press Print to print a hard copy via the receipt printer, or press Save To File to save on a USB drive. 4.
system diagnostics This function will display a pop-up dialog that allows a user to view and configure system properties. To navigate through the dialog, touch the desired tab on the touch-screen display to view properties. In most cases, it should not be necessary to change or adjust these properties. **Note** Please contact Triton Technical Support before changing any settings in this menu. 1. Navigate to Management Functions > Diagnostics. 2. Press System Diagnostics. 3.
purge (dispenser) This option allows users to cycle the dispenser in order to clear the note path. Any jammed bills should be deposited in the reject bin/cassette. When the purge command is used to clear the feed path following a jam or failure, some of the notes may pass out of the exit depending on location in the feed path and type of fault condition. 1. Navigate to Management Functions > Diagnostics > Dispenser. 2. Pressing Purge will begin the process of clearing the feed path. 3.
test dispense This function dispenses notes from each operational cassette into the reject cassette. No notes are sent to exit. The shutter test, applicable to FT units, will be performed as part of the Test Dispense operation. The shutter test exercises the unit shutter assembly by opening and closing the shutter. Do not insert objects or fingers when shutter assembly is opening/closing. 1. Navigate to Management Functions > Diagnostics > Dispenser. 2. Press Test Dispense. 3.
inject new cassette id (nmd only) This function allows the user to inject a new ID into a cassette. The NMD dispensing mechanisms use cassettes that possess internal memory which enables a cassette to store its own identification code. The Inject New Cassette ID function has no direct correlation to the physical position of the cassette within the dispenser. In most cases, cassette A will be placed in the top feed channel, cassette B in the second, and so on.
force unlock cassette (nmd only) This function provides a means of overriding the NMD locking mechanism associated with a specific cassette. Occasionally, a condition may occur that prevents a cassette from being removed from the dispenser, such as note lodged in the cassette gate, the mechanical shutter that lowers when notes are dispensed and raises when a cassette is removed from the dispenser. If the gate does not fully close, the cassette will remain locked into the dispenser.
dispenser totals This function displays dispenser activity totals in various categories, such as cumulative dispense and reject counts, and individual cassette totals. 1. Navigate to Management Functions > Diagnostics > Dispenser. 2. Press Dispenser Totals. 3. Report is displayed on screen. Use Page Up and Page Down buttons to navigate through report. Press Print to print a hard copy via the receipt printer, or press Save to File to save on a USB device. 4.
cassette parameters 1. Navigate to Management Functions > Diagnostics > Dispenser > Cassette Parameters. 2. Press Relearn Bill Thickness. For some dispensing mechanisms, the first time the dispenser is set up or a new note cassette installed, the dispenser will enter a learning mode during which it learns the thickness of notes loaded. This function may dispense and reject up to 15 notes into the reject cassette.
card reader status This functions generates a report showing the card reader hardware status. 1. Navigate to Management Functions > Diagnostics > Card Reader. 2. Press Card Reader Status. 3. Report is displayed on screen. Press Print to print a hard copy via the receipt printer, or press Save To File to save on a USB drive. 4. When report has been printed or saved, press Back button to return to the previous menu.
scan card This function reports the number of tracks the card reader is able to scan. If the card can be properly read, the information from each track will be displayed on screen. 1. Navigate to Management Functions > Diagnostics > Card Reader. 2. Press Scan Card. 3. Insert card into card reader. Card reader will attempt to read an EMV chip. If no chip is detected, card reader will read magnetic strip. 4. Remove card when on-screen prompt appears. 5. Report is displayed on screen.
device status (printer) This function generates a report showing the current hardware status, including the printer name and any errors. 1. Navigate to Management Functions > Diagnostics > Printer. 2. Press Device Status. 3. Report is displayed on screen. Use Page Up and Page Down buttons to navigate through report. Press Print to print a hard copy via the receipt printer, or press Save To File to save on a USB drive. 4.
configure printer **Note** The options available may vary depending on ATM model, installed dispenser, and/or optional peripherals. 1. Navigate to Management Functions > Diagnostics > Printer > Configure Printer. 2. Press Font Size to change the printed font characters to either 16-dot or 24-dot font. Applies to management reports and text receipts only. 3. Press Line Spacing (0-255 dots) to set the spacing between lines on the receipt or coupon. Applies to management reports and text receipts only. 4.
device status (modem/ethernet) This function generates a management report detailing the modem and ethernet parameters. 1. Navigate to Management Functions > Diagnostics > Modem/Ethernet. 2. Press Device Status. 3. Report is displayed on screen. Use Page Up and Page Down buttons to navigate through report. Press Print to print a hard copy via the receipt printer, or press Save to File to save on a USB drive. 4. When report has been printed or saved, press Back button to return to the previous menu.
modem totals This function generates a management report detailing the number of modem call attempts, busy signals, and aborted calls. 1. Navigate to Management Functions > Diagnostics > Modem/Ethernet. 2. Press Modem Totals. 3. Report is displayed on screen. Use Page Up and Page Down buttons to navigate through report. Press Print to print a hard copy via the receipt printer, or press Save To File to save on a USB drive. 4.
configure modem This function allows user to change the modem parameters. Do not attempt to alter these properties unless certain of the results. Incorrect settings may cause communication failure. Settings or changes in this menu are advanced configuration options, and should be provided by host processor. **Note** The options available may vary depending on software installed. In 4.
triton connect settings This function allow user to change the Triton Connect parameters. Do not attempt to alter these properties unless certain of the results. Incorrect settings may cause communication failure. Settings or changes in this menu are advanced configuration options. **Note** The options available may vary depending on software installed. In 4.0 software, steps 2 - 6 will be performed in the Port Settings/Call Options menus that appears on screen after choosing the modem model. 1.
configure ethernet settings This function allows user to change ethernet parameters. Do not attempt to alter these properties unless certain of the results. Incorrect settings may cause communication failure. Settings or changes in this menu are advanced configuration options, and should be provided by host processor or IT department. 1. Navigate to Management Functions > Diagnostics > Modem/Ethernet > Configure Ethernet Settings. 2. Press IP Address.
ping remote host address (modem/ethernet) This function tests and verifies TCP/IP communication. 1. Navigate to Management Functions > Diagnostics > Modem/Ethernet. 2. Press Ping Remote Host Address. 3. Enter a domain name or IP address to verify TCP/IP communication, then press Enter and Return. 4. A pop-up dialog will relay whether the test was successful or not. Press Enter to return to the previous screen.
manage certificate whitelist This function allows the list of individual certificates to be enabled or disabled. Check with host processor to determine if required. 1. 2. 3. 4. 5. Navigate to Management Functions > Diagnostics > Modem/Ethernet. Press Certificate Whitelist. Use the Page Up and Page Down buttons to navigate the list. Press Enable/Disable to toggle on (check mark) or toggle off (no check mark) desired certificate. Press Save and Return to save changes and return to the previous menu.
epp performance monitoring This function generates a report of communication statistics associated with the customer keypad. 1. Navigate to Management Functions > Diagnostics > Keypad. 2. Press EPP Performance Monitoring. 3. Report is displayed on screen. Use Page Up and Page Down buttons to navigate through report. Press Print to print a hard copy via the receipt printer, or press Save To File to save on a USB drive. 4.
electronic journal (pg 51-66) The Electronic Journal menu allows the user to view and print various journal entries. This information should be maintained in case of customer inquiry and/or for troubleshooting purposes.
display unaudited records This function generates a summary of all unaudited journal entries from the last time the journal was audited/ printed. 1. Navigate to Management Functions > Electronic Journal. 2. Press Display Unaudited Records. 3. Report is displayed on screen. Use Page Up and Page Down buttons to navigate through report. Press Print to print a hard copy via the receipt printer, or press Save To File to save on a USB drive. 4. When report has been printed or saved, press Back button. 5.
display last x This function can be used to display, print, or save all electronic journal records before or after auditing. 1. Navigate to Management Functions > Electronic Journal. 2. Press Display Last X. 3. Using the on-screen numeric keypad, enter the number of journals to display, then press Enter and Return. 4. Report is displayed on screen. Use Page Up and Page Down buttons to navigate through report.
display selected records This function allows user to sort journal entries by various criteria. 1. Navigate to Management Functions > Electronic Journal. 2. Press Display Selected Records. 3. Press Audit Filter, then touch desired option. Press Save and Return to return to previous screen. 4. Press Record Type, then touch desired option. Press Save and Return to return to previous screen. 5. Press Date Filter, then touch desired option. Press Save and Return to return to previous screen.
6. If the selected dates option was chosen for the date filter, press Start Date. Using the on-screen numeric keypad, enter the desired start date. Press Enter and Return. 7. If selected dates was chosen for the date filter, press End Date. Using the on-screen numeric keypad, enter desired end date. Press Enter and Return. 8. Press Field, then touch desired option. Press Save and Return to return to previous screen. 9. Press Contains. Using the on-screen keypad, enter desired criteria.
clear journal This function allows user to mark all unaudited records in the journal as audited. 1. Navigate to Management Functions > Electronic Journal. 2. Press Clear Journal. **Note** Clearing audits records. This function does not delete. 3. Press Enter to clear all journal entries and mark as audited. Press Enter to return to the previous screen.
archive/delete journal This function allows user to specify the destination and date range for archiving audited journal records. 1. Navigate to Management Functions > Electronic Journal. Caution Choosing None (Delete) option for Archive Location will permanently delete all journal records. 2. Press Archive/Delete Journal. 3. Press Archive Location. 4. Select the desired save location, then press Save and Return. 5. Press Archive records prior to: to choose date. 6.
view journal archive This function allows the user to browse archived journal entries. 1. Navigate to Management Functions > Electronic Journal. 2. Press View Journal Archive. 3. Press Look in: to select desired file location. Select either Internal Flash or USB Device, then press Save and Return. A USB device must be inserted into an available USB port on the main board to access USB files. 4. The Files of Type: option defaults to Journal Files (*.jrn).
7. Press Record Type, then touch desired option. Press Save and Return to return to previous screen. 8. Press Date Filter, then touch desired option. Press Save and Return to return to previous screen. **Note** Use the < and > buttons on the numeric on-screen keypad to toggle between the month, day and year. 9. If the selected dates option was chosen for the date filter, press Start Date. Using the on-screen numeric keypad, enter the desired start date. Press Enter and Return. 10.
journal properties This function generates a report that provides electronic journal information, such as the number of records in the journal, the number of audited or unaudited records, etc. 1. Navigate to Management Functions > Electronic Journal. 2. Press Journal Properties. 3. Report is displayed on screen. Use Page Up and Page Down buttons to navigate through report. Press Print to print a hard copy via the receipt printer, or press Save to File to save on a USB drive. 4.
auto archive This function allows the user to set parameters for auto archiving or deleting records on a predefined schedule. 1. Navigate to Management Functions > Electronic Journal. 2. Press Auto Archive. 3. Press Archive Location to set parameters. 4. Select the desired location, then press Save and Return. Caution If the None(Delete) option is chosen, records will be permanently deleted. These records cannot be retrieved. 5. Press Archive when journal exceeds (MB):.
6. Press Archive audited records older than (days):. Use the on-screen numeric keypad to select desired days, then press Enter and Return. 7. Press Archive unaudited records: to toggle the option on (check mark) or off (no check mark). This option allows archiving or deletion of unaudited records. Caution Enabling the Archive unaudited records option will allow data that has not been viewed or downloaded to be deleted.
password maintenance (pg 68-72) The Password Maintenance Menu allows the user to change the currently-logged-in user’s password, add or remove users, control user access, etc.
change user password This function allows the currently-logged-in user to change their password. For example, this function changes master password if user is logged in with master user ID (00). 1. Navigate to Management Functions > Password Maintenance. 2. Press Change User Password. 3. Using the on-screen numeric keypad, enter the new password for user, then press Enter. Do not include user ID. Password may be 4-12 numeric characters. 4.
modify user access This function allows the master user to select which Management Functions options will be accessible to other users. 1. Navigate to Management Functions > Password Maintenance. 2. Press Modify User Access. 3. Using the on-screen numeric keypad, enter the user ID you wish to modify. Press Enter and Return. 4. Touch desired selections to toggle the option on or off. User will have access to all option with a check mark beside them. 5.
add user This function allows the master user to add a new user. 1. Navigate to Management Functions > Password Maintenance. 2. Press Add User. 3. Using the on-screen numeric keypad, enter new user ID, then press Enter and Return. User ID may be any digit between 01-99 that is not currently assigned to another user. 4. Using the on-screen keypad, enter the new username, then press Enter and Return. 5. Using the numeric on-screen keypad, enter the new password for user, then press Enter. 6.
remove user This function allows the master user to remove user(s). 1. Navigate to Management Functions > Password Maintenance. 2. Press Remove User. 3. Using the on-screen numeric keypad, enter user ID you wish to delete, then press Enter and Return. 4. Press Enter to remove user, or Cancel to return to previous menu. terminal users This function generates a report that lists the User ID code and corresponding username for all terminal users. 1. Navigate to Management Functions > Password Maintenance. 2.
user access report This function generates a report that lists all management functions that selected user can access. 1. Navigate to Management Functions > Password Maintenance. 2. Press User Access Report. 3. Using the on-screen numeric keypad, enter user ID you wish to view, then press Enter and Return. 4. Report is displayed on screen. Use Page Up and Page Down buttons to navigate through report. Press Print to print a hard copy via the receipt printer, or press Save to File to save on a USB drive. 5.
system parameters (pg 74-80) The Systems Parameters menu allows the user to manage various basic settings on an X3 ATM, such as date and time, volume control, and shutting down the terminal.
date and time This function allows user to set the correct date and time. ATM will not go into service if these parameters are not set. 1. Navigate to Management Functions > System parameters. 2. Press Date and Time. **Note** Use the < and > buttons on the numeric on-screen keypad to toggle between the month, day and year or the hour, minute and second. 3. Press Set Date. 4. Using the on-screen numeric keypad, enter the current date. Press Enter and Return to return to the previous screen. 5.
regional settings This function allows user to change advanced parameters on the terminal, such as physical location, numbering scheme, and currency. Do not attempt to alter these properties unless certain of the results. Settings or changes in this menu are advanced configuration options. 1. 2. 3. 4. Navigate to Management Functions > System Parameters. Press Regional settings. Press the desired tab for Regional Settings, User Interface Language, Input Language, or Customize.
shutdown the terminal 1. 2. 3. 4. Navigate to Management Functions > System Parameters. Press Shutdown the Terminal. Press Enter on the pop-up dialog, and wait for the message It is now safe to shutdown your computer. Turn the power switch on the power supply to the off (O) position. restart terminal 1. Navigate to Management Functions > System Parameters. 2. Press Restart the Terminal. 3. Press Enter on the pop-up dialog. Terminal will reboot.
delete files This function is used to permanently delete graphics (.bmp) or screen files (.tsm) from the internal memory of the unit. Files must first be deleted as usable/active files from the Ads-Graphics menu to be deleted using this function. 1. Navigate to Management Functions > System Parameters. 2. Press Delete Files. The Look in: option is set to Internal Flash by default. This cannot be changed in this menu. 3. Press Files of Type: and choose desired file type.
software update 1. 2. 3. 4. Install USB drive loaded with software into an empty USB port on main board. Navigate to Management Functions > System Parameters. Press Software Update. Press desired filename on screen to highlight. If no files are shown, press the Refresh button. Files from USB drive should then appear under Available Options on the screen. Files must not be saved in a folder on USB drive. 5. Press Enter and Return to begin software installation. 6. Press Enter on the pop-up dialog. 7.
schedule reboot This function allows the user to establish a time at which the terminal reboot will be performed automatically. 1. Navigate to Management Functions > System Parameters. 2. Press Schedule Reboot. 3. Press Enable Schedule to toggle on (checkmark) or off (no checkmark). 4. Press Set Time when schedule is enabled. Using the on-screen numeric keypad, enter desired reboot time, then press Enter and Return. 5. Press Day of Week when schedule is enabled.
enable/disable argo ui This function allows the user to turn the new 4.1 interface on or off, and alternately use the classic blue tile menu featured in the 4.0 and earlier software. 1. Navigate to Management Functions > System Parameters. 2. Press Disable ARGO UI or Enable ARGO UI, as desired. 3. Press Enter on the pop-up dialog to disable or enable the new ARGO UI and return to the previous screen. 4. Press Enter on the pop-up dialog, then press Exit Management Functions. 5.
terminal configuration (pg 82-104) The Terminal Configuration menu allows user to view and configure terminal operating parameters. Options, such as host parameters, cash dispenser set up, ads/graphics, and terminal ID are available in this menu.
general parameters This function allows the user to view and configure general parameters, such as terminal ID, default customer language, account and transaction types, printer service options, status monitoring, and heartbeat message. 1. Navigate to Management Functions > Terminal Configuration. 2. Press General Parameters. Select desired general parameters to configure. 3. Press Terminal ID.
9. Press Out of Service on Low Paper to toggle on (check mark) or off (no check mark). This function allows the user to choose if the terminal will automatically go out of service when low receipt paper is detected, or if it will remain in service. 10. Press Out of Service on Printer Error to toggle on (check mark) or off (no check mark). This functions allows the user to choose if the terminal will automatically go out of service when a printer error occurs, or if it will remain in service.
coupons This function allows the user to configure printed and/or dispensed coupon parameters. Coupons are used to notify customers of awards, prizes, or promotional sales. Dispensed coupons are only available for NMD dispensers. 1. Navigate to Management Functions > Terminal Configuration. 2. Press Coupons. Select desired general parameters to configure. 3. Press Coupon. Use Page Up and Page Down buttons to navigate available options.
7. Press Random. Use the on-screen numeric keypad to enter the coupon random percentage (0-100), then press Enter and Return. This function sets the frequency at which prize coupons will be awarded. 8. Press Award Based on ISO Properties to toggle on (check mark) or off (no check mark). When enabled, this function awards coupons based on items configured in Management Functions > Terminal Configuration > ISO/Surcharge Properties. 9. Press Message.
12. Press Print to print a sample coupon. This function is used to verify message, graphic, and layout. 13. Press Save and Return to save all parameters and return to the previous menu.
terminal messages 1. Navigate to Management Functions > Terminal Configuration. 2. Press Terminal Messages. 3. Press Welcome Message. Using the on-screen keypad, enter the welcome message, then press Enter and Return. This message will be displayed on the left side of the customer transaction screen. 4. Press Store Message. Using the on-screen keypad, enter the store message, then press Enter and Return. This message will be printed on the customer receipt and at top of all management reports. 5.
cassette setup This function allows the user to configure cassette parameters, fast cash amounts, and withdrawal maximums. 1. Navigate to Management Functions > Terminal Configuration. 2. Press Cassette Setup. 3. Press Maximum Cash. Use the on-screen numeric keypad to enter desired amount for maximum withdrawal, then press Enter and Return. This function sets the maximum customer withdrawal limit. 4. Press Mix Method. Press desired option to toggle on (check mark), then press Save and Return.
5. Press Fast Cash 1. Use the on-screen numeric keypad to enter the desired fast cash amount, then press Enter and Return. During a withdrawal transaction, fast cash options may be presented to enable the customer to select amounts from a convenient list of options. The amounts do not have to be in set order, though typically, they increase in value from top to bottom. 6. Press Fast Cash 2. Use the on-screen numeric keypad to enter the desired fast cash amount, then press Enter and Return. 7.
iso/surcharge properties This function allows user to set surcharge type and amount, as well as add or delete ISO numbers. 1. Navigate to Management Functions > Terminal Configuration. 2. Press ISO/Surcharge Properties. 3. Press Withdrawal Surcharge. —— Press Enable Surcharge to toggle on (check mark) or off (no check mark). This function allows a terminal fee to be imposed on any customer transaction. —— Press Amount.
—— Decline Card: This function declines all customer transactions for customer cards with the displayed ISO numbers. —— Use Defined Surcharge: This function allows the applicable surcharge to be charged to customer cards with the displayed ISO numbers. —— Accept: This function accepts all transaction requests from customer cards with the displayed ISO numbers. —— Award Coupon: This function awards a configured customer coupon to customer cards with the displayed ISO numbers.
—— Allow PIN Change —— Block PIN Change —— Bansi Customer BIN —— If the Block Transaction Type action is enabled (check mark), Value will autofill with PIN Services. This cannot be changed by the user. 10. Press Save and Return to save value and return to the previous menu. 11. Press Save and Return to save ISO/Surcharge Properties and return to the previous menu.
communication (tcp/ip) This function allows user to view and configure communication settings for the host processor. 1. Navigate to Management Functions > Terminal Configuration. 2. Press Communication. 3. Press Protocol. Press desired option to toggle on (check mark), then press Save and Return. This option allows selecting the host processor’s communication requirements (dial-up, TCP/IP. etc.). Set as recommended by host processor. The other communication options will adjust accordingly. 4.
**Note** Only enable the communication header if directed by host processor. Incorrect data in this field will prevent customer transactions. 8. Press Enable Communication Header to toggle on (check mark) or off (no check mark) as directed by host processor. This function is only available with select host processors. 9. Press Communication Header, if applicable. Using the on-screen keypad, enter the information provided by host processor, then press Save and Return. This information is case sensitive. 10.
13. Press Save and Return after entering all communication information to save changes and return to the previous menu. 14. Press Advanced Options. 15. Press Use 12-Digit Sequence Number to toggle on (check mark) or off (no check mark) as directed by host processor. By default, the length of terminal sequence numbers are restricted to four (4) bytes of data. However, some processors require extended length terminal sequence numbers which require additional bytes to be correctly represented. 16.
communication (dial-up) This function allows user to view and configure communication protocol settings. 1. Navigate to Management Functions > Terminal Configuration. 2. Press Communication. 3. Press Protocol. Press desired option to toggle on (check mark), then press Save and Return. This option allows selecting the host processor’s communication requirements (dial-up, TCP/IP. etc.). Set as recommended by host processor. The other communication options will adjust accordingly. 4. Press Message Format.
7. Press Predial to toggle on (check mark) or off (no check mark) as directed by host processor. This function allows the terminal to dial out to the host processor and establish a connection as soon as a customer swipes their card. **Note** Only enable the communication header if directed by host processor. Incorrect data in this field will prevent customer transactions. 8. Press Enable Communication Header to toggle on (check mark) or off (no check mark) as directed by host processor.
14. Press Advanced Options. 15. Press Use 12-Digit Sequence Number to toggle on (check mark) or off (no check mark) as directed by host processor. By default, the length of terminal sequence numbers are restricted to four (4) bytes of data. However, some processors require extended length terminal sequence numbers which require additional bytes to be correctly represented. 16. Press Amount Type. Press desired option to toggle on (check mark) as directed by host processor, then press Save and Return.
ads-graphics The Ads/Graphics menu allow user to view and configure graphics and displays settings. 1. Navigate to Management Functions > Terminal Configuration. 2. Press Ads-Graphics. This screen shows which graphics are already available on the terminal via internal memory. To change graphic, use Page Up and Page Down buttons to navigate available options. Press the Select button or touch the desired file to highlight, then press Save and Return. 3. Press Add New.
optional screens This function allows the user customize the terminal by presenting only selected screens to customers. 1. Navigate to Management Functions > Terminal Configuration. 2. Press Optional Screens to configure which screens customers see. Press Preview Selected Screen if desired, then press Back button to return to optional screen choices. Use Page Up and Page Down buttons to navigate through screen options. Press the Enable/Disable button or touch the desired file to highlight.
optional screen buttons These functions allow user to customize the customer transaction screen options. 1. Navigate to Management Functions > Terminal Configuration. 2. Press Optional Screen Buttons to configure which screens customers see.
more options 1. Navigate to Management Functions > Terminal Configuration. 2. Press More Options. 3. Press Triton Connect to view or configure the Triton Connect settings. —— Press Communication. —— Press Primary Phone Number (or IP Address). Using the on-screen keypad, enter phone number or IP address as directed by Triton Connect owner, then press Save and Return. Primary phone number/host address is required. —— Press Backup Phone Number (or IP Address).
ing in the EMV card reader, and is only available when EMV Processing is enabled. —— Press Non-ICC Transactions to toggle on (check mark) or off (no check mark). This option allows terminal to process magnetic stripe-only transactions while EMV Processing is enabled. —— Press ICC Fallback to Magnetic Stripe to toggle on (check mark) or off (no check mark). This option allows the terminal to process a card as a magnetic stripe transaction if the IC on the card fails when EMV Processing is enabled.
—— Press Metal Absent Time (sec) for differential voltage. This is the time for which metal must be continuously removed before terminal recognizes skimmer removed. —— Press Detection Voltage (mV) for differential voltage. This is the voltage sensed by the metal detector by which any higher voltage is considered a skimmer. —— Warning Voltage (mV) for differential voltage. Option currently unavailable. —— Press Metal Preset Time (sec) for temperature corrected.
key management (pg 106-112) This menu allows users to enter encryption keys that protect the communications between the ATM and the host processor. Entering MAC or PIN master keys, downloading working keys, or verifying check digit options can be found under this menu.
enter master keys This function allows user to enter MAC master keys or PIN master keys, and requires two user access passwords in order to complete. The two required passwords are not the same as the passwords used to enter the Management Functions menu. Both the user 1 and user 2 passwords for the T9 keypad must be changed from the default code of 00000000 before master keys can be downloaded.
6. Press either Enter MAC Master Key 1 or Enter PIN Master Key 1. Host processor will provide master keys and specific instructions for entering keys. Master keys must be entered using the T9 keypad. 7. User 1 enter master keys using T9 keypad per host processor instructions, then press Enter. Compare check digits on screen to check digits provided by host processor. Press Enter. **Note** If on-screen check digits do not match check digits provided by host processor, press Cancel to terminate key entry.
download working keys This function places a call to the host to request keys. Upon receiving a valid request, the host processor will download the working keys and any other necessary parameters, such as surcharge amount, if applicable. Once downloaded, these parameters will remain in the terminal even if terminal is powered off. Working keys cannot be downloaded until Master Key entry is successful. Master keys and working keys are necessary for the terminal to complete customer transactions. 1.
check digits This function generates a management report that displays the check digits associated with the currently loaded master keys and working keys. 1. Navigate to Management Functions > Key Management. 2. Press Check Digits. 3. Management report is displayed on screen. Press Print to print a hard copy via the receipt printer, or press Save To File to save on a USB drive. 4. When report has been printed or saved, press Back button to return to the previous menu.
change passwords This function allows the user to change the T9 keypad user 1 and user 2 passwords. These passwords are used to enter master keys and download working keys. 1. Navigate to Management Functions >Key Management. 2. Press Change Passwords. 3. Press Change User 1 Password, as applicable. 4. Using the T9 keypad, enter the current password for user. 5. Using the T9 keypad, enter the new password for user, then press Enter. Password must be 8 numeric characters. 6.
update epp firmware This function begins the process of updating the keypad firmware. 1. 2. 3. 4. Install USB drive loaded with firmware into an empty USB port on the main board. Navigate to Management Functions > Key Management. Press Update EPP Firmware. Using the T9 keypad, enter the user 1 password, then press Enter. 5. Using the T9 keypad, enter the user 2 password, then press Enter. 6. Press desired filename on screen to highlight. If no files are shown, press the Refresh button.
enable triton key management This function includes the capability to download master keys remotely. To enable this function, terminal must be equipped with an TKM-capable (Triton key management) keypad, and the host processor must support Triton Standard for Remote Key. A valid license must be purchased via Triton for operation, and a code provided by Triton Technical Support must be entered to enable this function.
terminal status (pg 114-119) The Terminal Status menu allows user to view, save, or print various status reports; save and restore parameters; and reset terminal errors.
current terminal error This function generates a management report that displays the current terminal error code with a brief description of error. 1. Navigate to Management Functions > Terminal Status. 2. Press Current Terminal Error. 3. Error code is displayed on screen. Press Print to print a hard copy via the receipt printer, or press Save To File to save on a USB drive. 4. When report has been printed or saved, press Back button to return to the previous menu. terminal error history 1.
reset terminal error 1. Navigate to Management Functions > Terminal Status. 2. Press Reset Terminal Error. 3. No further action from user is required. This function will attempt to reset the current terminal error to zero. configuration summary This function allows user to generate a management report that contains current terminal configuration and hardware status information. Information is provided for all terminal configuration areas, including software, peripherals, communications, and messaging. 1.
restore default parameters This option allows user to set the ATM back to factory default settings. All current parameters that have been modified from factory default settings will be deleted. This function does not reset the journal or T9 keypad. 1. Navigate to Management Functions > Terminal Status. 2. Press Restore Default Parameters. 3. Pressing Enter on the pop-up dialog will begin the processing of erasing current terminal parameters.
restore parameters from external storage This function restores a previously saved set of terminal parameters via a USB drive inserted into an available USB port on the main board. 1. 2. 3. 4. 5. Ensure USB drive with previously saved parameters is installed into an empty USB port on main board. Navigate to Management Functions > Terminal Status. Press Restore Parameters from External Storage. Select correct parameter file, then press Enter and Return.
language This function, located on the Management Functions main menu, allows the user to toggle between several languages. English, French, and Spanish are the default options, although other languages may be included for international customers. These are management Functions languages only, and do not affect customer transaction screens.
favorites This function allows user to add favorite or commonly used functions to a quick access menu. 1. Navigate to Management Functions > Favorites. 2. Press Put Favorite Choice Here to fill any empty slot in the menu. Alternately, pressing Choose Favorites at the bottom of the menu highlights the first open Put Favorite Choice Here slot. 3. List of management functions is displayed on screen. Use Page Up and Page Down buttons to navigate through list. Touch desired option, then press Select. 4.