USER’S MANUAL ©2017 Triton Systems of Delaware, LLC. All Rights Reserved. ATMGurus®, the ATMGurus logo and tagline, Triton®, and the Triton logo are all registered trademarks of Triton Systems of Delaware, LLC. The third party trademarks that may be identified herein are the trademark of their respective owners.
revision history Contact Information - North America Contact Information - International Triton© Triton© 21405 B Street 21405 B Street Long Beach, MS 39560 USA Long Beach, MS 39560 USA 1 (800) 259-6672 1 (228) 575-3175 (228) 868-9445 (fax) (228) 868-0859 (fax) customer.service@atmgurus.com customer.service@atmgurus.com www.atmgurus.com www.atmgurus.
table of contents revision history................................................................................................................. 2 purpose................................................................................................................................. 2 scope...................................................................................................................................... 2 application......................................................................
display selected records........................................................................................... 43 clear journal................................................................................................................ 45 archive/delete journal.............................................................................................. 46 change user password................................................................................................. 47 change username........
glossary ada ansi atm eft dda des emv epp fcc ip iso iso in.
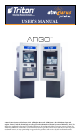
introduction Once unit is installed and power restored, you will be asked to set up passwords and security basics. The user manual describes the operating features and shows how to perform procedures typically performed by the owner/operator personnel. The ARGO series ATM offers: —— Reliable, state-of-the-art operating system with a PC platform design. The ARGO FT uses a Microsoft Windows© CE 7.0 operating system with Triton’s custom designed X3 main board.
standard features —— Management Functions allows extensive control and customization of operating parameters. See X3 Configuration Manual. —— Password protection for Management Functions and key management areas. —— Optional Message Authentication Code (MAC) data encryption protocol provides increased protection for message traffic to and from the ATM. Triple DES compliant. —— Optional TCP/IP with secure socket layer (SSL) adds another level of security for ATM to Host communications.
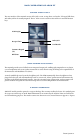
basic operation of argo ft control panel layout The user interface of the terminal consists of the LCD screen, receipt chute, card reader, T9 keypad, bill chute, and audio jack for the visually impaired. The 15” LCD screen is touch reactive and has no external function keys.
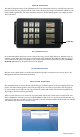
keypad operation The main T9 keypad consists of ten alphanumeric keys, two directional arrow keys, and four large function keys located in a 16-key group beneath the LCD screen. The keys have integral raised braille symbols to conform to ADA requirements. The entry of numeric characters via the main keypad is easy; simply press the desired character. CTRL Key on-screen keypad In certain Management Functions screens it may be necessary to enter alpha characters.
customer transactions A customer begins a transaction by inserting their ATM card into the card reader on the terminal. The card must be fully inserted so that the magnetic stripe and/or EMV chip can be read properly. For EMV transactions, the card must be removed prior to cash being dispensed. If card is inserted incorrectly, a warning message will be displayed on screen. Once the card has been read successfully, the customer must enter their PIN code.
setup basics Triton ATMs require a certain amount of configuration in order to place them into operation. This section lists the minimum configuration requirements to bring the ARGO FT into service. Please see the X3 Configuration Manual for other optional configurations. **Note** An error code of 246 will be displayed upon the first startup. You must change the master password before the ATM will go into service. An appropriate password must be entered to view the Management Functions menu.
using the triton configuration wizard Triton ATMs require a minimum amount of configuration in order to place them into service. These configuration requirements are covered in the Triton Configuration Wizard, which will walk users through setting the minimum requirements, and allow users to access optional configurations that may be required by the host processor. **Note** An error code of 246 will be displayed upon the first startup. You must change the master password before ATM can be put into service.
**Note** Users can toggle between three on-screen keyboards by pressing the Change Keyboard Style button. 8. Press Enter and Return button to save and return to the Configuration Wizard menu. 9. Press Surcharge Amount. Using numeric on-screen keypad, enter the desired surcharge amount. 10. Press Enter and Return button to save and return to the Configuration Wizard menu. 11. Press Set Date. Using numeric on-screen keypad, enter the current date, then press Enter and Return.
12. Press Set Time. Using numeric on-screen keypad, enter the current time. 13. Press Enter and Return button to save and return to the Configuration Wizard menu. 14. After these steps have been completed, press the Next button in the bottom, right corner of the screen to continue to the next set of requirements. **Note** Cash or test notes must be loaded into an active cassette to complete the Multiple Amount (denomination) function.
18. Press Start Quantity and follow on-screen instructions. Remove cassette, replenish cash, then press Enter. 19. Enter the number of notes loaded into cassette. This is not the value of the cashed added. Press Enter and Return button. 20. ATM will automatically perform a Trial Cassette Close. Print or save to file for record keeping purposes. 21. Press Back button to return to the Configuration Wizard menu. 22.
23. Press Protocol. 24. Select desired value, then press Enter and Return. This information is provided by the host processor. 25. Press Message Format. 26. Select desired value, then press Enter and Return. This information is provided by the host processor. **Note** The selections made in the Protocol menu will affect option 3 on the Configuration Wizard menu. If using a dial-up connection, user will see the option Primary Phone.
27. Press Primary Phone, or Primary Address. 28. Enter 10-digit primary phone number, URL, or IP address via on-screen keyboard. This information is provided by the host processor. Users can toggle between three on-screen keyboards by pressing the Change Keyboard Style button. 29. Press Enter and Return. 30. If no additional protocol information is required by host processor, skip to step 37. 31. Press Backup Phone or Backup Address. 32.
**Note** If user 1 and user 2 passwords have already been set, option 1 will be Change Passwords. 39. Press Set Passwords (for the T9 keypad). PCI requires dual authentication, meaning two users must be present to complete the T9 customer keypad configuration. 40. Enter new user 1 password using the T9 keypad. Press Enter. Password must be 8 characters. 41. Re-enter new password, then press Enter.
42. Enter new user 2 password using the T9 keypad. Press Enter. Password must be 8 characters. 43. Re-enter new password, then press Enter. Caution Master keys and instructions are provided by host processor and vary from customer to customer. Steps 44 through 47 are an example of what a user should see when entering master keys. Check digits shown are for example purposes only. 44. Press either Enter PIN Master Keys or Enter MAC Master Keys, and follow on-screen instructions.
46. Press Enter. User 2 add second set of master keys, then press Enter. Compare check digits on screen to check digits provided by host processor. **Note** If on-screen check digits do not match check digits provided by host processor, press Cancel to terminate key entry. Press either Enter PIN Master Keys or Enter MAC Master Keys, and follow on-screen instructions. 47. Press Enter. If master keys were entered successfully, press Enter to return to the Configuration Wizard menu. 48.
49. Press Enter to contact the host and begin working key download. 50. After keys are downloaded successfully, press Enter to return to Configuration Wizard menu. 51. After these steps have been completed, press the Next button in the bottom, right corner of the screen to continue to the final requirements in the Configuration Wizard. 52. All selections on the final screen are optional. Press Welcome Message, Store Message, Marketing Message, or Exit Message as desired.
management functions terminal close functions (pg 23-29) The Terminal Close menu allows the user to manage various close functions necessary to the management and accounting of an ARGO FT. For more information on each function, please see the X3 Configuration Manual. For more details on cassette close procedures, see the section of this manual labeled Cassette Close.
schedule close Schedule close is used to enable/disable and set times for automatic day closes. 1. Navigate to Management Functions > Terminal Close Functions > Schedule Close. 2. Press Enable Schedule to toggle option on (check mark) or off (no check mark). 3. If Enable Schedule is toggled on (showing a check mark), press Set Time. **Note** Use the < and > buttons on the numeric on-screen keypad to toggle between the hour, minute, and second. The Left and Right buttons perform the same function. 4.
send terminal totals This option enables or disables automatic transmission of terminal close totals to host processor. 1. Navigate to Management Functions > Terminal Close Functions. 2. Press Send Terminal Totals to toggle option ON or OFF. Set as recommended by host processor 3. Press Back to return to previous menu. trial close The Trial Close option is used to complete daily balancing of the cash dispenser with the processor.
day close This function completes daily balancing of the cash dispenser with the processor. This function clears totals and resets the business date. A summary of all transactions since the last Day Close was completed can be printed and totals are downloaded and sent to host processor. 1. Navigate to Management Functions > Terminal Close Functions. 2. Press Day Close, then press Enter to begin operation. 3. Day Close Report will be displayed on screen.
trial cassette close This function generates a report to help balance specific cassette(s) in the dispenser without resetting the value(s) to zero. The report summarizes all activity for chosen cassette(s) since the last cassette close. 1. Navigate to Management Functions > Terminal Close Functions. 2. Press Trial Cassette Close option. 3. Press desired cassette(s) to be included in the trial cassette close, then press Save and Return. 4. Trial cassette close report will be displayed on screen.
cassette close This function generates a report to help balance specific cassette(s) in the dispenser. The report summarizes all activity for chosen cassette(s) since the last cassette close and clears cassette totals from the terminal. 1. Navigate to Management Functions > Terminal Close Functions. 2. Press Cassette Close option. 3. Press desired cassette(s) to be included in the cassette close, then press Save and Return. 4. Cassette close report will be displayed on screen.
9. When report has been printed or saved, press Back button to return to the previous menu. cassette close options 1. Navigate to Management Functions > Terminal Close Functions. Select desired cassette close option. Cassette close options allow the user to customize close experience. 2. Press Perform Day Close to toggle on (check mark) or off (no check mark). This option, when enabled (checked), will automatically perform a day close at the end of a cassette close. 3.
add cash This function allows a user to add notes to one or more cassettes without performing a cassette close operation, and automatically provides additional journal entries for documentation. 1. Navigate to Management Functions > Terminal Close Functions. 2. Press Add Cash. 3. Press Note Count Cassette # on desired cassette, then press Enter. 4. Remove and replenish selected cassettes, then press Enter. 5. Using the on-screen numeric keypad, enter the number of bills added to cassette(s).
terminal status The terminal Status menu allows the user to view terminal errors and history, reset current terminal errors, view, import or export parameter, restore default parameters, and Navigate to software update history. To Navigate to Terminal Status menu, go to Management Functions > Diagnostics > Terminal Status. current terminal error 1. Navigate to Management Functions > Diagnostics > Terminal Status. 2. Press Current Terminal Error. 3. Error code is displayed on screen.
terminal error history 1. Navigate to Management Functions > Diagnostics > Terminal Status. 2. Press Terminal Error History. 3. Error code history is displayed on screen. Press Print to print a hard copy via the receipt printer, or press Save To File to save on a USB drive. 4. When report has been printed or saved, press Back button to return to the previous menu. reset terminal error Navigate to Management Functions > Diagnostics > Terminal Status and press Reset Terminal Error.
configuration summary The Configuration Summary generates a management report that contains current terminal configuration and hardware status information. Information is provided for all terminal configuration areas, including software, peripherals, communications, and messaging. 1. Navigate to Management Functions > Diagnostics > Terminal Status. 2. Press Configuration Summary. 3. Report is displayed on screen. Use Page Up and Page Down buttons to navigate through report.
save parameters to external storage This function saves the current terminal parameters to a USB drive inserted into an available USB port on the main board. 1. 2. 3. 4. Navigate to Management Functions > Diagnostics > Terminal Status. Ensure USB drive with previously saved parameters is installed into an empty USB port on main board. Press Save Parameters to External Storage. Press Enter on the pop-up dialog.
software update history This function allows user to generate a report of all software updates that have been installed onto the machine. 1. Navigate to Management Functions > Diagnostics > Terminal Status. 2. Press Software Update History. 3. Report is displayed on screen. Use Page Up and Page Down buttons to navigate through report. Press Print to print a hard copy via the receipt printer, or press Save To File to save on a USB drive. 4.
purge (dispenser) This option allows users to cycle the dispenser in order to clear the note path. Any jammed bills should be deposited in the reject bin/cassette. 1. Navigate to Management Functions > Diagnostics > Dispenser. 2. Pressing Purge will begin the process of clearing the feed path. 3. Once purge is complete, press Enter on the pop-up dialog to return to the previous menu. test dispense This function dispenses notes from each operational cassette into the reject cassette.
card reader status This functions generates a report showing the card reader hardware status. 1. Navigate to Management Functions > Diagnostics > Card Reader. 2. Press Card Reader Status. 3. Report is displayed on screen. Press Print to print a hard copy via the receipt printer, or press Save To File to save on a USB drive. 4. When report has been printed or saved, press Back button to return to the previous menu.
scan card This function reports the number of tracks the card reader is able to scan. If the card can be properly read, the information from each track will be displayed on screen. 1. Navigate to Management Functions > Diagnostics > Card Reader. 2. Press Scan Card. 3. Insert card into card reader. Card reader will attempt to read an EMV chip. If no chip is detected, card reader will read magnetic strip. 4. Remove card when on-screen prompt appears. 5. Report is displayed on screen.
device status (printer) This function generates a report showing the current hardware status, including the printer name and any errors. 1. Navigate to Management Functions > Diagnostics > Printer. 2. Press Device Status. 3. Report is displayed on screen. Use Page Up and Page Down buttons to navigate through report. Press Print to print a hard copy via the receipt printer, or press Save To File to save on a USB drive. 4.
test (modem/ethernet) This function tests the terminal modem by performing a dialing operation. 1. Navigate to Management Functions > Diagnostics > Modem/Ethernet. 2. Press Device Status. 3. Report is displayed on screen. Use Page Up and Page Down buttons to navigate through report. Press Print to print a hard copy via the receipt printer, or press Save To File to save on a USB drive. 4. When report has been printed or saved, press Back button to return to the previous menu.
device status (keypad) This function generates a report showing the current hardware status, serial number, version number, and loaded encrypted key check digits. 1. Navigate to Management Functions > Diagnostics > Keypad. 2. Press Device Status. 3. Report is displayed on screen. Use Page Up and Page Down buttons to navigate through report. Press Print to print a hard copy via the receipt printer, or press Save To File to save on a USB drive. 4.
display unaudited records This function generates a summary of all unaudited journal entries from the last time the journal was audited/ printed. 1. Navigate to Management Functions > Electronic Journal. 2. Press Display Unaudited Records. 3. Report is displayed on screen. Use Page Up and Page Down buttons to navigate through report. Press Print to print a hard copy via the receipt printer, or press Save To File to save on a USB drive. 4. When report has been printed or saved, press Back button. 5.
display last x This function can be used to display, print, or save all electronic journal records before or after auditing. 1. Navigate to Management Functions > Electronic Journal. 2. Press Display Last X. 3. Using the on-screen numeric keypad, enter the number of journals to display, then press Enter and Return. 4. Report is displayed on screen. Use Page Up and Page Down buttons to navigate through report.
display selected records This function allows user to sort journal entries by various criteria. 1. Navigate to Management Functions > Electronic Journal. 2. Press Display Selected Records. 3. Press Audit Filter, then touch desired option. Press Save and Return to return to previous screen. 4. Press Record Type, then touch desired option. Press Save and Return to return to previous screen. 5. Press Date Filter, then touch desired option. Press Save and Return to return to previous screen.
**Note** Use the < and > buttons on the numeric on-screen keypad to toggle between the month, day and year. 6. If the selected dates option was chosen for the date filter, press Start Date. Using the on-screen numeric keypad, enter the desired start date. Press Enter and Return. 7. If selected dates was chosen for the date filter, press End Date. Using the on-screen numeric keypad, enter desired end date. Press Enter and Return. 8. Press Field, then touch desired option.
clear journal This function marks all unaudited records in the journal as audited. 1. Navigate to Management Functions > Electronic Journal. **Note** Clearing audits records. This function does not delete. 2. Press Clear Journal. 3. Press Enter to clear all journal entries and mark as audited. Press Enter to return to the previous screen.
archive/delete journal This function allows user to specify the destination and date range for archiving audited journal records. 1. Navigate to Management Functions > Electronic Journal. Caution Choosing None (Delete) option for Archive Location will permanently delete all journal records. 2. Press Archive/Delete Journal. 3. Press Archive Location. 4. Select the desired save location, then press Save and Return. 5. Press Archive records prior to: to choose date. 6.
change user password This function allows the currently-logged-in user to change their password. For example, this function changes master password if user is logged in with master user ID (00). 1. Navigate to Management Functions > Password Maintenance. 2. Press Change User Password. 3. Using the on-screen numeric keypad, enter the new password for user, then press Enter. Do not include user ID. Password may be 4-12 numeric characters. 4.
modify user access This function allows the Master user to select which Management Functions options will be accessible to other users. 1. Navigate to Management Functions > Password Maintenance. 2. Press Modify User Access. 3. Using the on-screen numeric keypad, enter the user ID you wish to modify. Press Enter and Return. 4. Touch desired selections to toggle the option on or off. User will have access to all option with a check mark beside them. 5.
add user This function allows the Master user to add a new user. 1. Navigate to Management Functions > Password Maintenance. 2. Press Add User. 3. Using the on-screen numeric keypad, enter new user ID, then press Enter and Return. User ID may be any digit between 01-99 that is not currently assigned to another user. 4. Using the on-screen keypad, enter the new username, then press Enter and Return. 5. Using the numeric on-screen keypad, enter the new password for user, then press Enter. 6.
remove user This function allows the Master user to remove user(s). 1. Navigate to Management Functions > Password Maintenance. 2. Press Remove User. 3. Using the on-screen numeric keypad, enter user ID you wish to delete, then press Enter and Return. 4. Press Enter to remove user, or Cancel to return to previous menu.
date and time This function allows user to set the correct date and time. ATM will not go into service if these parameters are not set. 1. Navigate to Management Functions > System parameters. 2. Press Date and Time. **Note** Use the < and > buttons on the numeric on-screen keypad to toggle between the month, day and year or the hour, minute and second. 3. Press Set Date. 4. Using the on-screen numeric keypad, enter the current date. Press Enter and Return to return to the previous screen. 5.
volume control This function allows user to control the terminal speaker and headphones volume. 1. 2. 3. 4. Navigate to Management Functions > System Parameters. Press Volume Control. Press the on-screen Up and Down buttons to adjust volume to desired level. Press Enter and Return to save changes and return to the previous screen. shutdown the terminal 1. 2. 3. 4. Navigate to Management Functions > System Parameters. Press Shutdown the Terminal.
restart terminal 1. Navigate to Management Functions > System Parameters. 2. Press Restart the Terminal. 3. Press Enter on the pop-up dialog. Terminal will reboot. software update 1. 2. 3. 4. Install USB drive loaded with software into an empty USB port on main board. Navigate to Management Functions > System Parameters. Press Software Update. Press desired filename on screen to highlight. If no files are shown, press the Refresh button.
dispenser operation dispenser The purpose of this section is to describe the procedures for cassette closing and replenishment. Information concerning note handling and note quality are discussed where relevant. ARGO FT units are equipped with an NMD100 dispenser located in the lower security cabinet. Currency capacity depends upon the dispenser mechanism installed in the ATM, however, note quality and thickness is also a factor. Do not overfill the cassette.
note condition The number of rejects can be directly influenced by the technique used to load the cassette and the quality of the currency. Notes loaded into the mechanism cassettes must be in fit condition if a high level of performance is expected from the unit.
cassette close This function generates a report to help balance specific cassette(s) in the dispenser. The report summarizes all activity for chosen cassette(s) since the last cassette close and clears totals from the terminal. 1. Navigate to Management Functions > Terminal Close Functions. 2. Press Cassette Close option. 3. Press desired cassette(s) to be included in the cassette close, then press Save and Return. 4. Cassette close report will be displayed on screen.
loading the nmd-100 cassette 1. When prompted via Management Functions, remove cassette by grasping handle and pulling from dispenser. 2. If cassette has a lock, use the security key to unlock cassette. 3. Open cassette by simultaneously pressing the green release button and lifting the lid. Flip lid back completely, allowing it to rest on flat surface. 4. Pull the packer plate to the front of the cassette (toward the handle). Ensure the packer plate is fully back.
clearing notes from the reject cassette 1. While security cabinet is open, remove the reject bin by grasping the handle and pulling from dispenser. **Note** Do not remove the reject cassette without removing the rejected notes. Removing reject cassette with power applied causes the terminal to reset the reject count to zero. To ensure an accurate rejected note count, remove notes from reject bin every time it is removed from dispenser. 2. If cassette has a lock, use the security key to unlock cassette. 3.
test dispense This function dispenses notes from each operational cassette into the reject cassette. No notes are sent to exit. 1. Navigate to Management Functions > Diagnostics > Dispenser. 2. Press Test Dispense. 3. Press desired single cassette or All Cassettes to begin the test dispense operation. A pop-up dialog will inform user if test dispense was successful. 4. Once complete, press Enter on the pop-up dialog to return to cassette menu. 5. Press Back to return to the previous screen.
electronic lock operation Electronic locks are now equipped with a super master reset (SMR) password. This password should only be used if the manager password has been lost/forgotten. Using the SMR password will reset lock back to factory default settings; however, once the SMR password has been changed from factory default code, it cannot and will not change unless a hard reset of the lock is performed. Caution Upon arrival, the 8-digit SMR password combination for the lock is set at 5-5-5-5-5-5-5-5.
changing the combination For your convenience, the video Changing the Combination on an Electronic Lock with Swing Bolt by Triton Systems/ATMGurus is available on you YouTube. Caution Always perform this operation with the door open. Test new/changed combination several times before closing door. To change the combination, follow the steps below: **Note** After each key press, the lock will beep. After the final digit is entered, the lock will beep twice. A triple beep signals an invalid entry.
lockout feature The electronic lock has a Wrong Try Penalty lockout feature to prevent unauthorized personnel from accessing cabinet. This feature performs as follows: —— Entry of four consecutive invalid combinations will start a 5-minute delay period. LED flashes red at ten-second intervals during delay period. —— At the end of the 5-minute delay period, two more consecutive invalid combinations will begin another 5-minute delay period.
remove user (manager feature only) **Note** After each key press, the lock will beep. After the final digit is entered, the lock will beep twice. A triple beep signals an invalid entry. Always perform this operation with the door open. If a mistake is made, wait 30 seconds, then repeat steps. 1. Enter manager code and hold down last digit of code until the lock emits two sets of double beeps. 2. Press 3. Lock should beep once. User is now permanently removed.
general maintenance This section of the manual covers preventative maintenance procedures, such as replenishing receipt paper, cleaning the enclosure, and cleaning the card reader. Only qualified service personnel are authorized to repair or service terminals. Should a malfunction occur, do not attempt to service the unit yourself. Contact a Triton-certified service provider. replenishing receipt paper 1. 2. 3. 4. Open the rear service door.
cleaning card reader Special cleaning cards (Triton P/N 05010-00024) are available for proper maintenance of the card reader. These waffle-type cleaning cards may be used with multiple types of card readers. The card reader should be cleaned at least once per month, although it may be necessary to clean card reader more often in high traffic locations. **Note** Cleaning cards are designed for single use. 1. 2. 3. 4. 5. Remove cleaning card from sealed pouch. Insert cleaning card into card reader.
t9 keypad activation 1. Obtain the terminal serial number. This can be found on the inside of the cabinet. 2. Navigate to Management Functions > Diagnostics > Keypad Diagnostics. 3. Press Activate EPP. T9 keypad serial number, nonce, and user ID will be displayed on screen. 19-40-12-34 4. 5. 6. 7. On laptop, navigate to www.tritonatm.com, then log in with username and password. In the left hand navigation panel, click on Software Activation. In the blue box, click on Re-Activate T9 EPP.
appendix a - triton warranty statement The Manufacturer warrants that the Merchandise delivered to a distributor will perform in accordance with the Manufacturer’s published specifications as detailed below from date of shipment from Long Beach, MS. The Manufacturer’s warranty shall not apply to any damage resulting from abuse, negligence, accident, or to any loss or damage to the Merchandise while in transit.
unfilled part of these terms and conditions without any liability whatsoever. All Rights Reserved This publication is protected by copyright and all rights are reserved. No part of it may be reproduced or transmitted by any means or in any form, without prior consent in writing from Triton Systems of Delaware, LLC. The information in this publication has been carefully checked and is believed to be accurate.
• resulting from improper maintenance; and • caused by any other abuse, misuse, mishandling, or misapplication. Under no circumstances shall the Manufacturer or its suppliers be liable for any special, incidental, or consequential damages based upon breach of warranty, breach of contract, negligence, strict liability, or any other legal theory.
In addition to warranty returns, Triton offers a limited return program for unused Merchandise. Acceptance is determined on the condition, age, and reason for returning the Merchandise. Triton charges a restocking fee to cover the handling, testing, and verification of the returned Merchandise, at its discretion. • A 10% restocking fee is charged if the Merchandise is returned in the original manufacturer’s packaging unopened. • A 25% restocking fee is charged if the opened Merchandise is returned intact.
ATMGURUS WARRANTY STATEMENT The Manufacturer warrants that the Merchandise delivered to a Purchaser will perform in accordance with the Manufacturer’s published specifications as detailed below from date of shipment from Long Beach, MS. The Manufacturer’s warranty shall not apply to any damage resulting from abuse, negligence, accident, or to any loss or damage to the Merchandise while in transit.
part of these terms and conditions without any liability whatsoever. All Rights Reserved This publication is protected by copyright and all rights are reserved. No part of it may be reproduced or transmitted by any means or in any form, without prior consent in writing from ATMGurus. The information in this publication has been carefully checked and is believed to be accurate. However, ATMGurus assumes no responsibility for any inaccuracies, errors, or omissions that may be contained in this document.
a service technician authorized by ATMGurus shall void this warranty. Limited Warranty covers normal use.
• • • • Components must be returned in proper packaging. Damage resulting from improper packaging is subject to additional fees or return without processing of the warranty claim. Merchandise altered or modified outside the specifications set forth by the Manufacturer or ATMGurus may not be accepted as a warranty return. Incomplete components (parts missing) may not be accepted as valid warranty returns. ATMGurus reserves the final right in determining acceptance of a warranty claim.
AUTOMATED TELLER MACHINE (“ATM”) SOFTWARE END-USER AGREEMENT IMPORTANT: PLEASE READ CAREFULLY: BY INSTALLING OR OTHERWISE USING THE ATM, YOU (AS THE OWNER OR LESSEE OF THE ATM), AGREE TO BE BOUND BY THE FOLLOWING TERMS AND CONDITIONS, INCLUDING, WITHOUT LIMITATION, THE WARRANTY DISCLAIMERS, LIMITATIONS OF LIABILITY AND TERMINATION PROVISION WHICH APPLY TO YOUR USE OF THE ATM SOFTWARE CONTAINED IN THIS ATM AND IS HEREBY LICENSED BY TRITON SYSTEMS OF DELAWARE, LLC.
ENTIRE AGREEMENT: This License Agreement and the accompanying Limited Warranty set forth the entire agreement between you and Triton, supersedes all prior agreements, whether written or oral, with respect to the ATM Software, and may be amended only in a writing signed by both parties.
appendix b - grg dispenser operation dispenser The GRG dispenser is an option on the ARGO FT for customers outside of the United States. The purpose of this section is to describe the procedures for cassette closing and replenishment. Information concerning note handling and note quality are discussed where relevant. ARGO FT units are equipped with an optional GRG dispenser located in the lower security cabinet.
note condition The number of rejects can be directly influenced by the technique used to load the cassette and the quality of the currency. Notes loaded into the mechanism cassettes must be in fit condition if a high level of performance is expected from the unit.
cassette close This function generates a report to help balance specific cassette(s) in the dispenser. The report summarizes all activity for chosen cassette(s) since the last cassette close and clears cassette totals from the terminal. 1. Navigate to Management Functions > Terminal Close Functions. 2. Press Cassette Close option. 3. Press desired cassette(s) to be included in the cassette close, then press Save and Return. 4. Cassette close report will be displayed on screen.
load/replenish the grg cassette 1. Unlock/open security door. 2. Press lever beside cassette that you wish to remove. 3. Grasp handle and pull cassette from dispenser, supporting bottom of cassette with other hand. 4. Unlock cassette with key, if necessary. To open cassette, push button on latch, then lift out and up. 5. Lift lid of cassette. Flip back fully, letting lid rest on table or other flat surface. 6. Move packer plate to rear of cassette (toward handle.
10. Repeat steps for remaining cassettes. 11. Continue with Cassette Close or other procedure via Management Functions. **Note** Do not remove the reject cassette without removing the rejected notes. Removing reject cassette with power applied causes the terminal to reset the reject count to zero. To ensure an accurate rejected note count, remove notes from reject bin every time it is removed from dispenser.
4. Once complete, press Enter on the pop-up dialog to return to cassette menu. 5. Press Back to return to the previous screen.