
Guide

7
Ft7000 Controller PC Hard drive remove and rePlaCement ProCedures
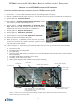
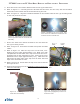
11. Refer to Figures 10 and 11. Place the hard drive and bracket upside down on a clean static free
work surface with the 2 thumbscrews facing forward.
12.Loosenthetwo(2)thumbscrewsonthetophalfoftheharddriveretainerbracket(nowonthebot-
tom).
13.RefertoFigure11.Pullthebottomhalfofthebracket(nowontop)upasfarasitwillgo(approxi-
mately.2”).
14. Carefully remove the hard drive from the retainer bracket.
installing the ft7000 ContRolleR PC haRd dRive and bRaCket
Procedure:
1. RefertoFigures10and11.Placetheharddrivebracketupsidedownwiththetwo(2)thumbscrews
facing forward.
2. Loosenthetwo(2)thumbscrewsonthetophalfoftheharddriveretainerbracket(nowonthebot-
tom).
3. RefertoFigure11.Pullthebottomhalfofthebracket(nowontop)upasfarasitwillgo(approxi-
mately.2”).
4. Carefully slip the hard drive into the top half of the hard drive retainer bracket, the top side down
and the connectors facing right.
**CAUTION**
Use extreme caution: Do not damage the hard drive! Make
sureit’sclearofthelockingangeswhenremovingitfrom
the bracket.
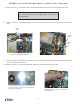
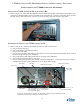
Figure 10. Hard drive and mounting brack-
et removed from the Controller PC.
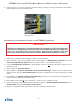
Figure 11. Removing the hard drive from
the mounting bracket.
**CAUTION**
Use extreme caution when handling static sensitive elec-
tronic devices.
**CAUTION**
Use extreme caution: Do not damage the hard drive! Make
sureit’sclearofthelockingangeswhenmountingitinthe
bracket.