
Guide

5
Ft7000 Controller PC Hard drive remove and rePlaCement ProCedures
removing the ft7000 controller Pc from the control bay
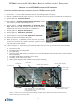
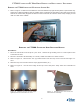
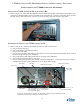
1. Refer to Figure 3. Make sure all cables are clear and that the top right access panel is open all the way.
Grasp the U-shaped handle at the top middle of the Controller PC and slowly pull it away from the top
shelf in the Control Bay Support the bottom of the Controller PC with the other hand, keeping it level
until it is clear of the cabinet.
Figure 3. Removing the Controller PC.
Removing the ft7000 ContRolleR haRd dRive and bRaCket
Procedure:
1. Place the anti-static wrist strap on your wrist. Attach the grounding wire to a metal part of the
Controller PC case.
3. Place the Controller PC assembly on a clean, stable and static free work surface.
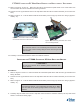
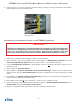
4. RefertoFigure4.Removethetwo(2)smallscrewsfromthetopcoverfrontleftandrightcor-
ners.
5. Slidethetopcoverforwarduntilitstops(approximately¼”).
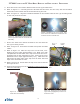
6. Refer to Figure 5. Lift the front edge of the top cover and pull it away from the Controller PC
case.
Figure 4. Remove the two screws (high-
lighted)fromtheControllerPCcover.
Figure 5. Removing the cover from the
Controller PC assembly.