
Guide

10
Ft7000 Controller PC Hard drive remove and rePlaCement ProCedures
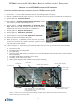
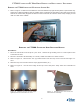
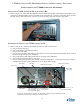
2. RefertoFigure19.Ifused,installtheretainerbracket(yellow)onthetoprightsideofthecabinet.
Hand-tightenthetwo(2)thumbscrews.
SyStem Start uP and oPerational teSting of the ft7000 Pc controller
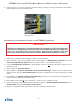
1. Switch on the UPS and Power Supply to power up the terminal.
2. After Windows, Prism, and Kalignite load, select Option 1, Management Functions from the
Power Up ATM Startup Optionsmenu(orpressCntrl+1ontheRSPkeyboard).
3. Log into Management Functions. Select Option 2 and run all menu selections. Verify no error
conditions exist.
4. Select Option 8, Terminal Status.
5. Select Option 3, Restore Parameters from External Storage. Make sure the USB external
storage device with the Saved ParametershasbeeninstalledatoneoftheControllerPC’sUSB
ports.
6. Select Option 1, Display Conguration Summaryandthenprintandverifyallcongurationpa-
rameterswiththepreviously“saved”copy.
7. Select Option 2 and run all menu selections. Verify no error conditions exist.
8. Press the Cntrl key on the RSP keyboard and select Option 2, Exit Management Functions to run
Health Check and enter Customer Transactions.
13. Perform a complete online performance test from Customer Transactions.
Figure 19. The location of the yellow re-
taining bracket.
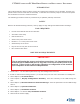
**IMPORTANT**
Restoring the parameters that were saved at the beginning of this procedure will
save time re-conguring the terminal. After the terminal has been re-congured,
print out a copy of the Configuration Summary and compare it with the copy that
was saved at the beginning of this procedure. Make sure everything is correct.