
manual
Triton Systems ©
130
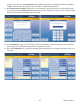
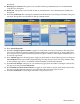
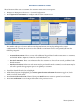
1. Navigate to Management Functions > Terminal Conguration.
2. Press More Options.
3. Press Triton Connect to view or congure the Triton Connect settings.
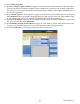
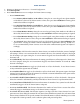
— Press Communication.
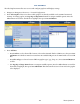
— Press Primary Phone Number (or IP Address). Using the on-screen keypad, enter phone number
or IP address as directed by Triton Connect owner, then press Save and Return. Primary phone
number/host address is required.
— Press Backup Phone Number (or IP Address). Using the on-screen keypad, enter phone number
or IP address as directed by Triton Connect owner, then press Save and Return. Primary phone
number/host address is required.
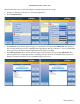
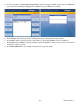
— Press Alarm Monitor Primary. Using the on-screen keypad, enter phone number or IP address as
directed by Triton Connect owner, then press Save and Return. Alarm monitor primary is required.
— Press Alarm Monitor Backup. Using the on-screen keypad, enter phone number or IP address as
directed by Triton Connect owner, then press Save and Return. Alarm monitor backup is required.
— Press Protocol. Press desired option to toggle on (check mark), then press Save and Return. is
option allows selecting the Triton Connect communication requirements (dial-up, TCP/IP. etc.).
Set as recommended by Triton Connect owner e other communication options will adjust ac-
cordingly.
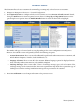
— Press Max Retries. Calls from the terminal to Triton Connect are made in blocks that consist of multiple
call attempts. If there is no connection aer the terminal calls twice, the terminal will pause, then begin
the call attempt cycle again. Using the on-screen numeric keypad, enter desired number of call blocks
between 0 - 10.
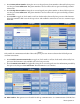
— Press Redial Delay. is function determines the waiting period between call attempts to the Triton Con-
nect host computer. Using the on-screen numeric keypad, enter desired number of seconds (0 - 1000)
between call attempts.
— Press Enable Triton Connect to toggle on (check mark) or o (no check mark). To use Triton Connect
on any terminal this option must be enabled.
— Press Enable Call Back to toggle on (check mark) or o (no check mark). is option requires the Triton
Connect host to hang up and wait for terminal to call back to transmit information. is option will be
automatically enabled when SSL is used.
— Press Enable Scheduled Journal Entries to toggle on (check mark) or o (no check mark). is option
allows the terminal to automatically send all journal data to Triton Connect at a predetermined time.
— Press Journal Record reshold. is function determines the number of new journal records that will
automatically trigger a call to the Triton Connect computer.
— Press Low Cash reshold. is function determines the number of notes le in a cassette that will au-
tomatically trigger a notication message to the Triton Connect computer.
— Press Enter New Access Code. is function requires a six-digit code that a Triton Connect host com-
puter must use when calling the terminal. If code entered into ATM does not match the code entered into
Triton Connect database for the specic terminal, the ATM will initiate a call back. Matching access codes
are required for certain operations, such as soware updates and password updates.