
Owner Manual

1-2
EMV Card rEadEr UpgradE proCEdUrEs
9600 rEMOVE and rEplaCE prOCEdUrES
Before proceeding, follow these steps to remove power from the ATM:
Unlock and open the ATM control panel. Cut the printer paper, and push
the printer paper advance button until all of the paper is ejected out the front
(DO NOT pull the paper back through the printer, it will cause shredding
and jams). Remove the paper roll. Turn the power switch to the OFF (0)
position. If possible, unplug the ATM power cord at the wall outlet.
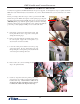
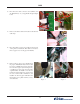
2. Remove the nut holding the pneumatic piston arm to
the control panel. Support the control panel as you
disconnect the end of the assembly.
1.
Unlock and open the lower cabinet fascia panel. The
fascia panel will be used to support the control panel
during the following steps.
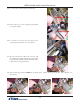
3. Lower the control panel so that it rests on the top edge
of the fascia panel. Be very careful, this is the only
thing holding the control panel up. If it should fall off
of the fascia panel, damage will occur.
4. Remove the 2 (two) screws retaining the cable
clips to the printer bracket.
5. Cut the ty wrap that secures the printer power, reset,
and paper low sensor cables to the left and right printer
bracket cable clips. Note how these cables are ty
wrapped to the clips: you will use a new ty wrap to
reconnect the cables to the clips in a later step.
You may have upgraded to the EMV Card Reader in a previous upgrade. Go through these steps as a quality check. The
EMV card reader in this kit may be newer than the one you have. Retain all hardware, (screws, nuts bolts) some will be
reused.