
Owner Manual


2-3
9600
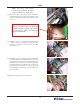
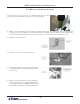
6. Install the keypad retaining plate with the 4 (four)
short standoffs. Start all 4 (four) before tightening. It
may take a few attempts before all 4 (four) standoffs
are started properly. DO NOT CROSS THREAD
THE STANDOFFS. Note the retaining bracket
mounts on top of the screen mounting bracket. Use
the nut driver to tighten these standoffs.
7. Tighten the 2 (two) screws in the upper screen
mounting bracket, loosened in Step 4.
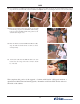
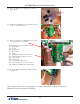
10.
Pressonthefrontofthekeypadassemblyrmlyto
seat the mounting pads into the retaining plate. Secure
the assembly with 4 (four) self tapping screws. (4mm
x 12mm bag 1) Continue to apply pressure while
installing the screws. These are self tapping, do
not over tighten. Upon completion, check the front
mounting area, there should be no space between the
keypad assembly and the control panel.
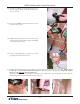
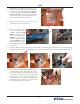
9. Feed the cables from the front thru the upper left opening of the retaining plate. Maneuver the wires until the keypad
assembly seats into the 2 (two) mounting guides. Do not pinch or bind the wires. Some wire wiggling will be required.
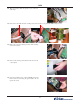
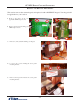
8. Remove the RED twisty
tie from the new keypad
assembly cable bundle. DO
NOT cut the black ty wrap
that is close to the connectors.
NOTE: As you feed the
cables through the retaining
plate, DO NOT pinch the
cable at the point shown. The
cables should lay down in the
recessed area.