
Owner Manual


1-6
EMV Card rEadEr UpgradE proCEdUrEs
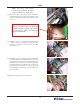
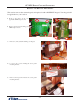
19. Place the pneumatic piston back onto its bolt and secure
with the nut removed earlier.
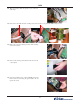
20. Reattach the low paper sensor and bracket to the new
paper bracket with 2 (two) screws. Ensure the plastic
washers are between the paper bracket and sensor
bracket. If your new bracket has shoulders around
each screw hole, OMIT the plastic washers. The plastic
washers, or shoulders on the paper bracket, create
a space between the paper bracket and the sensor
bracket. If you had a type one sensor bracket, refer to
the instructions at the end of this section (page 1-10)
to attach the sensor to the new bracket, then continue
with this step.
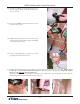
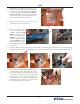
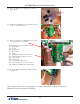
23. Place 2 (two) adhesive cable clips on the new
bracket (for the ribbon cable)
22. Route the black printer cable and reset cable
under the 2 (two) plastic clips. Tighten the
screws retaining the clips. Ty wrap the black
printer cable and reset cable to the RIGHT
plastic clip. Route the low paper sensor cable
under the LEFT plastic clip (right to left) and
ty wrap the 3 (three) cables to the clip.
Printer cable
Reset cable
Low paper
sensor cable
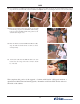
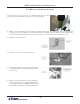
21. Reconnect the low paper sensor
to J11 on the printer controller,
and ty wrap the cable to the
paper bracket if applicable.