
Owner Manual

1-4
EMV Card rEadEr UpgradE proCEdUrEs
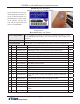
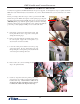
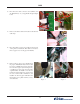
11. Remove the 2 (two) screws securing the paper bracket
to the printer bracket.
10. Loosen the bolt on the pneumatic piston bracket.
12. Loosen but do not remove the 2 (two) upper screws
securing the printer bracket to the control panel.
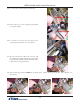
13. Move the disconnected cables aside as needed. Lift
the printer bracket slightly and slide the paper bracket
from beneath the printer bracket and pneumatic piston
bracket. Remove the paper bracket.
14. Slide the new paper bracket UNDER the pneumatic piston bracket and the printer bracket. This will take some
maneuvering.