
Owner Manual

4
9100 SINGLE TO DUAL POWER SUPPLY CONVERSION
REMOVAL OF THE 9100 SINGLE POWER SUPPLY
1. Perform the approved power down procedure. Disconnect the AC line cord from the wall outlet.
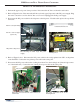
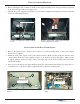
2. Refer to Figures below. Disconnect the AC line cord and topper (if present) at the DC power supply. Plug
the new 6” extension cord into the AC line cord. Leave it unplugged from the power supply.
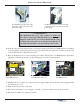
3. Disconnect the DC power cable for the dispenser at the dispenser. Feed the cable up into the top cabinet
enclosure.
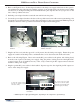
4. Refer to Figures below. Disconnect the DC power cable for the receipt printer from CN1 on the printer
controller PCB. Connect the new printer power cable at the same point.
5. Disconnect the DC power cable for the docking board from J4 on the docking board (inward edge connec-
tor of the mainboard). Connect the new docking board power cable at the same point.
DC power connection at CN1 on the Printer Con-
troller PCB
Printer DC Power Cable
DC power connection at J4 on the
Docking Board
Dispenser Communication
Cable
Docking Board DC Power
Cable
Disconnecting the 9100 single DC power
supply
AC line cord for Topper
(if present)
AC line cord (from wall)
DC power to dispenser
The DC power cable connection at the
TDM dispenser.
TDM power
cable
6” AC Extension Cord