MODEL 9100 SINGLE TO DUAL POWER SUPPLY FIELD CONVERSION PROCEDURE TDN 07103-00183-00 APRIL 27, 2012 CORPORATE HEADQUARTERS: 21405 B Street Long Beach, MS 39560 Phone: (800) 259-6672 Fax: (228) 868-9445 COPYRIGHT NOTICE © 2014 Triton. All Rights Reserved.
9100 SINGLE TO DUAL POWER SUPPLY CONVERSION DOCUMENT UPDATES APRIL 27, 2012 REMOVED SPARE FUSE FROM KIT MARCH 14, 2014 UPDATED PART NUMBERS CONTENTS PERFORMING THE 9100 SINGLE TO DUAL POWER SUPPLY CONVERSION INTRODUCTION ..........................................................................................................................................2 SCOPE.................................................................................................................................................
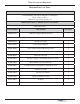
FIELD CONVERSION PROCEDURE REQUIRED PARTS AND TOOLS TOOLS REQUIRED #1 and #2 Phillips screwdriver (Magnetic recommended) 11/32” (9mm) nut driver ESD wrist strap with grounding cord 9100 SINGLE TO DUAL POWER SUPPLY CONVERSION PARTS SUPPLIED PART NUMBERS DESCRIPTION QUANTITY 06200-08161 9100 Power Supply Replacement Kit 1 ACCESSORY BOX 09200-01215 Dual Power Supply 1 03011-05216 Power Adaptor Bracket 1 02054-00302 Power Adaptor Bracket Mounting Screws 3 02301-00024 #8-32 w/SEM Mounting Nut
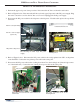
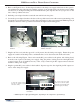
9100 SINGLE TO DUAL POWER SUPPLY CONVERSION REMOVAL OF THE 9100 SINGLE POWER SUPPLY 1. Perform the approved power down procedure. Disconnect the AC line cord from the wall outlet. 2. Refer to Figures below. Disconnect the AC line cord and topper (if present) at the DC power supply. Plug the new 6” extension cord into the AC line cord. Leave it unplugged from the power supply. 3. Disconnect the DC power cable for the dispenser at the dispenser. Feed the cable up into the top cabinet enclosure.
FIELD CONVERSION PROCEDURE 6. Refer to the Figures below. Remove the DC power supply mounting screw (and ground straps if present) along the front edge of the power supply case. 7. Slide the DC power supply forward until it stops and then carefully lift it straight up from the top cabinet enclosure (with attached cables).
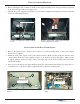
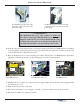
9100 SINGLE TO DUAL POWER SUPPLY CONVERSION 4. Refer to the Figures below. Set the adaptor bracket for the dual power supply in the back of the top enclosure with the base plate (the plate side with the openings) down and the angle sides facing forward. Make sure the four (4) L-shaped locking tabs underneath the base plate slip into the four (4) open slots on the base of the top cabinet enclosure. 5. Push the power adaptor bracket towards the rear until it locks into place. 6.
FIELD CONVERSION PROCEDURE The Mini-Mech dispenser DC power cable connection (10-pin connector) at the dual power supply The TDM dispenser DC power cable connection (10-pin connector) at the dual power supply *** IMPORTANT*** The Mini-Mech DC power cable requires an in-line 4A fuse. Before connecting a Mini-Mech DC power cable to the dispenser, make sure the correct fuse is installed in the casing and both ends of the cable are securely fastened. One fuse is provided in the kit.