
Owner Manual


8
MODEL 9100 SPEECH UPGRADE
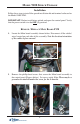
Nuts
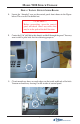
4. Assemble the audio PCB to the bracket using the #4-40 screws/nuts
provided. The screws are inserted (2) on the back side of the board with the
nuts secured to the bracket as shown below.
5. Connect one end of the ribbon cable included to the audio board as shown
(blue tracer visible).
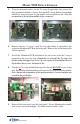
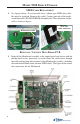
6. Insert audio board assembly to the control panel and start the right side
screw using the K40x12 screws included. Connect/secure the cable routing
clip shown on the left side screw hole. Tighten both screws.