
Owner Manual


9
TDM TO MINIMECH CONVERSION PROCEDURES
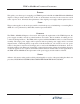
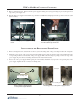
4. Refer to the Figures below. Set the adaptor bracket with the power supply in the back of the top enclosure with the base
plate (the plate side with the openings) down and the angle sides facing forward. Make sure the four (4) L-shaped locking
tabs underneath the base plate slip into the four (4) open slots on the base of the top cabinet enclosure.
5.
Push the power adaptor bracket towards the rear until it locks into place.
6. Secure the power adaptor bracket, with the plastic cable retainer, to the base of the top cabinet enclosure at the center rear
mounting point. Secure the power adapter bracket, as well as any ground wires to the base of the top cabinet enclosure at
the right front mounting point. Place the power cord in the cable retainer.
The mounting points for the power adapter
bracket in the upper cabinet.
Slots for the power
adapter bracket
Threaded holes for the
power adapter bracket
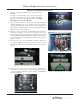
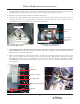
MiniMech
Printer Controller
Docking Board
DC Topper (if installed)
Ground
8. Refer to the following Figures. Dress and route the DC power cables for the printer, and docking board, from the control
panel to the power supply, using the cable clip shown, and ty wraps provided. Plug the printer, docking board and the
lighted DC-powered topper (if one is installed) into the connectors as shown below. Plug the specifi c DC power cable
for the MiniMech into the single 10-pin DC output connector on the power supply, and route it down through the cabinet
to the vault below.
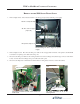
Power supply and adapter
bracket
in the top cabinet enclosure
Mounting points
for ground straps
Mounting points for the
power adapter bracket
Power cable for
dispenser
Communications
cable, Docking
board to EJ
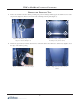
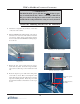
7. ENSURE THE POWER SUPPLY IS IN THE OFF POSITION, AND THE AC CABLE IS DISCONNECTED FROM THE
WALL OUTLET. Connect the AC cable extension to the AC cable and power supply as shown above. Ensure the cable is
tightly seated and secure in the cable retainer.